Efficiency Mode in Windows 11 is an interesting new feature that allows users to improve their computer’s performance, including extending battery life. This guide covers everything related to Efficiency Mode, including how to activate and manage it.
Tip: using a gaming laptop? Learn how to make it last longer when using the battery.
Content
- What Is Efficiency Mode?
- How Windows 11 Efficiency Mode Works
- How to Enable Efficiency Mode
- What to Do If Efficiency Mode Is Greyed Out
- How to Enable Efficiency Mode in Microsoft Edge and Google Chrome
- When to Use Efficiency Mode
- How to Force a Windows App Not to Use Many Resources
- Frequently Asked Questions
What Is Efficiency Mode?
Efficiency mode is an option in Windows 11’s Task Manager that Microsoft released as part of the 22H2 Windows 11 update. Once enabled, this mode works to increase performance by limiting the stress placed on the CPU by an app (or more). Based on that, your system will be able to lower fan noise and improve its thermal performance. All that adds up to overall lower power consumption. Efficiency Mode is an update to the Eco Mode feature that was available in Windows 10.
According to Microsoft’s own tests, this mode can improve system responsiveness by up to 76%. This option is part of Microsoft’s Sustainable Software Initiative, which focuses on reducing carbon emissions and helping Microsoft achieve carbon negative status by 2023.
To summarize, if you notice one of your apps consuming too many resources, you can easily enable Windows 11’s Efficiency mode for it and fix the issue.
How Windows 11 Efficiency Mode Works
Efficiency mode works by restricting background processes from interfering with tasks that the user is actively using. When enabled, it does two things:
- Lowers Process Priority: Windows applies a priority criterion to its background tasks. By reducing priority, Efficiency Mode no longer allows the system to allocate resources to that particular app or service.
- Enables EcoQoS: EcoQoS is a “Quality of Service” package designed to reduce the CPU’s clock speed. It does so while ensuring that efficient tasks of the targeted applications continue to work. For instance, EcoQoS can allow an app to run background tasks for updates, indexing, etc., since these processes don’t need a high clock speed to operate. Having said that, app developers will need to adopt the APIs related to EcoQoS in their apps for the option to work seamlessly.
Good to know: if you’re experiencing rapid battery drain on your PC, make sure you try these fixes as well.
How to Enable Efficiency Mode
Enabling Efficiency Mode in Windows 11 is easy. Just keep in mind that you need to first update to the 22H2 version for the feature to be unlocked. If you have done so already, you’ll have to decide for which app you want to limit resources. You can examine the Task Manager to make the decision.
- Open Task Manager by hitting Ctrl + Shift + Esc or right-clicking the taskbar and selecting the option.
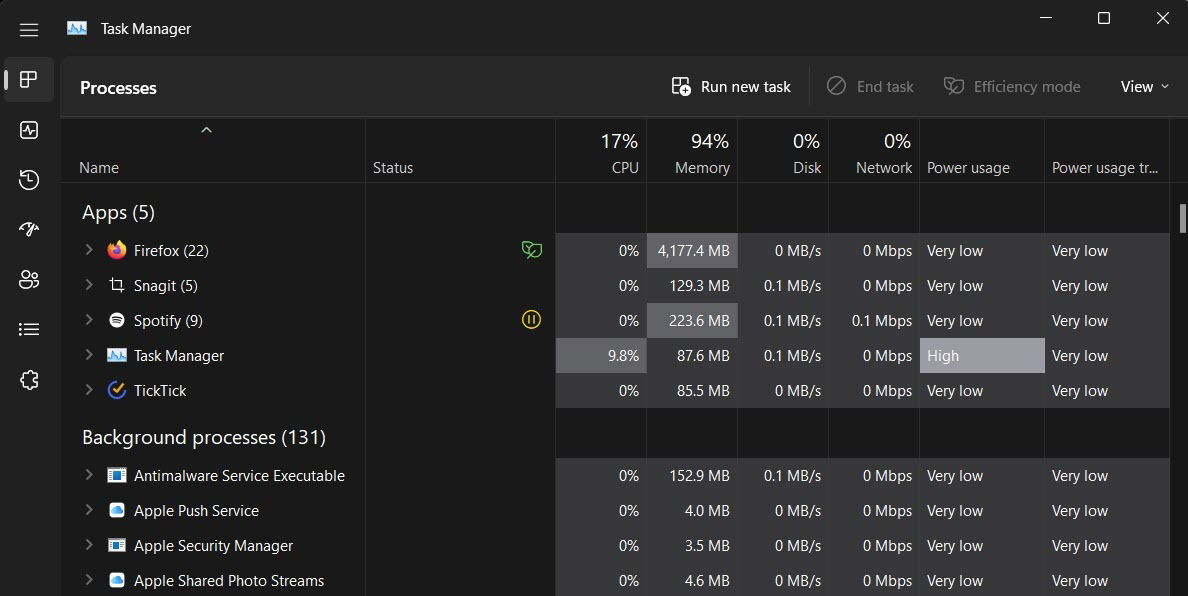
- In “Processes,” check which apps are consuming a lot of CPU resources. You can do this by clicking the “CPU” option so that Task Manager can arrange the processes based on this.
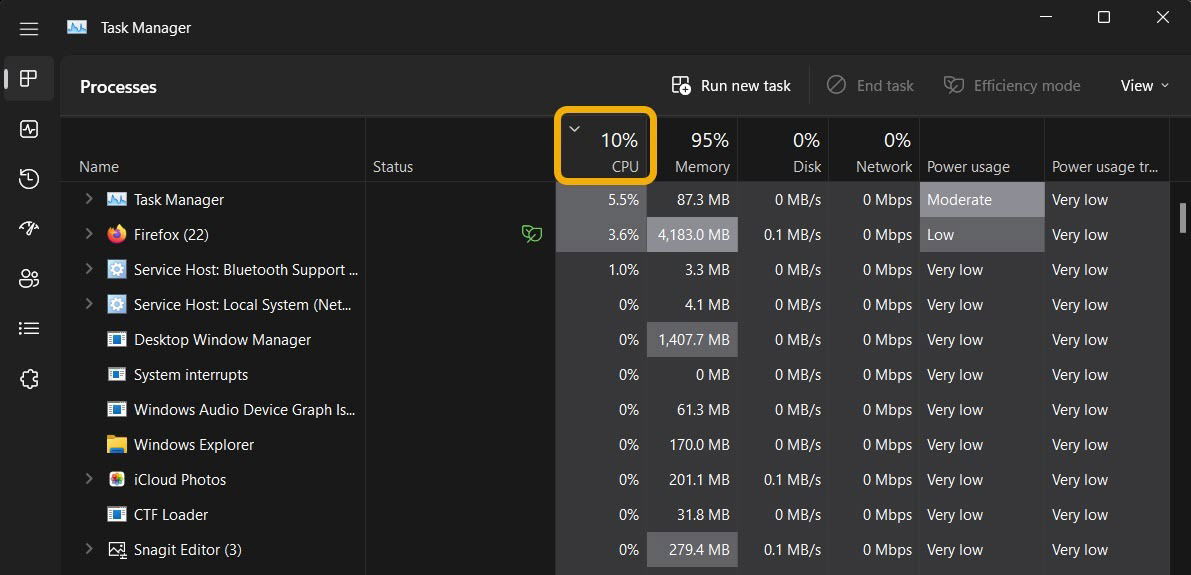
- After identifying an app, select it, then click the “Efficiency Mode” button at the top. Alternatively, find the same option when right-clicking the process in the Task Manager.
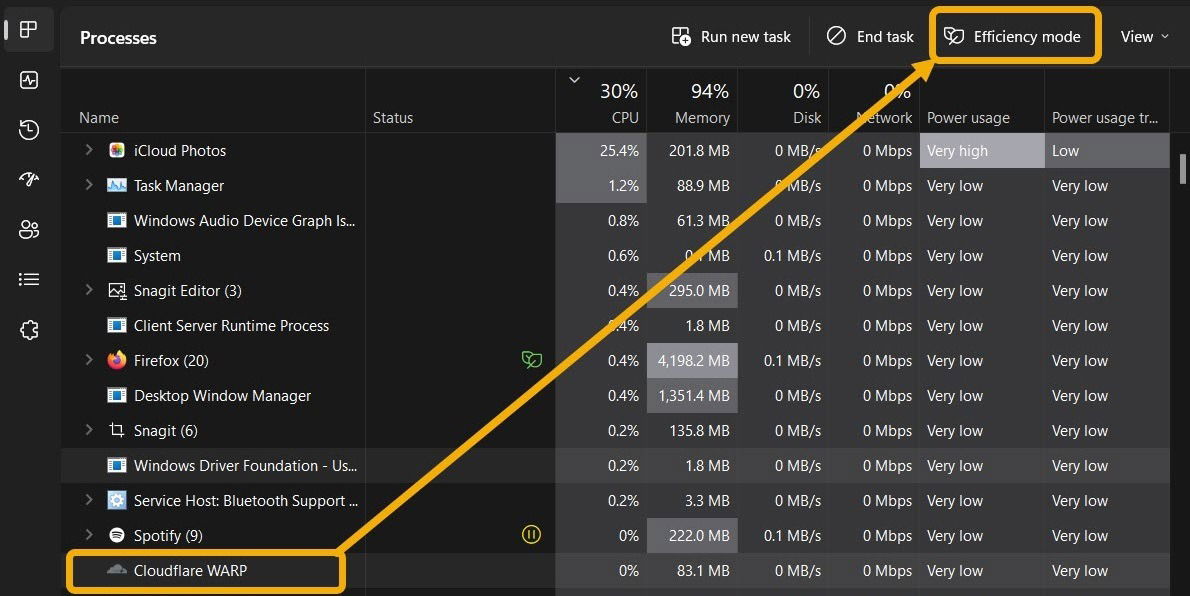
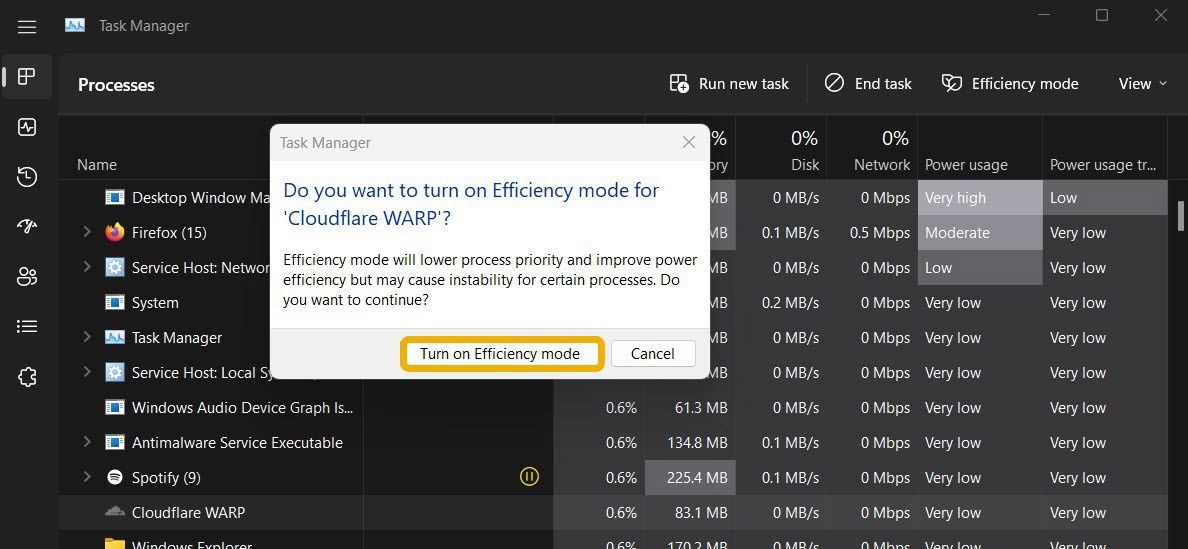
- A window will appear to inform you that this mode may cause instability for certain processes (more about that later). You can proceed by clicking the “Turn on Efficiency Mode” button.
- After enabling it, a green leaf icon will appear under your Task Manager’s “Status” column.
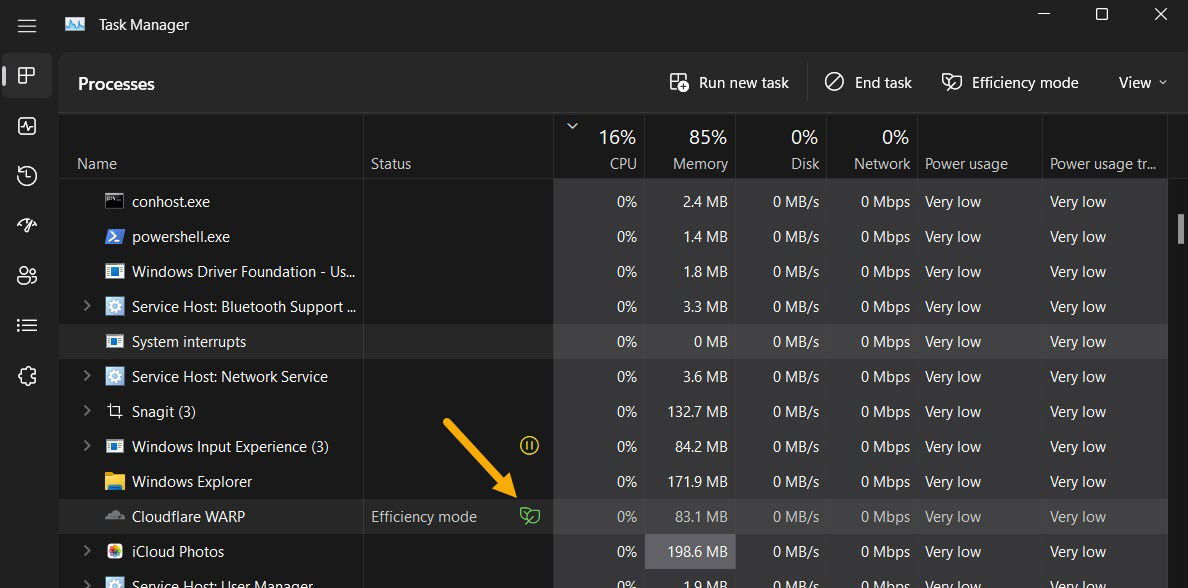
- If you notice any problems after enabling this mode, you can easily disable it by selecting the app once more and clicking the “Efficiency mode” button in the top bar.
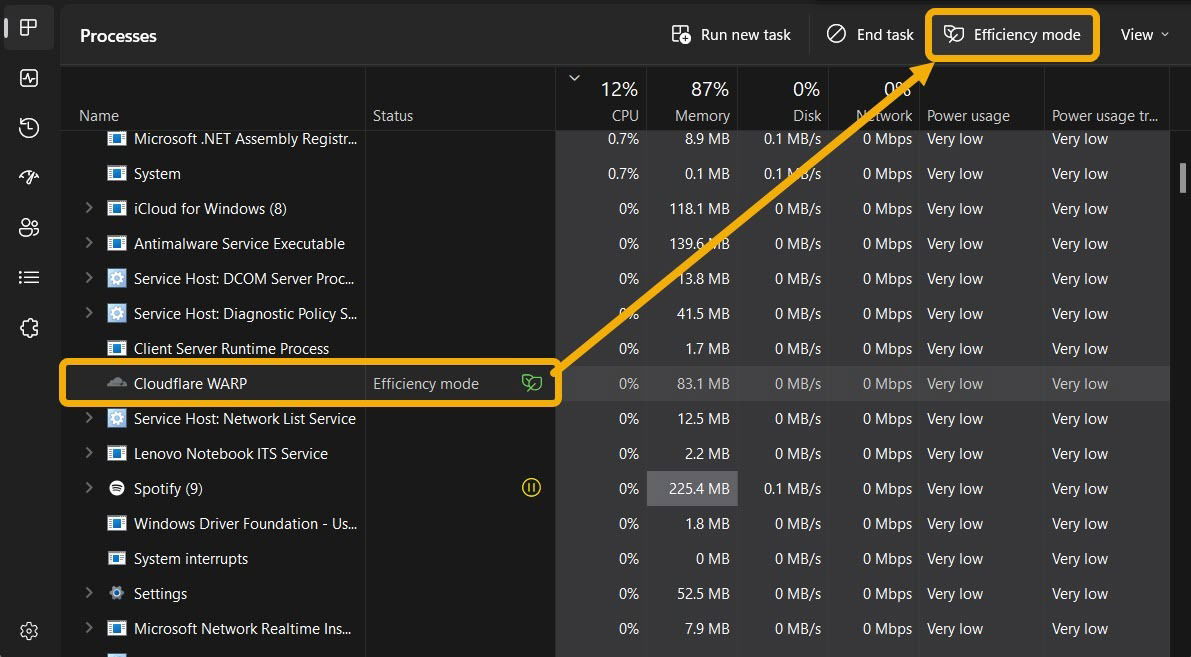
Note: you may find that Windows 11 has already enabled this mode for some of the apps automatically, which happens when the app is already in line with EcoQoS and the related APIs.
What to Do If Efficiency Mode Is Greyed Out
You can enable Windows 11’s Efficiency Mode for almost any app. However, sometimes you will find the button is greyed out after selecting an app in the Task Manager. There are two reasons for this. The first is that you’ve selected a core Windows app or service, and they don’t support this option.
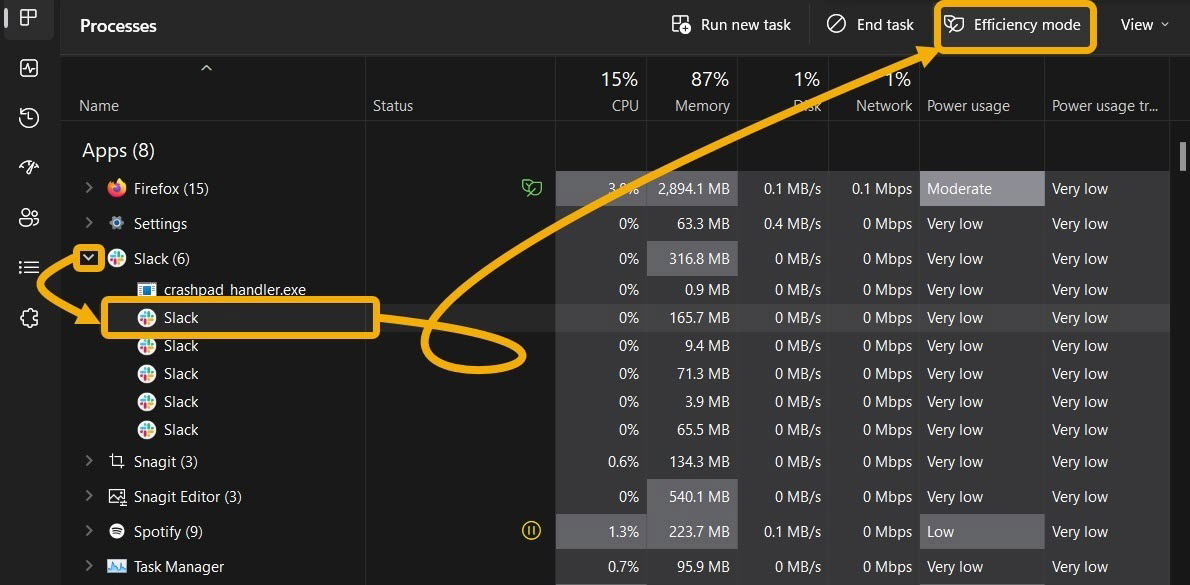
The second is that you’ve selected a process group. Process groups in Task Manager aren’t treated as one individual app, as they include several processes and instances of an app. For example, if you’ve selected “Slack” in Task Manager, you’ll find Efficiency Mode greyed out.
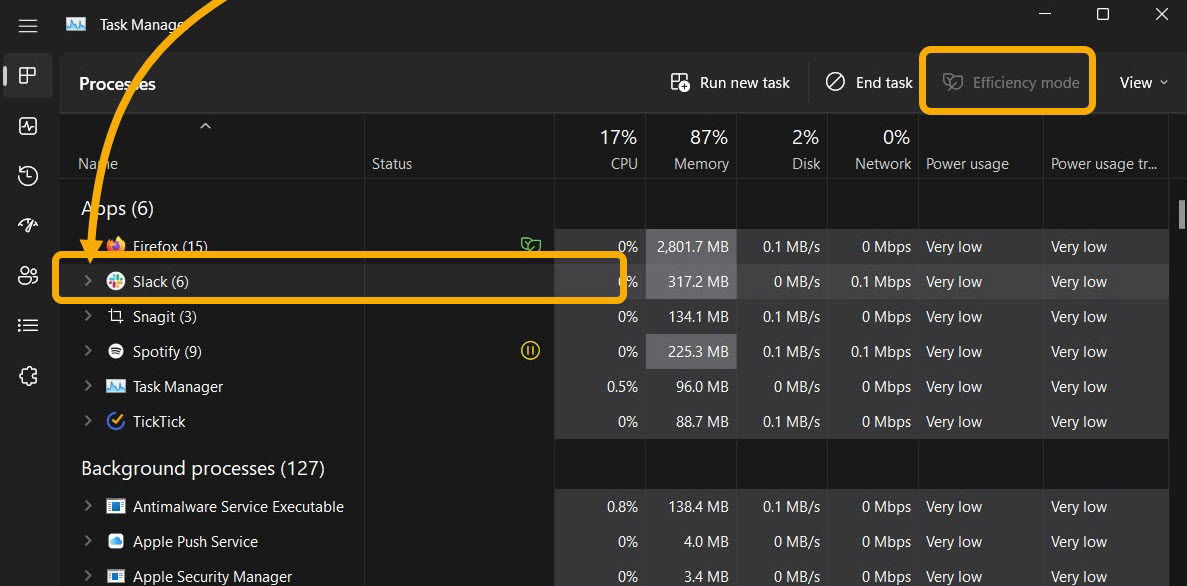
However, clicking on the arrow next to the process group will expand it. Then you can select each instance and enable Efficiency Mode for it.
Tip: make sure you enable these flags to boost your browsing in Chrome.
How to Enable Efficiency Mode in Microsoft Edge and Google Chrome
Most users rely on Microsoft Edge and Google Chrome to browse the Internet and getting work done and tend to use the apps for hours. Thus, enabling this power-saving mode directly from these apps can be helpful.
Microsoft Edge
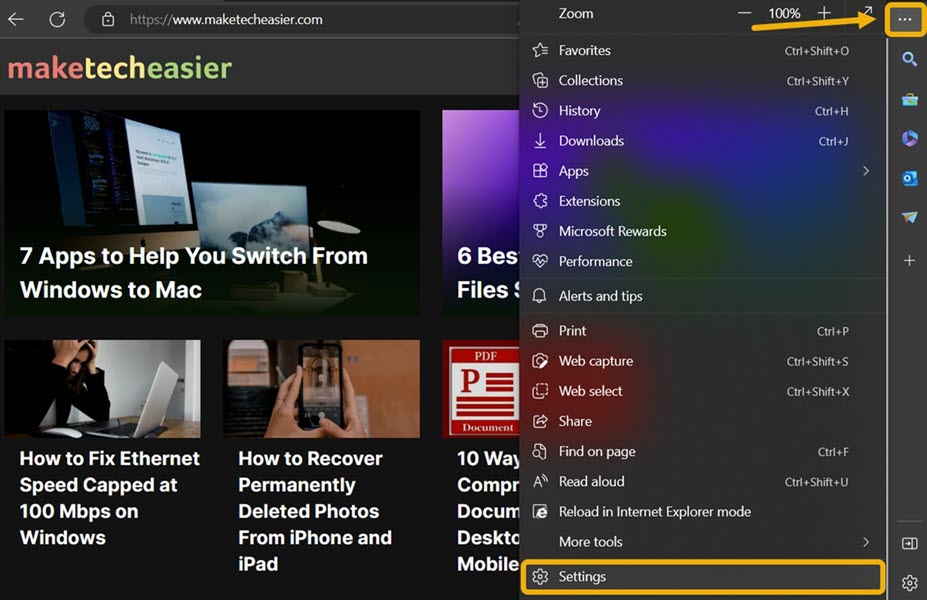
- Click the three-dot icon in the top-right corner, then choose “Settings.”
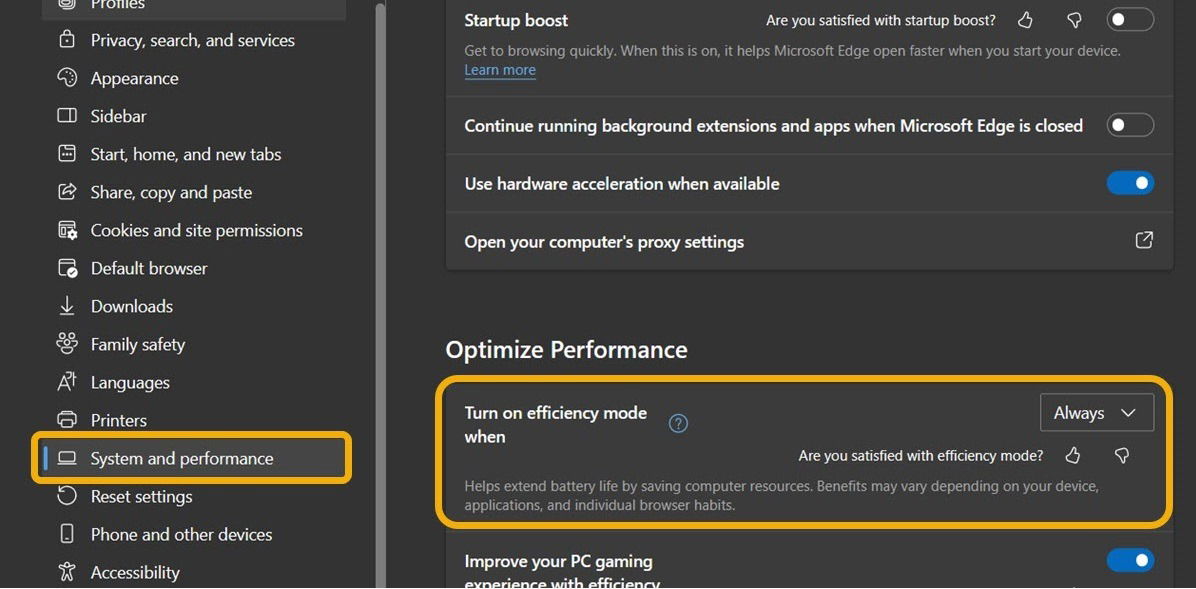
- Navigate to the “System and Performance” section, then enable “Turn on efficiency mode when”, alongside other options that aim to decrease battery usage, such as “Improve your PC gaming experience with efficiency mode.”
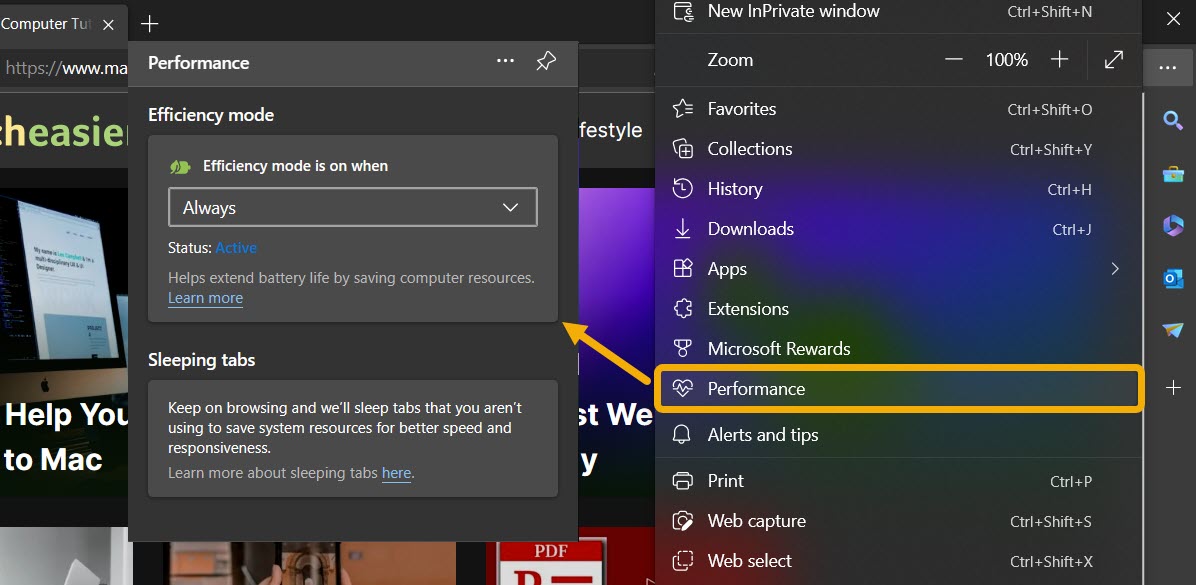
- Alternatively, tweak Efficiency Mode’s settings by clicking the menu icon again and choosing “Performance.” You can set your “Efficiency Mode” preferences from there.
Google Chrome
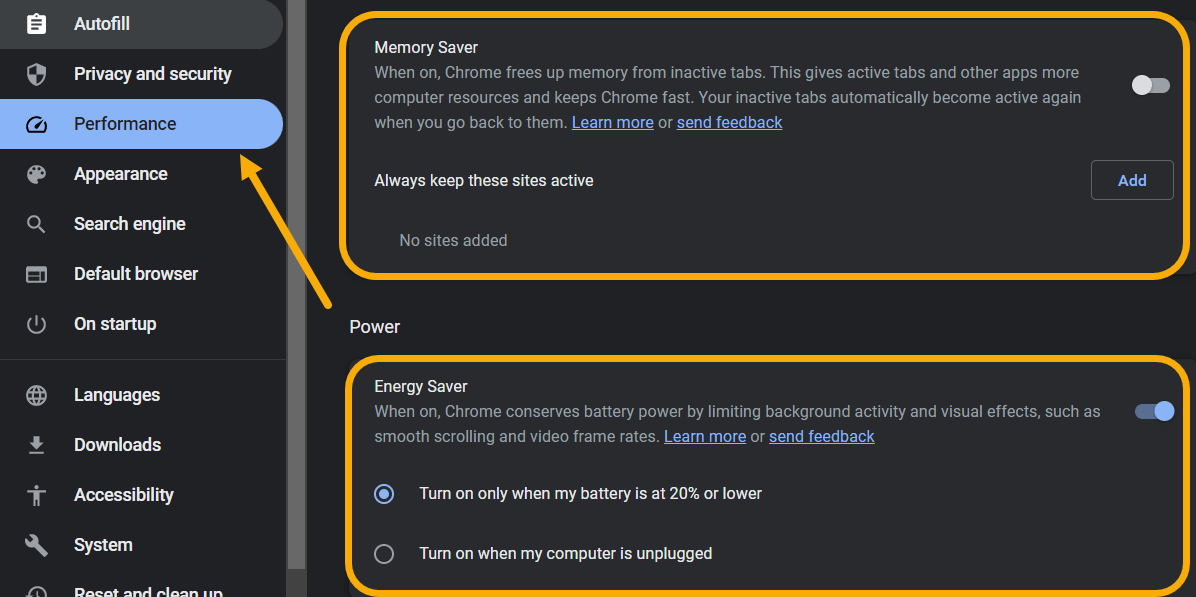
While you can’t enable Efficiency Mode directly from Chrome, you can activate two more features that will help you further conserve system resources: Memory Saver unloads inactive tabs, while Energy Saver is designed to prolong battery life.
Although Energy Saver aims to reduce battery usage just like Efficiency Mode, users can enable both of them since the Energy Saver feature optimizes background activity and visual effects with no contradictions with Efficiency mode. “Memory Saver,” on the other hand, is all about reducing RAM usage.
- To access those two features, navigate to “Settings -> Performance.”
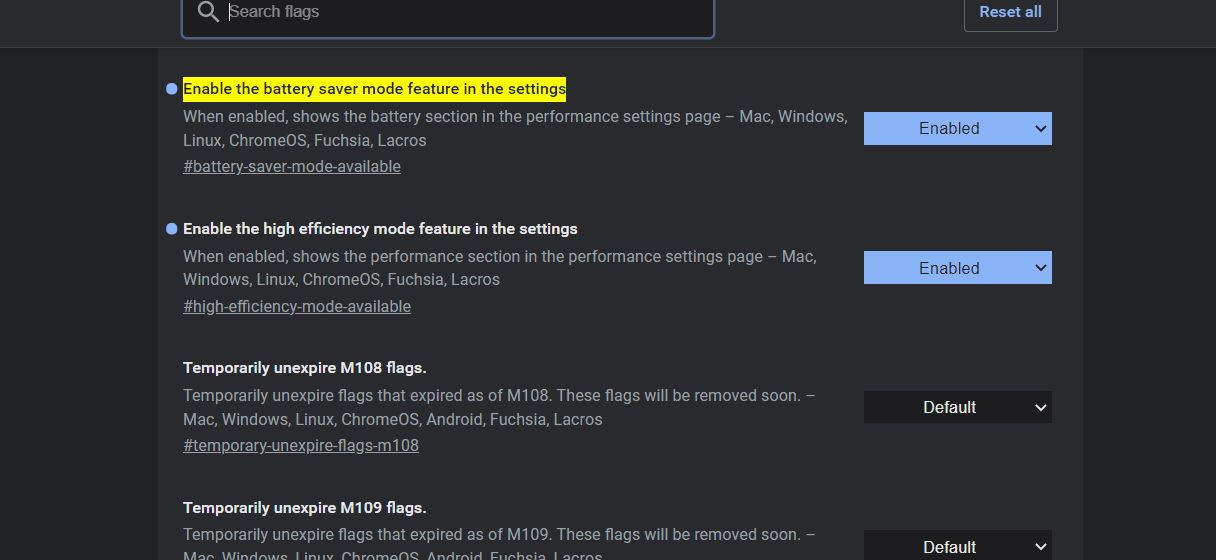
- If those options aren’t enabled by default, you must follow the subsequent paths and enable them manually. You should copy every path to the address bar and navigate to it.
chrome://flags/#high-efficiency-mode-available
chrome://flags/#battery-saver-mode-available
Good to know: perform regular maintenance on your PC to maintain it in good condition. Learn how to easily check your PC health.
When to Use Efficiency Mode
In most scenarios, you should enable Windows 11 Efficiency Mode for apps that tend to eat a lot of CPU power. However, if you’re proactively trying to save some power on your laptop, you probably should enable it for most running processes.
On the other hand, you may want to abstain from using this mode on apps you frequently use that actively send notifications, as Windows 11 may block them. Additionally, refrain from using it on apps that sync your work in the background.
How to Force a Windows App Not to Use Many Resources
Some apps can be quite stubborn, making it harder for the user to limit their resources using Efficiency Mode, as it works dynamically and lets Windows decide how it limits CPU usage.
However, you can still manually limit CPU usage for any app, which is an excellent option for apps that are very aggressive against the CPU, such as video-conversion apps.
- Launch the Task Manager
- From the left menu, choose “Details.”
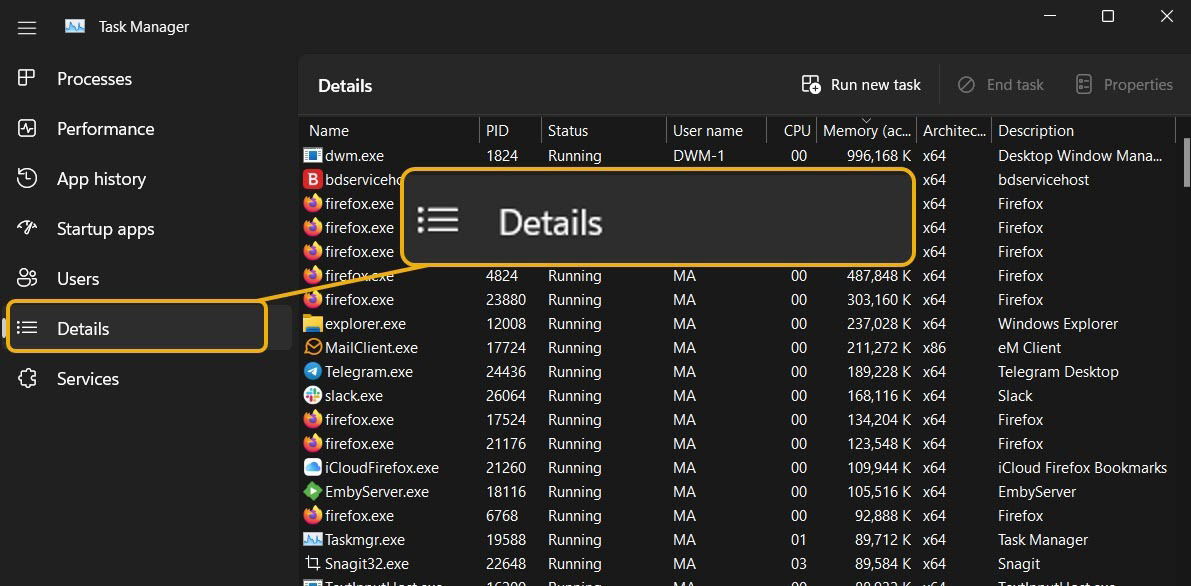
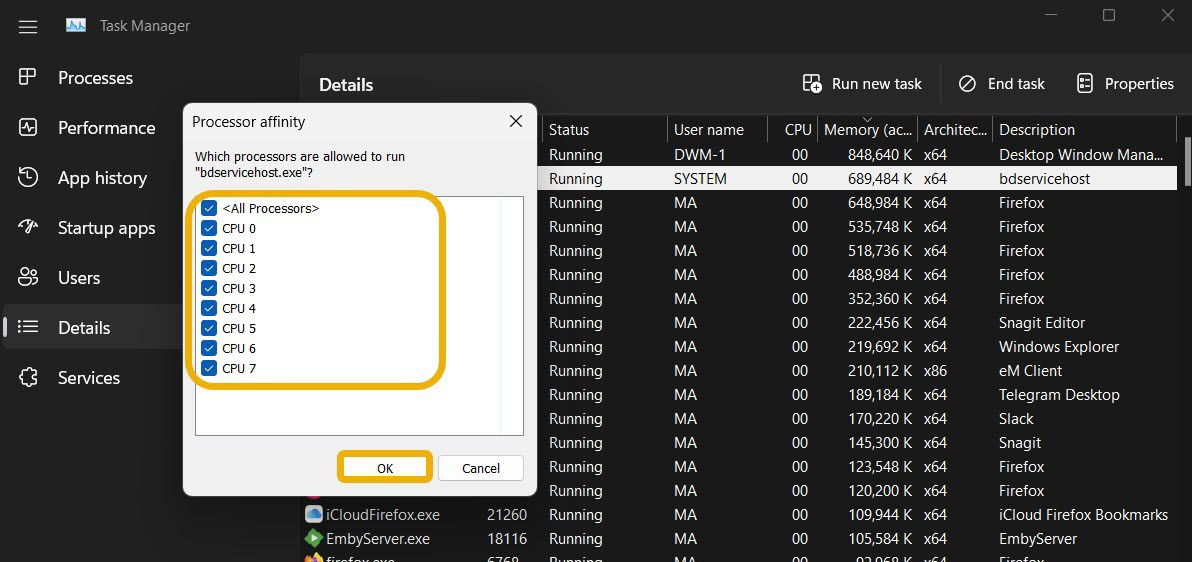
- Right-click the process you want to limit, then choose “Set Affinity.”
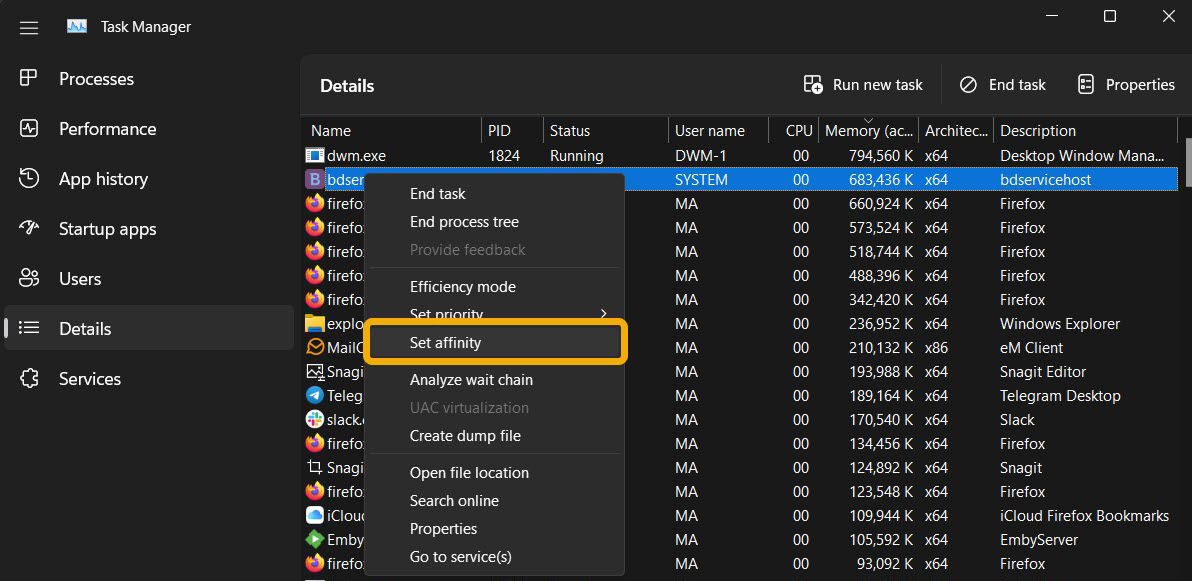
- A new window will open where you can assign fewer CPU cores to this process, which will result in CPU consumption being drastically limited. For instance, you could assign only “CPU 0” and “CPU 1” cores, then click “OK.”
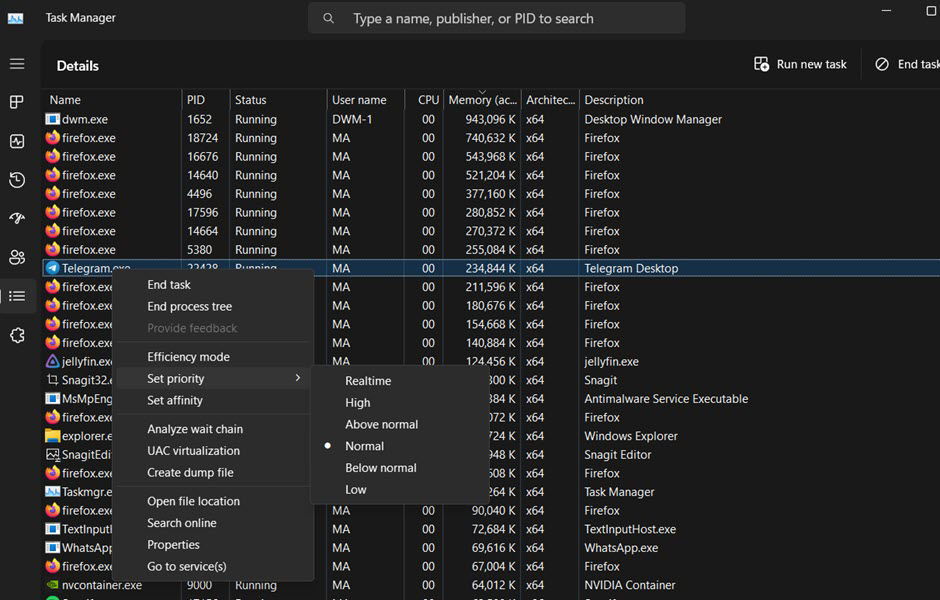
- Moreover, you can manually set the priority for the process. Assigning it “Low” priority helps reduce resource consumption. Do this by right-clicking the process and choosing “Set Priority.”
Follow this method to manually manage priority and CPU usage instead of activating Efficiency Mode. However, only do this if you notice that Efficiency Mode doesn’t work as expected. Additionally, there’s no use for activating Efficiency Mode and manually limiting resources at the same time!
Tip: ensure your system never overheats by installing one of these effective fan control software options.
Frequently Asked Questions
What’s the difference between Efficiency Mode and Power optimized settings?
Power optimized in Windows 11 helps reduce the background activity of an app, which, in turn, lowers battery consumption. However, the difference between the Power Optimized settings and Efficiency Mode is that the latter also optimizes background activity. However, you may not need to enable the Power Optimization settings for background activity if you already have Efficiency Mode turned on for to the same app, unless the app is working improperly or consuming a disproportionate amount of resources.
To Power optimize background apps, navigate to “Settings -> Apps -> Installed Apps,” then click the three-dot menu and select “Advanced Options.” Finally, choose “Power Optimized” under the background app permissions.
Why does Efficiency Mode automatically get disabled?
Windows 11 might disable Efficiency mode upon restarting the device. You can always re-enable it through Task Manager. If you found that your system has disabled it after restarting, re-enable it.
Can you put multiple apps in Efficiency Mode at the same time?
Unfortunately, no. You’ll need to enable the mode for each app individually, as it’s not possible to select multiple apps and activate the feature for them collectively.
What does the UWP Process Group suspending process mean?
If you opened Task Manager and noticed a yellow pause symbol next to a process, you may have wondered what it means. Hovering your mouse over it will reveal a message that says: “The UWP process group is suspending processes to improve system performance.” UWP is an abbreviation for Universal Windows Platform, which is a platform that started with Windows 10. Many apps are based on UWP, especially Microsoft Store’s apps, Photos, Skype, Snipping Tool, Xbox, and Clipchamp. Windows 11 might suspend these apps to improve battery consumption and CPU usage when it reduces background activity. This is an automated process.
Image credit: Flaticon. All screenshots by Mustafa Ashour.
Mustafa is a tech content writer who’s a geek at heart. His passion lies in writing about technology, especially software-related topics. He’s also interested in digital marketing, business development, and entrepreneurship. He holds a Bachelor’s degree in Accounting and Finance.
Subscribe to our newsletter!
Our latest tutorials delivered straight to your inbox
Sign up for all newsletters.
By signing up, you agree to our Privacy Policy and European users agree to the data transfer policy. We will not share your data and you can unsubscribe at any time. Subscribe
