The new Windows Photos app isn’t bad. It’s actually been around since Windows 8 but is still the most recent built-in option for viewing photos. It has a nice interface and decent image-filtering options off the bat. However, it’s also prone to not working as it should.
If you have an issue with the Photos app not working, these fixes can be implemented, as can this alternative that’s built right in to Windows.
Note: before going through the below tips, the first thing you should try, as with many Windows issues, is to run a basic check for corrupt system files on Windows. To do this, just open the command prompt, enter the command sfc /scannow and restart Windows.
Content
- 1. Use Windows Store Apps Troubleshooter
- 2. Optimize Photos App’s Internal Settings
- 3. Install Windows Media Pack (Windows N and KN)
- 4. Update the Photos App
- 5. Reset the App
- 6. Terminate the App
- 7. Repair the Photos App
- 8. Remove and Reinstall the App
- 9. Perform a System Restore
- 10. Install New Windows Updates
1. Use Windows Store Apps Troubleshooter
Photos is a Windows Store app using Microsoft’s proprietary UWP format that causes all kinds of problems. (Check out the litany of problems with Xbox Game Pass for PC, as an example.) The first port of call to fix this is the built-in Windows troubleshooter for Photos and other Windows apps.
- Right-click on the Start menu and select “Settings.”

- Go to the “System” tab and select the “Troubleshoot” option.

- Look for the “Other Troubleshooters” option and click on it.

- Find the “Windows Store Apps” troubleshooter and click the “Run” button next to it.

- Follow the instructions provided by the troubleshooter on your screen. These steps may help fix any issues you’re experiencing with Windows Store apps.

2. Optimize Photos App’s Internal Settings
If your Photos app is running slowly, one solution could be to tweak its internal settings to make it work more smoothly.
- Open the Photos app from the Start menu.

- Go to the three-dot icon at the top right and select “Settings.”

Many configuration settings with the Photos app may have been enabled by default. To ensure a fast response time, you need to optimize these settings.
- The most important one is the Photos app’s sync with OneDrive, which is something you may not need frequently. Every time you’re online, it can affect the speed of the Photos app. Thus, you need to turn off the option “Show my cloud-only content from OneDrive.”
- You can also turn off “Display delete confirmation dialog,” which consumes extra memory. Hardware-accelerated video encoding is also something you don’t need unless you are planning to use the Photos app as a video editor.

- The Photos app can be truly busy using up lots of memory to load a pictures folder. Therefore, you should also “Disable indexing parts of your photo library stored on Network locations.”

3. Install Windows Media Pack (Windows N and KN)
As with every Windows release, there are several different versions of Windows available for purchase. We’re not just talking about the usual Home and Professional versions either. For example, the “N” and “KN” versions of Windows 10, which are special versions of Windows made for Europe and Korea.
The N editions of Windows have the same features and capabilities as other editions, except for media-related technologies and certain preinstalled media applications, such as Groove, Movies & TV, Voice Recorder, and Skype. Unlike other versions of Windows, the N editions lack Windows Media Player, other multimedia apps, and the necessary libraries for multimedia playback. As a result, this can surprisingly affect the functionality of the Photos app, as it also relies on multimedia libraries.
If you want to check your Windows version:
- Right-click on the Start menu and choose “Settings.”

- In the “System” menu, scroll down and select “About.”

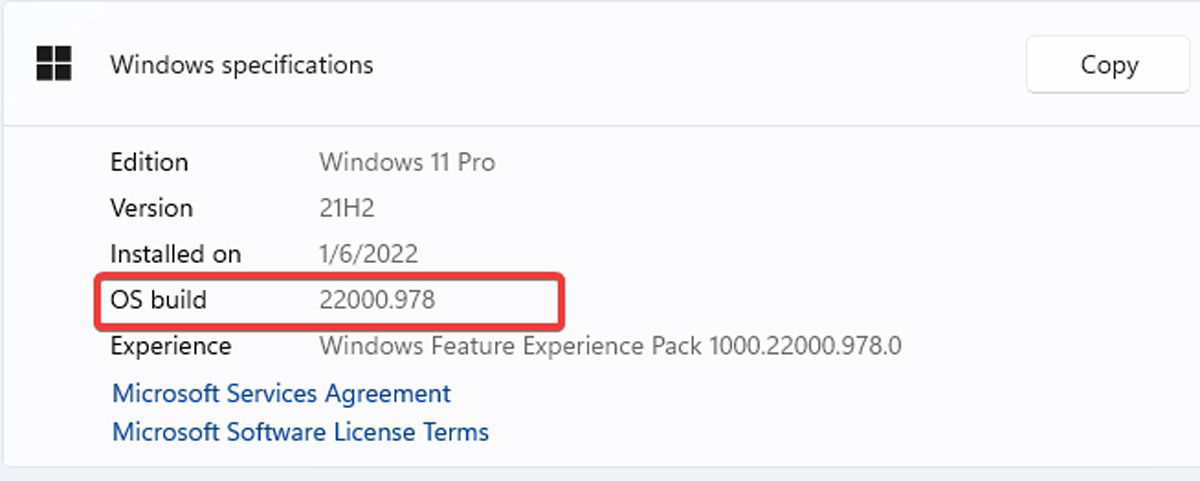
- Scroll down in the new window and see what’s next to “OS build.”

If you see an “N” or “KN” next to your OS build, you need to download the Windows Media Feature Pack.
For Windows 10 N, follow the steps below:
- Click on the Start button in Windows, then open “Settings.”
- Select the “Apps” option.
- Click on the “Apps and Features” option.
- Select “Optional features.”
- Look for “Add a feature” and click on it.
- Find and install the “Media Feature Pack” in the list of available optional features.
- You can also download it from the Microsoft website.
If you’re running Windows 11 N, follow these steps:
- Right-click on the Start menu, then go to “Settings.”

- Select “Apps” from the left menu, then on the right side, click on “Optional features.”

- Select “View features” next to “Add an optional feature.”

- Look for the “Media Feature Pack” in the list of optional features and install it.

4. Update the Photos App
If an app hasn’t been updated in a while, it may encounter issues and stop functioning correctly, possibly due to a bug. To resolve this, it’s recommended to check the Microsoft Store for available updates for the Photos app. Updating the app can fix bugs and improve its performance.
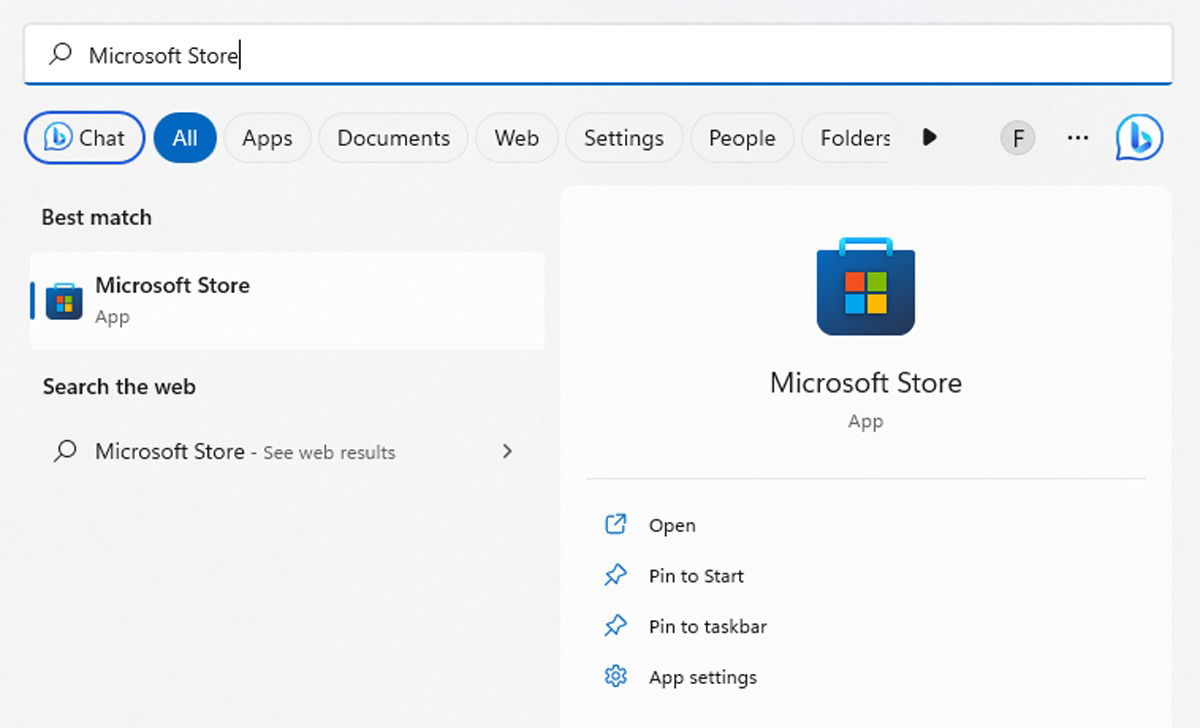
- Click on the Start menu, type “Microsoft Store” and click on it.

- Click on the “Library” button located on the left side of the screen.

- Find the “Update” button next to “Microsoft Photos” and click on it.

Open the Photos app and check to see whether it is fixed. If not, proceed to the next method.
5. Reset the App
Resetting the Photos app will wipe the app’s cache and reset all its data to default settings. Do so by following the steps below:
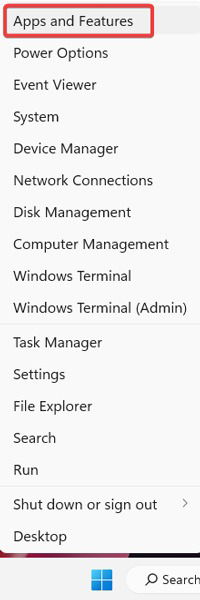
- Right-click on the Start menu and go to “Apps and Features.”

- Scroll down to “Photos” in the list and tap “Advanced options.”

- Click “Reset.” This will wipe all data from the Photos app, including any saved image presets or settings you may have had, and get it back to its original state.

6. Terminate the App
If resetting the app doesn’t solve the problem, try manually closing it and reopening it. These steps should help fix the issue in most cases:
- Right-click on the Start menu, then select the “Apps and Features” option.

- Search for the “Photos” app by scrolling through the list of apps. Once you find the app, click on the three-dot menu located on the right side of the app listing and choose “Advanced options.”

- On the Advanced options page, click the “Terminate” button.

7. Repair the Photos App
If terminating the Photos app does not resolve the issue, it is possible that the app is corrupt or damaged. Fortunately, Windows provides a solution for this. You can easily repair the Photos app by following the instructions below:
- Right-click on the Start menu and select “Apps and Features.”

- Scroll through the list of apps to find the “Photos” app. Click on the three-dot menu located on the right side of the app listing, then choose “Advanced options” from the menu.

- On the “Advanced options” page, click on the “Repair” button under “Reset.”

8. Remove and Reinstall the App
The more drastic option is to remove the Photos app manually, then reinstall it. Unfortunately, you can’t do this through the “Apps and Features” list as you could a normal app. Instead, you need to use an elevated PowerShell command.
- Right-click on the Start menu and select “Windows Terminal (Admin).”

- In the Windows Terminal window, type the following and press Enter to uninstall it:
get-appxpackage *Microsoft.Windows.Photos* | remove-appxpackage

- To reinstall the Photos app, go to the “Microsoft Store” app and search for “Microsoft Photos” and select it.

- Click on “Get” to install the app.

9. Perform a System Restore
If you more or less know when the problems started with your Photos app, you can perform a System Restore to an earlier time before the issues began.
- Open the Start menu, type “restore,” then tap “Create a restore point.”

- In the new window, click on “System Restore” and follow the prompts until you can select a restore point. Select the one you want (ideally before your Photos app problems started) and go ahead with the process.

10. Install New Windows Updates
Updates always bring performance and security features and sometimes contain bug fixes. Installing new Windows updates can also fix the Photos App not working on Windows.
- Right-click on the Start menu and choose “Settings.”

- In the left pane, click on the “Windows Update” menu. Select “Check for updates” or “Download now,” and let Windows scan for and install all the new updates.

For many people, the old Windows Photo Viewer worked just fine. While it wasn’t as flashy as “Photos,” it did the job and was a functional and convenient way of browsing your photos in a given folder.
Microsoft has steadily phased Photo Viewer out, however, and if you have a PC with Windows 10 or 11 preinstalled, you’ll need to get a bit technical to set Photo Viewer as the default.
Windows isn’t all bad, though, and you can make it more fun by checking out our list of 10 awesome screensavers you can get for it. Also see our guide on setting allocation unit size with your new hard drive.
As a technophile, Farhad has spent the last decade getting hands-on experience with a variety of electronic devices, including smartphones, laptops, accessories, wearables, printers, and so on. When he isn’t writing, you can bet he’s devouring information on products making their market foray, demonstrating his unquenchable thirst for technology.
Subscribe to our newsletter!
Our latest tutorials delivered straight to your inbox
Sign up for all newsletters.
By signing up, you agree to our Privacy Policy and European users agree to the data transfer policy. We will not share your data and you can unsubscribe at any time. Subscribe
