Windows 8 has lots of interesting features, and these features are also working more efficiently when compared to the older versions like Vista and 7. Automatic maintenance is one such feature which runs in the background and ensures that your Windows 8 PC is running in top shape. As the name implies, automatic maintenance runs automatically, and unfortunately Microsoft hasn’t provided any way to disable this feature.
What automatic maintenance does is to update your PC, scan for viruses and potentially harmful files, disk defragmentation, system diagnostics, etc. It will usually run when your PC is idle, so it won’t get into your way when you are working. However, there will be times when we need to manually start or stop the automatic maintenance feature. Here is how you can do so.
Manually Start Automatic Maintenance
As mentioned above, there is no way to disable the automatic maintenance feature completely, but you can change the maintenance schedule to meet your needs. To manually start the automatic maintenance:
1. Press “Win + X” and select “control panel” from the list of options. Once you are in the control panel, select “action center” from the displayed options. That said, make sure that you have selected the “view by” as Small Icons or Large Icons.

2. Here in the action center, click on the dropdown button next to “Maintenance” and select the option “start maintenance” to manually start automatic maintenance.

Manually Stop Automatic Maintenance
You can only stop automatic maintenance while it is running. Whenever the automatic maintenance is running in the background, you will see a small icon in the notification area.

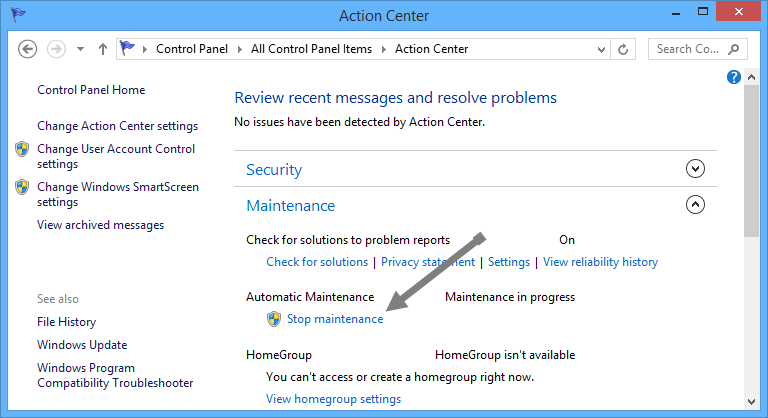
Now, if you want to stop the automatic maintenance, open control panel, click on “action center” and then click on the dropdown button next to “maintenance.”
Once you are there, you can see the “stop maintenance” link. Just click on that link to stop running automatic maintenance on your Windows 8 PC.

That’s it. It is that easy to start and stop automatic maintenance feature in Windows 8, though it is not that obvious how you can do so. It is recommended that you let Windows run the job by itself, as it will take care of many small but subtle issues like updates and security scans.
On a side note, if you don’t want that little icon to appear in the notification area whenever the automatic maintenance is running, just navigate to “Control panel -> action center -> change action center settings” and uncheck the checkbox “automatic maintenance” and click on the OK button to save changes.

Do share your thoughts on the automatic maintenance feature in Windows 8 via the comments form below.
Vamsi is a tech and WordPress geek who enjoys writing how-to guides and messing with his computer and software in general. When not writing for MTE, he writes for he shares tips, tricks, and lifehacks on his own blog Stugon.
Subscribe to our newsletter!
Our latest tutorials delivered straight to your inbox
Sign up for all newsletters.
By signing up, you agree to our Privacy Policy and European users agree to the data transfer policy. We will not share your data and you can unsubscribe at any time. Subscribe
