Microsoft likes to keep you in their walled garden. If you’ve ever used Cortana or tried to search for something from the Start menu, it uses Bing to do the search. When you click on the search result, it opens in the Edge browser, even though it is not the default browser. And obviously, Windows 10 doesn’t come with an easy way to change this behavior. Though you cannot directly change the default search engine, you can force Windows 10 to use Google and open results in your favorite browser. This article will show you how to do that.
Set Google as Default Search Engine for Start Menu
Since Windows 10 has no options to change the default search engine or the browser when searching from the Start menu, we need to force it. To do that we are going to use a free and open-source software called Search Deflector. Using it, you can redirect all the searches to your favorite search engine in your favorite browser. You are no longer tied to using Bing and Edge. All you have to do is install Search Deflector and tell it what search engine and browser to use.
1. First, go to the software’s official GitHub page and download the latest version of Search Deflector. After downloading, double-click on the .exe file and proceed to install it.

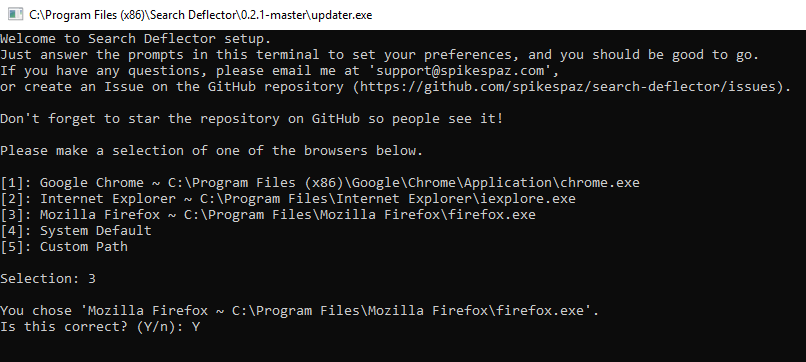
2. While installing, Search Deflector asks you to set up the configuration by selecting the browser of your choice. Search Deflector automatically finds all the installed browsers on your system and lists them. To select the browser, type the number associated with it and press Enter. In my case, since I use Firefox, I typed in 3.
You can also choose the option “System Default.” This option makes sure that the search results will always open in your current default browser. The benefit of this approach is that if you ever change your default browser, you don’t have to reconfigure Search Deflector again.
3. Confirm your choice by entering “Y.”

4. Choose your favorite search engine by entering the associated number. Since we want Google as the default search engine, type “7” and press Enter.

5. Again, confirm your choice by entering “Y.”
6. You are done configuring Search Deflector. Press Enter to close the configuration window.

7. On the main installation window, click on the Finish button to complete the installation procedure.

To test it, search for something web-related and press Enter. For the first time you will be asked to choose a default program. Select “launcher.exe,” select the checkbox “Always use this app” and click on the “OK” button.

Search Deflector will redirect the search to the search engine of your choice and open it in your favorite browser.

Do keep in mind that the quick results you see in the right panel when searching via the Start menu or Cortana are still served by Bing. When you click on the results, Search Deflector will redirect them according to your configuration.
In the future, if you want to change the configuration of Search Deflector, open File Explorer, go to the Search Deflector installation folder and double-click on the “Setup.exe” file.
Comment below sharing your thoughts and experiences regarding using the above methods to change the default search engine of the Start menu in Windows 10.
Image credit: Flickr
Vamsi is a tech and WordPress geek who enjoys writing how-to guides and messing with his computer and software in general. When not writing for MTE, he writes for he shares tips, tricks, and lifehacks on his own blog Stugon.
Subscribe to our newsletter!
Our latest tutorials delivered straight to your inbox
Sign up for all newsletters.
By signing up, you agree to our Privacy Policy and European users agree to the data transfer policy. We will not share your data and you can unsubscribe at any time. Subscribe
