For any Windows user, “Win + L” is a handy shortcut to lock your system to protect it from unauthorized activity. As useful as it is, this action will lock up the entire system including the screen. But there will be times when you just want to lock the keyboard and mouse but not the screen. This may include, but not be limited to, blocking your kids from messing with your system while watching a movie, to keep track of the progress of an activity on your computer, etc.
No matter what the reason is, there is always an app for Windows and BlueLife KeyFreeze is one such app that makes the task simple and easy.
Also read: 20 Things to Try When Your Mouse Keeps Freezing in Windows
Lock Keyboard and Mouse, Not the Screen
Using KeyFreeze to lock your keyboard and mouse is easy. First, download the application, extract it to your desktop and execute it. As soon as you execute the application, KeyFreeze will give you five seconds while displaying the unlock keys before locking your keyboard and mouse.

As soon as the lock has been activated, you can no longer use your keyboard or mouse to interact with your system. If you want to unlock the system, simply press the displayed keyboard shortcut “CTRL + ALT + F.” If you want to lock the system again, simply reuse the keyboard shortcut.

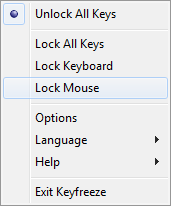
If you just want to lock either the keyboard or the mouse, then right click on the KeyFreeze icon in the taskbar and select the relevant option, e.g. “Lock Keyboard” to lock just the keyboard and “Lock Mouse” to only lock the mouse.

Even though the application is straightforward, it does have some basic settings like playing sound while locking or unlocking, showing pop-up windows, locking on startup, etc. To access the settings panel, right click on the KeyFreeze icon in the taskbar and select the “Options.”

That being said, if you want to quickly launch the KeyFreeze program whenever you want to lock your system, then you can create a simple AutoHotKey script and schedule it to launch it on system startup. To do that, you first need to download and install the AutoHotKey application.
Also read: How to Use a Game Controller as a Mouse in Windows
Once installed, create a new text document and add the following script to the file and save it. Once you’ve saved the file, rename it to “lock.ahk” (or whatever you want). Just make sure that you are using “.ahk” extension instead of “.txt.” Also, don’t forget to change the application location according to where you’ve placed the KeyFreeze application.
;;; Launch KeyFreeze Application
^!K::Run "C:Program FilesKeyFreezeKeyFreeze.exe"
return

What the above script does is launch the KeyFreeze application whenever you press the keyboard shortcut “CTRL + ALT + K.” Of course, you can always customize the keyboard shortcut to suit your needs. Now, double click on the file and test the keyboard shortcut.
Once you are done with the configuration, create a basic scheduled task using the task scheduler to launch it at system startup, and you are good to go.
That’s all there is to do, and it is that simple to use KeyFreeze to lock your keyboard and mouse. Hopefully that helps, and do comment below sharing your thoughts and experiences about using this free app to lock your system.
Vamsi is a tech and WordPress geek who enjoys writing how-to guides and messing with his computer and software in general. When not writing for MTE, he writes for he shares tips, tricks, and lifehacks on his own blog Stugon.
Subscribe to our newsletter!
Our latest tutorials delivered straight to your inbox
Sign up for all newsletters.
By signing up, you agree to our Privacy Policy and European users agree to the data transfer policy. We will not share your data and you can unsubscribe at any time. Subscribe
