Microsoft forces you to restart your Windows computer every time it performs an update. At first glance, it would seem unusual, as Linux systems don’t have any such requirements. Updates are supposed to happen in the background and not disturb your current workflow. But that’s not the case with Windows, which doesn’t have any built-in feature to prevent a reboot after an update. This tutorial shows a few workarounds to disable automatic restart after an update in Windows.
Good to know: need to check the specs of your PC? Learn how to do that.
Content
- 1. Using Local Group Policy Editor
- 2. Using Registry Editor
- 3. Using Task Scheduler
- 4. Changing Active Hours
1. Using Local Group Policy Editor
If you have a Windows Pro or Enterprise version, it’s easy and convenient to stop automatic restarts for Windows updates from the Local Group Policy Editor.
Tip: learn how to enable the Group Policy Editor if you’re running a Windows Home edition.
On your Windows device, open the Run command, Win + R, and type gpedit.msc then hit Enter.
Once the Local Group Policy Editor window opens, navigate to the following path on the left pane: Local Computer Policy -> Computer Configuration -> Administrative Templates -> Windows Components -> Windows Update.
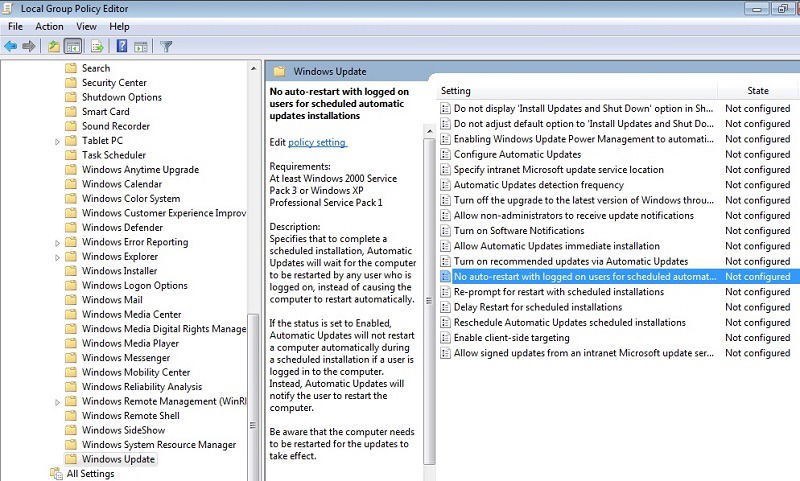
On the right pane, double-click on the entry: No auto-restart with logged on users for scheduled automated updates installation.
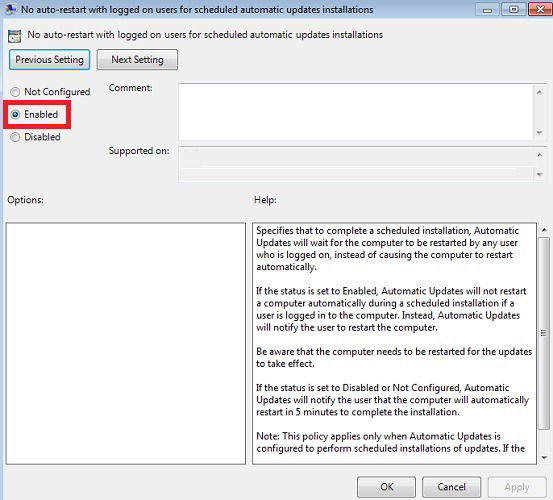
Select the Enabled box, and click Apply -> OK to disable the auto-restart function completely for any future updates.
In the No auto-restart window, you can play with a few other options by clicking the Next Setting button. While they may not entirely prevent a restart after an update, they will give you a breather so that you can restart later at your convenience.
FYI: if you’re experiencing problems after a recent Windows update, learn how to move forward.
Delay Restart
Using a setting called Delay Restart, you can postpone automatic restart to a future time duration, which can be several hours after an update.
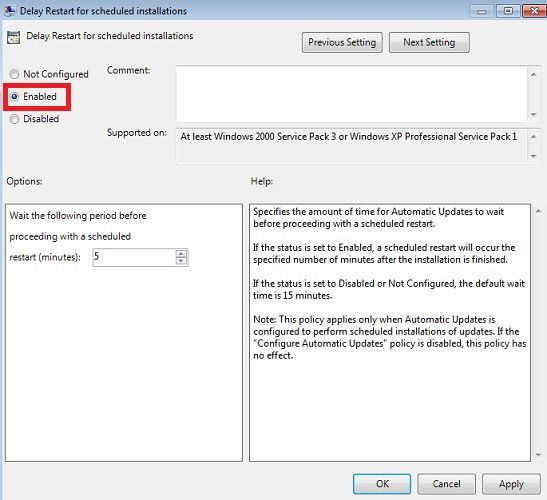
When you see the Delay Restart for scheduled installations option, check the Enabled box. The default duration for the system to restart after an update is 5 minutes. Change the timing to your own preferences.
Change the Restart Re-Prompt Timing
Automatic updates usually wait for a period of time before prompting you again to restart your computer. You can change the setting so that it won’t bother you during the time that you are using your computer.
Double-click on the Re-prompt for restart with scheduled installations. The default timing is 10 minutes. Click the Enabled button, and specify the new time in the bottom-left pane.

Tip: it’s always a good idea to back up your registry before performing any tweaks.
2. Using Registry Editor
You can also use the Registry Editor to stop automatic restart for Windows updates.
Open the Run command, Win + R, and type regedit in the box to open the Registry Editor on your device. Insert the following path into the Registry Editor window:
ComputerHKEY_LOCAL_MACHINESOFTWAREPoliciesMicrosoftWindowsWindowsUpdate
If there is no WindowsUpdate key, right-click on the Windows folder (at the top), and create a new key.
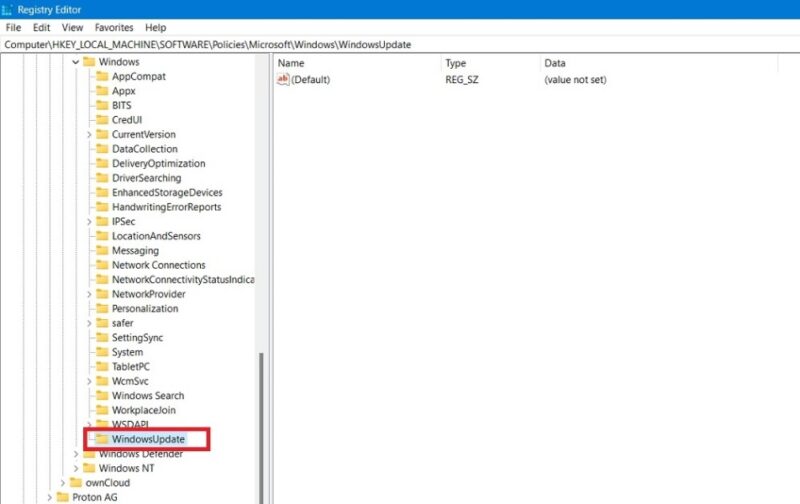
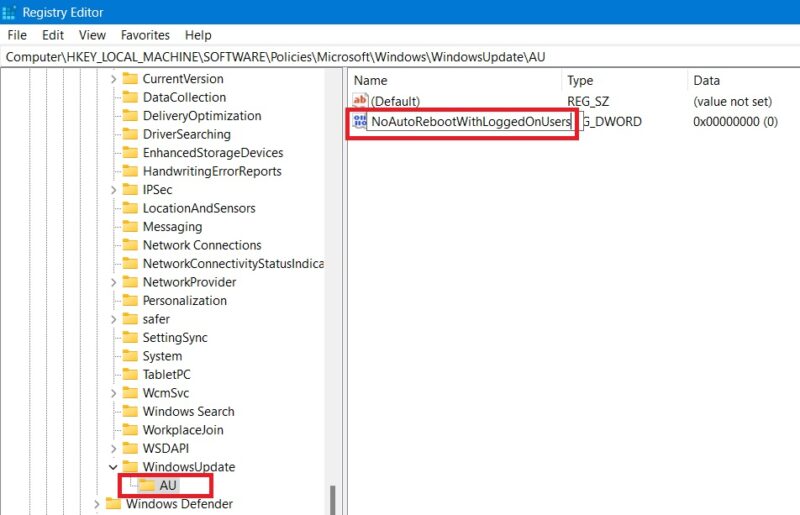
When WindowsUpdate is visible, create another key AU, one level deeper. Select this key, and right-click in the white space next to it. Choose DWORD (32-bit), and name it NoAutoRebootWithLoggedOnUsers.
Double-click on the NoAutoRebootWithLoggedOnUsers entry to change its value from the default 0 to 1, and click OK to save the changes.
3. Using Task Scheduler
The Windows Task Scheduler is another useful app that can be used to disable automatic restarts following a Windows update.
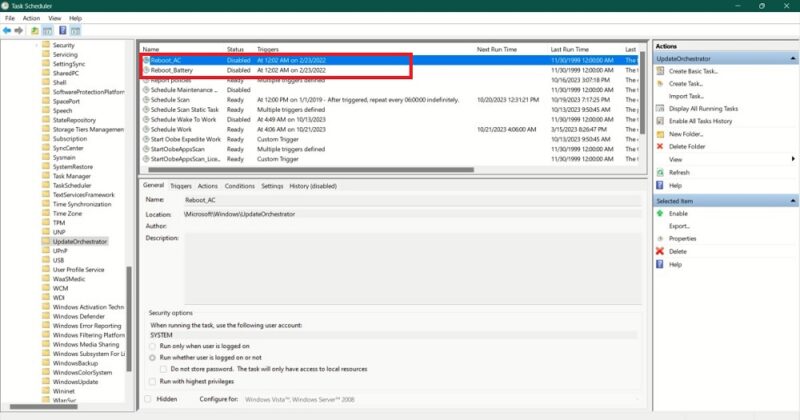
Open the Task Scheduler from the Windows Search box. Navigate to Task Scheduler -> Task Scheduler Library -> Microsoft -> Windows -> UpdateOrchestrator. The UpdateOrchestrator Service operates in the background to scan, download, and install Windows updates.
If you see a Reboot option in the panel on the right side of UpdateOrchestrator, right-click to Disable it. On some devices, you may see the option separately as Reboot AC and Reboot Battery. It is Disabled in both cases in the example below.
If you don’t see a Reboot option, it means the Reboot task was not created. The workaround is to change the basic restart parameters for the Schedule Scan option. Select its Properties with a right-click.
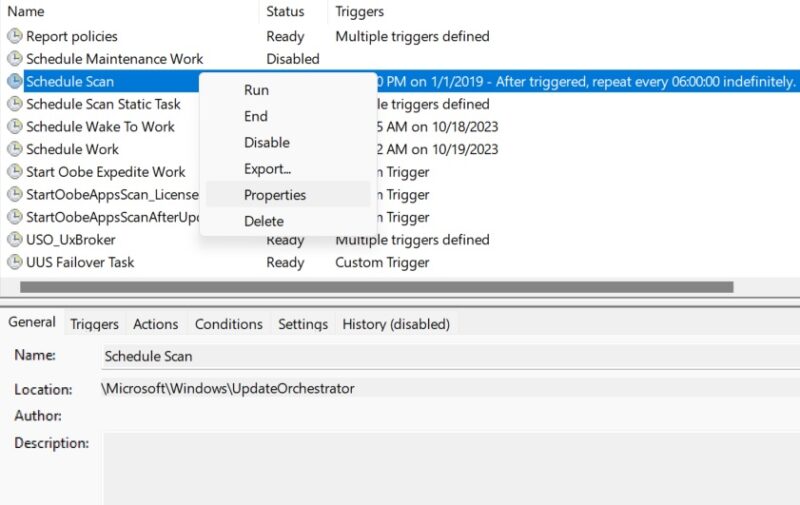
Change the restart parameters from the Conditions tab.
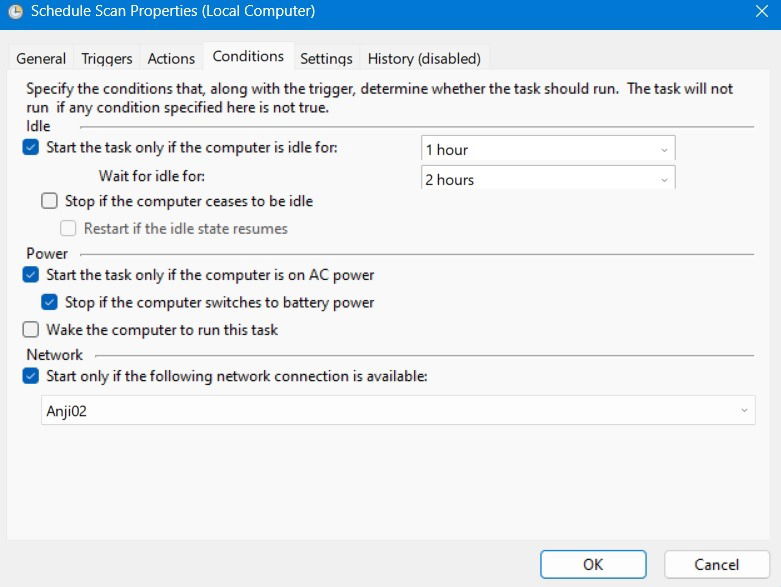
Choose the value for Start the task only if the computer is idle for. It can vary up to an hour. The system won’t prompt you for a restart as long as you record a keystroke in less than the time frame you choose. You can also change the Wait for idle for value from its default 5 minutes to a maximum value of 2 hours.
You can also tick the Start the task only if the computer is on AC power and Stop if the computer switches to battery power options. It’s also possible to restrict the scheduled scan to start only when there is a particular network connection. Select this from the bottom of the screen.
Alternatively, modify Update Orchestrator Service parameters from the Services app.
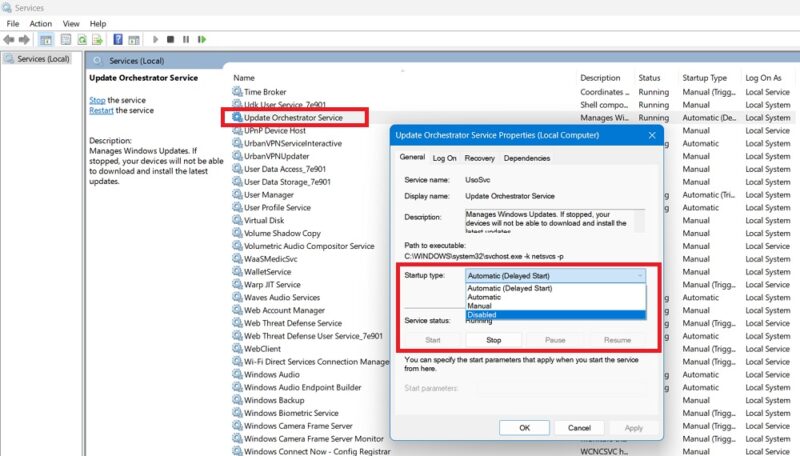
Double-click on the option to view a dialog box, then head to the General tab. Under Startup type, Automatic (Delayed) will be selected by default. Change this value to Disabled.
FYI: Task Scheduler not working for you? Learn how to fix it by checking our guide.
4. Changing Active Hours
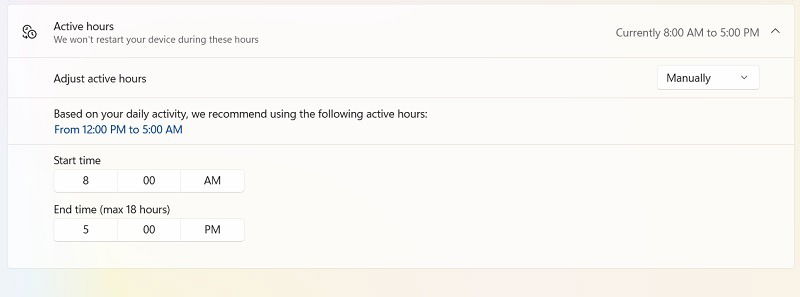
Windows has a feature called Active Hours, which, as the name suggests, allows users to specify a period of time during which the operating system should not automatically install updates or perform system reboots.
In Windows 11, navigate to Settings -> Windows Update -> Advanced Options -> Active Hours. For Windows 10, choose Settings -> Update & Security -> Windows Update. Then, select Change Active Hours.
If the Adjust Active Hours button is set to Automatically, change it to Manually. Allocate a time duration of the day when your system should not prompt you for a restart. Easily adjust these settings to not get any restart notifications for at least 23 hours a day.
You can also use Focus Assist to prevent unnecessary distractions, including restarts for updates. For Windows 11, go to Settings -> System -> Focus, and click on Notifications.
Select Turn on do not disturb automatically, and add your schedule.
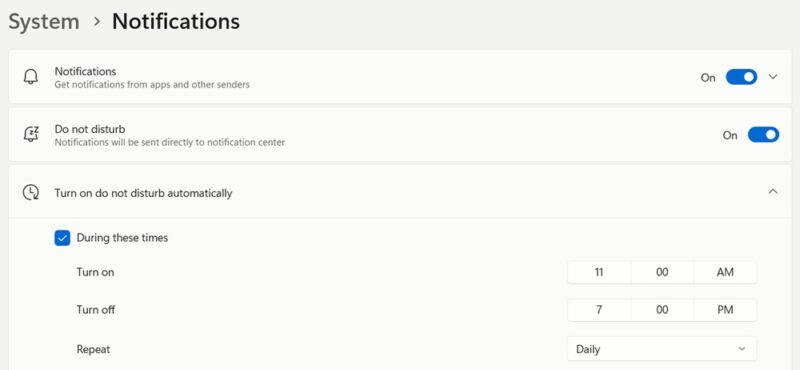
On Windows 10, Focus Assist has various rules, including one that ensures you don’t get disturbed during certain hours.
As shown here, you can stop and control the Windows update in such a way that it does not force you to automatically restart your PC. Likewise, you can turn off automatic driver updates in Windows. If you find your Windows Update Service missing, there are ways to bring it back to your computer.
Image credit: Unsplash. All screenshots by Sayak Boral.

Sayak Boral –
Staff Writer
Sayak Boral is a technology writer with over eleven years of experience working in different industries including semiconductors, IoT, enterprise IT, telecommunications OSS/BSS, and network security. He has been writing for MakeTechEasier on a wide range of technical topics including Windows, Android, Internet, Hardware Guides, Browsers, Software Tools, and Product Reviews.
Subscribe to our newsletter!
Our latest tutorials delivered straight to your inbox
Sign up for all newsletters.
By signing up, you agree to our Privacy Policy and European users agree to the data transfer policy. We will not share your data and you can unsubscribe at any time. Subscribe