This guide will show how to run older Windows applications using the program compatibility troubleshooter. The compatibility mode helps run your favorite applications designed for an older Windows system on newer laptops and PCs. We are following the detailed steps based on Microsoft’s official troubleshooting guide and discuss each compatibility setting.
Also read: How to Run Old Games on Windows
About Program Compatibility Troubleshooter
Most Windows software designed for an earlier operating system work quite well on the latest Windows versions (but not always the other way around). The compatibility troubleshooter’s main goal is to fix any compatibility issues – for example, if your program is not rendering properly on a newer Windows device. The older your legacy operating system gets, such as Windows 7, Vista, or XP, the more it is necessary to troubleshoot applications in compatibility mode.
To access program compatibility troubleshooter in Windows, go to “Settings -> Update & Security -> Troubleshoot” and select “Additional Troubleshooters.”

Scroll down from the Additional Troubleshooter settings to launch the Program Compatibility Troubleshooter. This will launch a new dialog box.

When the troubleshooter starts running, it will search for available programs on your Windows 10 system. Give it a few seconds or even one to two minutes.

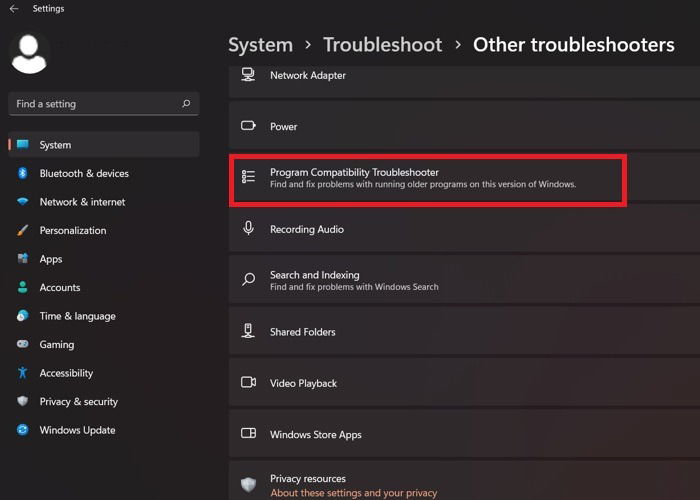
Locating the program compatibility troubleshooter in Windows 11 is slightly different from Windows 10. It requires one less step, as the original window screen doesn’t change. Instead of “Settings,” go to the launcher through “System -> Troubleshoot -> Other Troubleshooters.”

Searching for available programs in Windows 11 program troubleshooter is faster, and the results are populated quickly.

Apart from the navigational menu, you can also get to compatibility mode from the search box of Windows 10/11 or the new Start menu search option of Windows 11. The remaining steps are the same for both Windows 10 and 11.
Run Program Compatibility Troubleshooter in Windows
To run a legacy Windows program in Windows, first import the program and any of its installation files from an older operating system, such as Windows XP or even the latest Windows system.

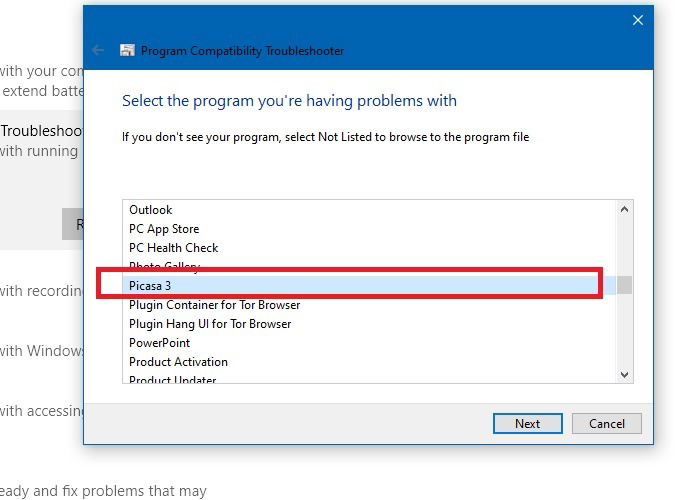
Once the installation is finished, go back and launch the program compatibility troubleshooter. Wait for the programs to populate so that the newly installed legacy application is visible. If your older Windows 7 or XP program is not visible, select “Not Listed.” Select the program and click “Next” to proceed.

1. Compatibility Mode: Try Recommended Settings
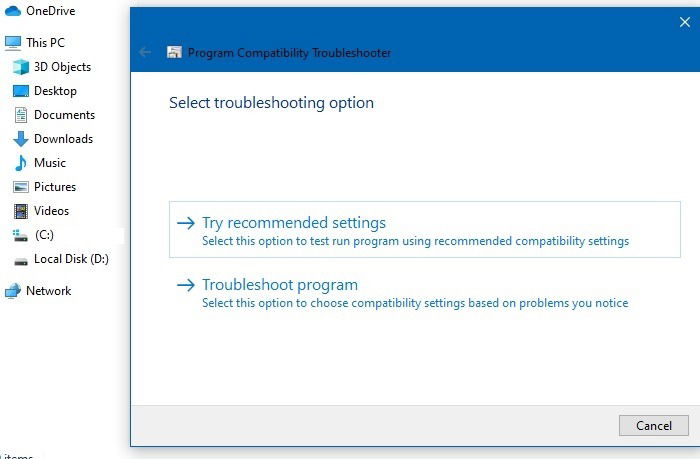
The Program Compatibility Troubleshooter offers two different options to resolve any compatibility issues. We will examine each. Use “Try Recommended Settings,” which will allow the Troubleshooter to automatically apply the Windows compatibility based on internal presets.

The selected program is ready to be fixed for compatibility issues (Picasa 3 in this example). Test the program to note the issues. Click “Next” to continue, and it will launch the old program.

The Program Compatibility Troubleshooter will quickly detect and resolve any issues and probe you on whether the problem has been fixed. If yes, select “Yes, save the settings for this program” and exit the wizard. You should not be facing any more problems after this step.
If there are still issues, you can select “No, try again using different settings,” and it will send you back to the second option, as shown in the next section.

2. Compatibility Mode: Troubleshoot Programs
As a second option in the Program Compatibility Troubleshooter, select “Troubleshoot program,” which allows you greater manual controls on the exact nature of the issue.
Select the exact bottlenecks, such as “the program opens but doesn’t display correctly” or “the program requires additional permissions.” If you’re not sure about the problem, just select “I don’t see my problem listed.”

You will be given a selection of older operating systems the program may have been designed for. Select “I don’t know” if you don’t remember. After selecting, the program will automatically establish compatibility with the older version. Click “Next” after which you have to again test compatibility settings for the program.

Once you complete the above two steps, the older program designed for the older version of Windows should properly work in your newer version of Windows. There are more advanced compatibility tricks shown below.
Also read: Can You (and Should You) Continue to Use Windows 7 in 2020?
3. Use Reduced Color Mode
Today’s PC graphics are much more advanced than older versions. It is possible that some of your older programs may have been designed to run using a limited set of colors in the palette. This is what leads to blank screens.
You can reset your older Windows program to operate either in “8-bit (256) color” or in “16-bit (65536) color.” To do this, right-click the program’s .exe file on any PC location and go to “Properties -> Compatibility.” Use the “reduced color mode” option to fix the issues. Apply the changes to save, and run the older program once again. If it still does not work properly, go to the next compatibility setting.

4. Run in 640×480 Resolution
Sometimes the display problems in an older program are due to graphics issues,
which may be jagged or rendered incorrectly. Right-click the program .exe file again and select “Properties -> Compatibility.” You can select the “640×480” screen resolution as shown below.

Once you change the program resolution to 640 x 480, the compatibility issues should be resolved. You may also notice a “Did this program work correctly” prompt on the Program Compatibility Assistant.
5. Change High DPI Settings
There is another compatibility setting called “Change High DPI settings,” which will resolve any conflicts due to programs that are appearing blurry, too big, or too small in Windows.
For this, go back to the “Properties -> Compatibility” option and click “Change High DPI Settings.” It will open a new dialog box as shown here. Select either “fix scaling problems” or “override high DPI scaling behavior.” Both will help you make the programs appear less blurry.

6. Run Programs as Administrator
The best way to achieve proper compatibility of an older program is to always run it as an administrator. It can be done from the Start menu or a simple right-click of the program’s exe file.

7. Change Settings for All Users

As a last step, apply the program settings for all PC accounts. Even if you’re the administrator, this would allow the program to behave uniformly for all logged-in users.
Frequently Asked Questions
1. How do I get a program out of compatibility mode?
If you’re running your program in compatibility mode, the best way to find out is to go to the program’s default executable folder on your Windows PC. Right-click and select “Properties,” then go to “Compatibility.” You will find the option “Run this program in compatibility mode for Win 8/7/Vista/XP” enabled. Simply uncheck or deselect this setting, and you’re out of compatibility mode.

2. How do I check whether a program is compatible with Windows 10?
While downloading a program, ensure you only select the setting for Windows 10. If you had previously installed a program designed for Win 8.1/8/7, you will generally find an upgrade to Windows 10 option in the System tray.
3. How do I check whether the Windows programs are up to date?
You can check the update status of any installed program from the Windows Update menu, where you can select “Check for updates.” If any programs requires an update, it will alert you.
As you have seen in this guide, most older apps or games run poorly on newer versions of Windows because they were specifically designed for Windows 8, Windows 7, Windows Vista, or Windows XP. But with the Windows Program Compatibility Troubleshooter, there is always a way to run your legacy apps on a newer computer. If you still have old DOS programs you want to run on Windows, here’s a way to do that.

Sayak Boral –
Staff Writer
Sayak Boral is a technology writer with over eleven years of experience working in different industries including semiconductors, IoT, enterprise IT, telecommunications OSS/BSS, and network security. He has been writing for MakeTechEasier on a wide range of technical topics including Windows, Android, Internet, Hardware Guides, Browsers, Software Tools, and Product Reviews.
Subscribe to our newsletter!
Our latest tutorials delivered straight to your inbox
Sign up for all newsletters.
By signing up, you agree to our Privacy Policy and European users agree to the data transfer policy. We will not share your data and you can unsubscribe at any time. Subscribe