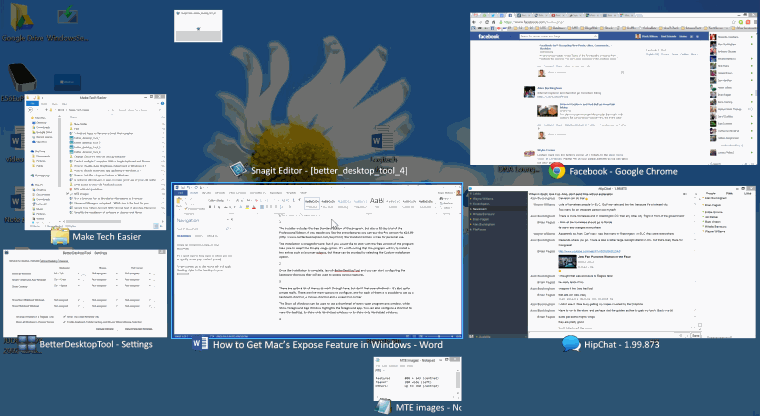
It’s no secret that operating systems borrow ideas from each other – this is something that is true for both mobile and desktop platforms. If you’re a Windows user, you may well have noticed some features of OS X that you like the look of; or maybe you switched from macOS to Windows. One particularly handy feature is Exposé, which can be used to very quickly re-arrange all open windows so you can find the one you’re looking for. With BetterDesktopTool, you can get Mac’s Exposé feature in Windows.
Windows is a little limited when it comes to navigating between open windows. You can use the taskbar, but this can very quickly become cluttered if you are working with a large number of programs and windows at the same time. There’s the useful “Alt + Tab” keyboard shortcut, but this can involve a lot of key presses if there are a lot of windows to cycle through.
To get hold of a copy of BetterDesktopTool, launch your web browser and pay a visit to the program website. Click the “Download” tab at the top of the page and grab a copy of the application.

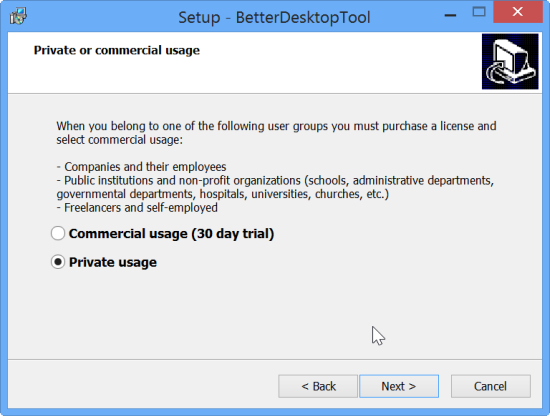
The installer includes the free Standard Edition of the program, but also a 30 day trial of the Professional Edition. If you decide you like the extra features, you can buy the Pro version for €14.99; the Standard Edition is free for personal use.
The installation is straightforward, but if you would like to stick with the free version of the program, take care to select the “Private usage” option. It’s worth noting that the program will try to install a few extras such as browser addons, but these can be avoided by selecting the “Custom installation” option.

Once the installation is complete, launch BetterDesktopTool and you can start configuring the keyboard shortcuts that will be used to access various features.

There are quite a lot of menus to work through here, but don’t feel overwhelmed – it’s also quite simple really. There are five main options to configure, and for each of them, it is possible to set up a keyboard shortcut, a mouse shortcut and a screen hot corner.
The “Show all Windows” option can be used to see a thumbnail of every open program and window, while “Show Foreground App Window” highlights the foreground app. You can also configure a shortcut to view the desktop, to show only minimized windows or to show only minimized windows.

When you use your shortcut, gesture or hot corner to show all windows, any program or window that you have running or open will be reduced to a thumbnail and display at the same time. You can switch to a particular program by simply clicking its thumbnail.

If you would like to keep things neat, tick the box labelled “Arrange Windows in a Regular-Grid”. If you have multiple monitors set up, you may find it useful to enable the option labelled “Move All Windows to Primary Screen” so all of your window thumbnails can be seen on the same monitor.

You may have running programs that you do not necessarily need to be able to access quickly and you can opt to exclude these from the “All Windows” view to help keep things uncluttered. Use your shortcut to display all windows, right click the one you would like to exclude and select the option labelled “Exclude all equal Windows from Overview”.

BetterDesktopTool can also be used to mimic the Spaces feature of OS X, giving you multiple virtual desktops to work with to help keep programs and windows better organized. Move to the “Virtual-Desktop” tab and ensure that the “Enable Virtual-Desktop” option box is ticked.

At the bottom of the dialog, you can choose the number of virtual desktops that should be available to you by adjusting the number that are in each row and column.

Much like on the previous tab, you can now configure the shortcuts you would like to use to access and view your virtual desktops. All it then takes is a double click to move to another desktop. You can use each one for a different task, so Internet related tool could be on desktop one, and word processing and image editing tools on the second.

Windows and virtual desktops can also be accessed by right clicking the notification area icon for BetterDesktopTool and making a selection from the menu that appears.

If you have used a Mac before, you’ll be used to the way Exposé and Spaces work – BetterDesktopTool does a great job of emulating them on Windows. But if you’re new to these features, it should not take you long to discover just how valuable they can be.
Mark Wilson is a software fiend and a fan of the new, shiny and intriguing. Never afraid to get his hands dirty with some full-scale geekery, he’s always trying out the latest apps, hacks and tweaks. He can be found on Google+, Facebook and Twitter.
Subscribe to our newsletter!
Our latest tutorials delivered straight to your inbox
Sign up for all newsletters.
By signing up, you agree to our Privacy Policy and European users agree to the data transfer policy. We will not share your data and you can unsubscribe at any time. Subscribe
