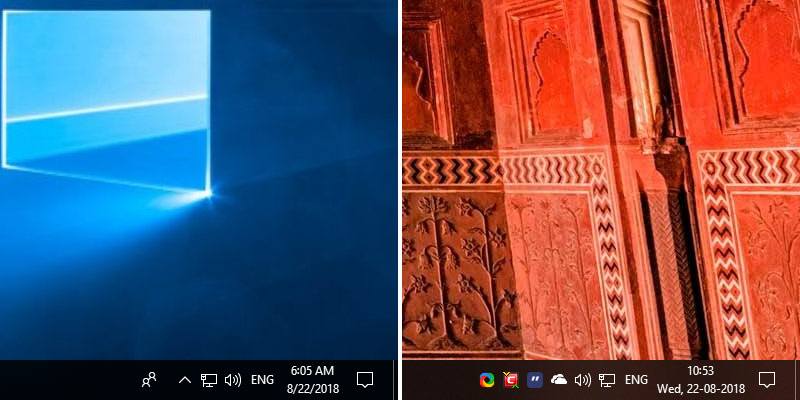
Windows shows the time and date both in the taskbar and flyout calendar panel in a very traditional way: i.e. the date is represented by two digits and backward slash (/) as a separator. The time is represented in either 24-hour or 12-hour format while using a colon (:) as the separator between hours, minutes, and seconds.
Maybe you want to use dashes or dots as the separator, show day of the week in the taskbar, use a custom symbol for AM and PM, etc. Here is how you can fully customize the time and date format in Windows 10.
Also read: How to Change the Time Format in Windows 10
Customize Time Format
To fully customize the time and date formats you have to dig deep within the Control Panel. But as a reward, you are provided with plenty of options to customize the time and date formats. If needed, you can even customize the number and currency formats, too.
The below method works for Windows 7 and 8.
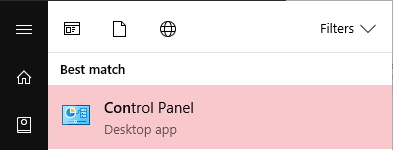
1. The Settings app in Windows 10 lets you customize basic formatting settings for both Time and Date. For advanced format customization it will redirect you to the good old Control Panel. We will start by opening Control Panel from the Start menu.
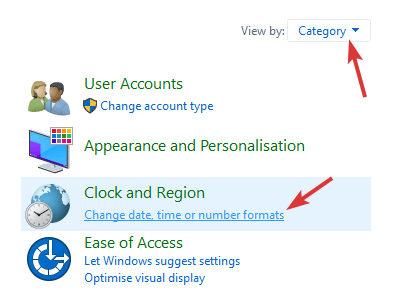
2. After opening the Control Panel, make sure that “View By” is set to “Category,” and click on the “Change date, time, or number formats” link.
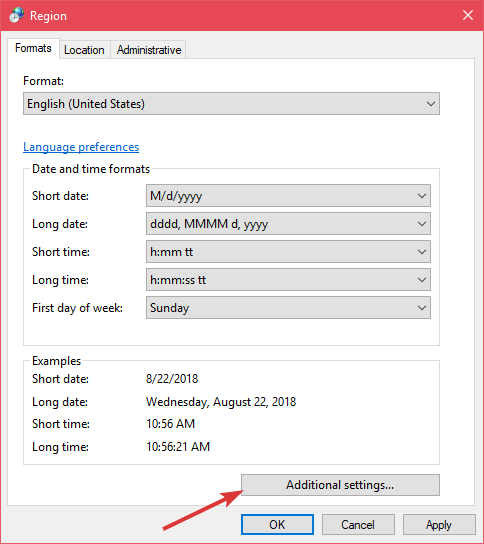
3. You will be taken to the Region window where you can change the basic format by selecting pre-defined formats from the dropdown menu. Since we want to further customize the formatting, click on the “Additional Settings” button.
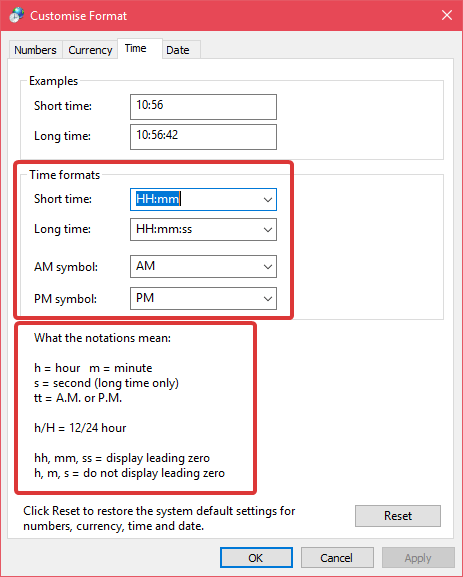
4. In the customize format window go to the Time tab. Here you can customize how the short time (appears on the taskbar) and long time (appears in the flyout calendar panel) looks. All you have to do is enter the appropriate notation in the “Short Time” and “Long Time” fields under the “Time Formats” section.
Fortunately, you can see what notations to use and what they actually mean under the “What the notations mean” section. If you want to, you can also customize the separator between hours, minutes, and seconds to whatever you want.
Note: the Short Time cannot display seconds on the taskbar. Seconds are only visible in the flyout calendar panel.
5. Similarly, you can enter your own symbols for both AM and PM.
6. Once you are done, click on the “Apply” button to see the changes applied instantly.
If you think you made a mistake, you can reset everything to system defaults by clicking on the “Reset” button.
Also read: How to Move the Clock to Right-Most Corner on the Taskbar in Windows 10
Customize Date Format
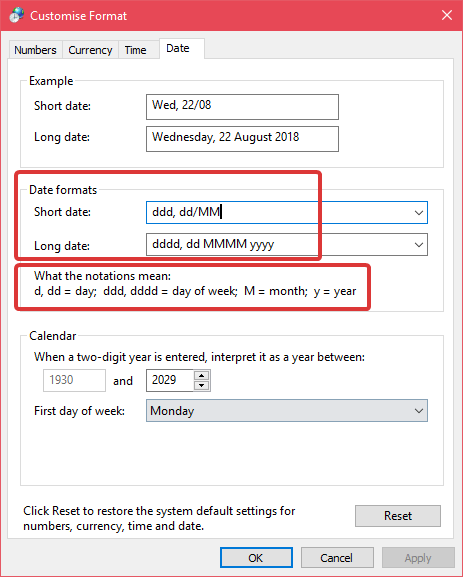
1. To customize the date format, go to the Date tab. Unlike the Time tab, the Date tab gives you quite a few notations to play around with.
2. Just like with the Time, type the notations in the Short Date and Long Date fields under the “Date Formats” section to customize how the date appears in the taskbar and in the calendar panel. For instance, I’ve used the date format “ddd, dd/MM/yyyy” to display the date as “Wed, 22/08/2018” in the taskbar.
You can see what notations to use and what they actually mean in the same section. Additionally, though Windows doesn’t explicitly tell you, you can display the full name of the month using the “MMMM” notation and short name of the week (eg: Fri) using the “MMM” notation.
3. After customizing, click on the “Apply” button to save the changes. The changes are instantly applied.
Play with different notations, shuffle them, and use different separators and symbols to get most out of customizing the date and time.
Comment below sharing your thoughts and experiences regarding using the above method to customize the date and time formats in Windows.
Vamsi is a tech and WordPress geek who enjoys writing how-to guides and messing with his computer and software in general. When not writing for MTE, he writes for he shares tips, tricks, and lifehacks on his own blog Stugon.
Subscribe to our newsletter!
Our latest tutorials delivered straight to your inbox
Sign up for all newsletters.
By signing up, you agree to our Privacy Policy and European users agree to the data transfer policy. We will not share your data and you can unsubscribe at any time. Subscribe
