
USB 3.0 is the third generation USB standard that boasts 10 times faster speeds than USB 2.0 and is more energy efficient. But at times your USB 3.0 ports may stop working on your Windows 10 or 11 computer for no apparent reason. If you’re facing such issues yourself, learn how to fix USB 3.0 ports that are not working on your device.
Content
- 1. Update USB 3.0 Drivers via Windows Update
- 2. Install USB 3.0 Drivers Using Device Manager
- 3. Manually Install USB 3.0
- 4. Enable xHCI
- 5. Reinstall BIOS
- Frequently Asked Questions
1. Update USB 3.0 Drivers via Windows Update
If your USB 3.0 ports are not working, it’s possible that their associated drivers have become corrupted or are missing. Fortunately, updating your Windows system with the latest drivers might help reinstall them.
- Click on the “Start” button and on “Settings” from the “Pinned” section.

- Click on “Windows Update” in the left-side menu. On Windows 10, you need to go to “Settings -> Update & security -> Windows Update.”

- Select “Advanced options -> Optional updates.”

- Click on the “Drivers updates” section to expand it, and select any USB 3.0 driver updates for your PC.
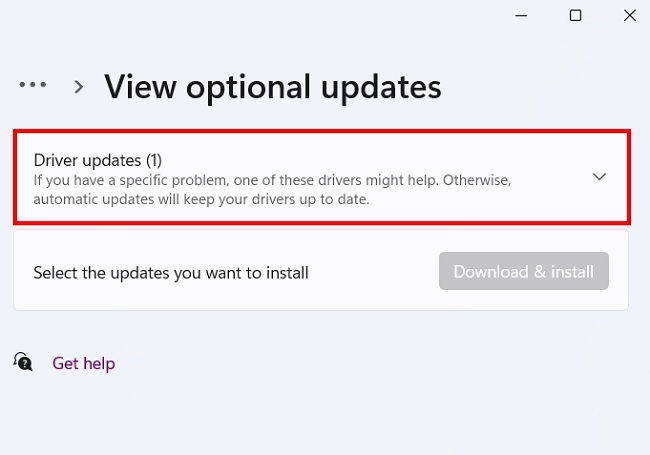
- Press “Download & install” and allow a few minutes for the drivers to complete the process.

- Restart your PC.
Also read: How to Fix “There’s a Problem With Your Office License” in Windows
2. Install USB 3.0 Drivers Using Device Manager
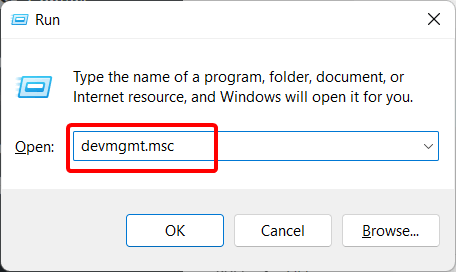
- Press Win + R, then type
devmgmt.mscin the “Run” window to open Device Manager.
- Locate “Universal Serial Bus controllers” and expand it.

- If you see “USB Root Hub (USB 3.0)” in the listing, right-click on the driver, then select “Uninstall device.”

- If you see multiple “USB Root Hub (USB 3.0)” options, uninstall every one of them.
- Select “Action -> Scan for hardware changes” from the menu at the top.

- Your Windows PC should begin searching for USB Root Hub (USB 3.0) updated drivers to install them.
- If “USB Root Hub (USB 3.0)” is not listed at all in Device Manager, you should still go to “Action -> Scan for hardware changes.” If the drivers were corrupted or somehow uninstalled, doing so will locate the correct drivers.
- Reboot your computer.
Also read: How to Fix “This Setting Is Managed by Your Administrator” in Windows
3. Manually Install USB 3.0
Before you install the drivers manually, you should first find the serial number and the model number of your PC. This is written on a printed label attached to the base of your laptop or desktop. Once you have that information, head to your PC manufacturer’s website and find the drivers in the Drivers section.
If you have a custom-built PC or couldn’t find the drivers on the PC manufacturer’s website, download them from your PC’s motherboard manufacturer.
- Press Win + R and type
msinfo32in the “Run” window, then press “OK.”
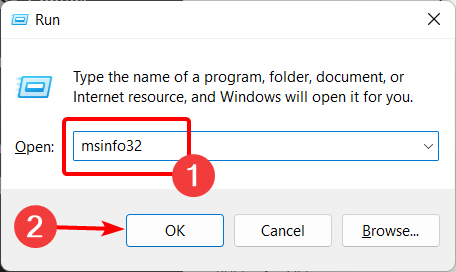
- Check the “BaseBoard manufacturer,” “BaseBoard Product,” and “BaseBoard Version” fields on the right.

- Head to the websitefor the motherboard’s manufacturer and download and install the latest drivers for your components.
- Right-click on the “Start” button and click on “Device Manager.”

- Double-click to expand “Universal Serial Bus Controllers.”

- Locate “USB Root Hub (USB 3.0),” then right-click and select “Update driver.”

- Choose “Browse my computer for drivers,” then select “Let me pick from a list of device drivers on my computer.”

- Click on “Have Disk,” then click “Browse.” Open the location where you downloaded the drivers and select it.

- Open the “.inf” file and follow the instructions to complete the installation of the correct drivers for USB 3.0.
- Restart your PC.
Also read: How to Fix Task Scheduler Not Working in Windows
4. Enable xHCI
Another reason your computer’s USB 3.0 ports have suddenly stopped working is that the xHCI controller could have been disabled and the EHCI controller switched on. For context, USB 3.0 uses the xHCI controller architecture. It was created to support all of the existing and future USB transfer speeds. You can turn the xHCI option back on via BIOS.
- Restart your computer and press the F2 or F8 key to access the BIOS. (Or press the key that is set by your PC manufacturer.)
- Using the arrow keys, select the “Advanced” tab, then open “USB Configuration.”
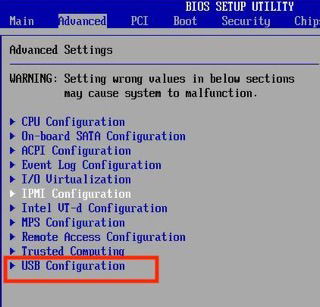
- If the xHCI mode is disabled, enable it.
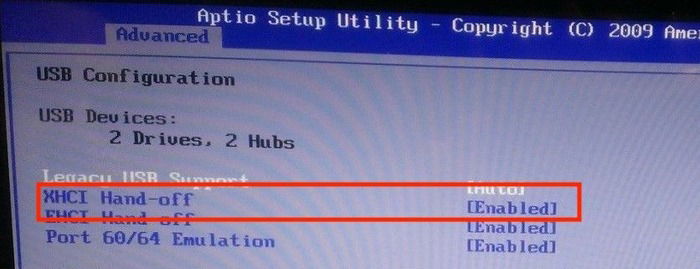
If this didn’t help you or the option is grayed out, you should reinstall the BIOS to enable USB 3.0 again.
Also read: UEFI vs. BIOS: Which One You Should Use
5. Reinstall BIOS
In some cases, issues related to USB 3.0 ports or any other ports could be connected to the motherboard. The issue can be resolved by updating your BIOS to the latest version.
Before you do anything, you need to find information about the model of your motherboard and its manufacturer.
- Press the “Start” button and type
command prompt.

- Open the Command Prompt search result and “Run as administrator.”

- Type the following:
wmic baseboard get product, manufacturer, version, serialnumber

- Command Prompt will show your motherboard manufacturer’s name and model number.

- Open your browser and search for the drivers compatible with your motherboard model. Once you’ve located them, download them to your PC.
- Extract the download folder as you would do with an archive.

- Plug in a USB flash drive, then drag the folder onto it in File Explorer.
- In the folder, you should find an instruction file that provides information on how to install the BIOS update. Read it and follow it accordingly, as the instructions can vary depending on the manufacturer.

Also read: 9 Easy Ways to Check PC Health
Installing BIOS
- Restart your computer and access the BIOS settings by pressing the F2 or F8 key.
- Open the “Boot” menu, select “Boot Device Priority,” and move your USB device to the top.
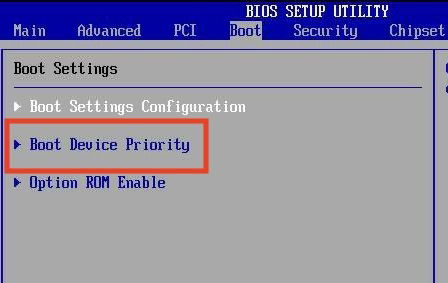
- Save your changes and exit.

- Your PC will boot from your USB drive first.
- Run the BIOS file to update the BIOS of your computer.
Also read: How to Reset/Reinstall Windows Without Losing Your Files
Frequently Asked Questions
USB 3.0 vs. Thunderbolt 3: which is faster?
Developed by Intel in collaboration with Apple, Thunderbolt ports first appeared on the MacBook Pro in 2011. Since then, they’ve also made their way into some premium Windows laptops, such as the Dell XPS 13 Plus. Thunderbolt ports boast significant improvements over USB 3.0, including offering transfer speeds of up to 40GB as opposed to just 5.0GB.
Is USB 3.0 the same as USB-C?
No. USB 3.0 and USB-C have different types of connectors. In terms of speed, USB 3.0 supports a maximum transfer speed of 4.8 Gbps, while USB-C can support up to 10 Gbps. However, you can use a USB 3.0 to USB-C USB cable to transfer data or charge devices.
Should I use legacy BIOS or UEFI?
If you’ve upgraded to Windows 11, you don’t need to do anything, as UEFI is enabled by default. But if you are using Windows 10, you should convert to UEFI from BIOS, as the former is better in every sense: faster boot time, better security, power management, and system management.
Image credit: Castorly Stock via Pexels. All screenshots by Abdul Moiz.
Abdul Moiz loves technology, fashion, photography, and business. His first love is technology, and he loves talking about it. How does he chill when he’s not writing? You are most likely to catch him eating out, traveling, working out, or watching tech videos.
Subscribe to our newsletter!
Our latest tutorials delivered straight to your inbox
Sign up for all newsletters.
By signing up, you agree to our Privacy Policy and European users agree to the data transfer policy. We will not share your data and you can unsubscribe at any time. Subscribe
