Despite the advent of cloud storage, many users still prefer USB drives when it comes to transferring files or backing up data. While in the process of copying files from your Windows computer to your USB drive, you may get an error message that says, “The disk is write protected.” This tutorial offers several troubleshooting steps to resolve the issue.
Good to know: to protect sensitive information, encrypt the USB drive from your Windows PC.
Content
- 1. Check the USB Drive for a Physical Lock
- 2. Scan Your USB Drive for a Virus
- 3. Check Whether the USB Drive Is Full
- 4. Check Security Permissions
- 5. Use the DiskPart Utility to Remove Write Protection
1. Check the USB Drive for a Physical Lock
Certain USB drives have a write protection switch located on the side or bottom for added security. This feature comes in handy when using a removable drive on a public computer. By turning on the write protection or lock switch, all files become read-only, which safeguards the data.
 Image source:
Flaticon
To transfer files from your Windows PC to a USB drive, it’s important to confirm that the lock switch on the USB drive is in the unlocked position and won’t hinder file copying. Slide the switch to unlock the USB, and try transferring the files again. Once the process is complete, you can move the switch back to its original state.
2. Scan Your USB Drive for a Virus
When transferring files using a USB drive, it’s important to be aware that it may contain viruses that could prevent successful copying. This could result in a write-protected error.
To fix the problem, it is recommended that you scan your USB drive with Microsoft Defender, the default antivirus software that is part of Windows Security.
- Open File Explorer, and right-click on your USB drive.
- Select “Show more options -> Scan with Microsoft Defender” from the context menu if you’re running Windows 11. On Windows 10, the option will appear as soon as you right-click.

If malware is detected, it is crucial to immediately remove the virus using antivirus software to prevent infecting computer files. Once the virus is eliminated, you should perform a full system scan to ensure that all other files are safe.
Tip: want to know whether the antivirus software works? Learn how to test it.
3. Check Whether the USB Drive Is Full
Do you have enough free space on your USB drive? If there’s no storage available, and you try to transfer a large file, you may encounter the error message, “The disk is write protected.” Follow the steps below to check it.
- Launch File Explorer, and click “This PC.”

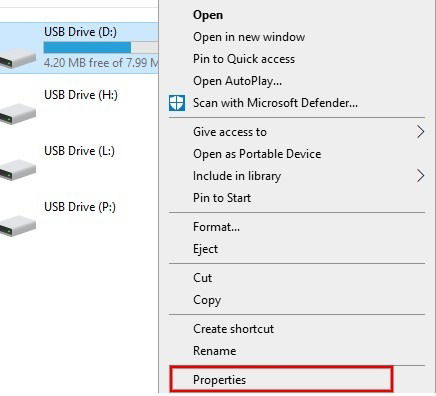
- Right-click the USB drive in the list of all drives on your PC, then click “Show more options -> Properties” in the context menu.

- Check the “Used space” and “Free space” sections in the “General” tab.

- If your USB drive is almost full, free up space by formatting it or deleting unimportant files and checking whether the error disappears. Remember to back up files before formatting.
- Alternatively, use another USB drive for file transfer.
4. Check Security Permissions
If there is a drive permission issue, you won’t be able to copy the files and may get the error “The disk is write protected.” Ensure that write privileges are enabled for the user account by following the steps below:
- Launch File Explorer, and click “This PC.”
- Right-click the USB drive, and select “Show more options -> Properties.”

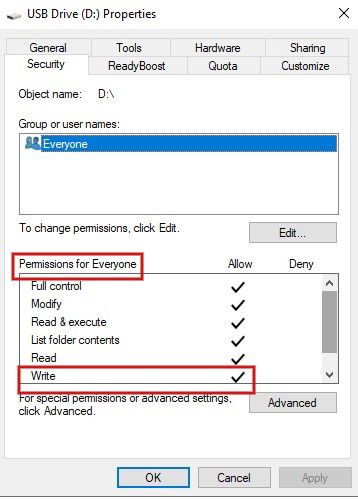
- Click the “Security” tab, and check the “Permissions for Everyone” area at the bottom. Check whether the “Write” option under the “Allow” column is ticked.

- If the Write option is not enabled, select the “Everyone” user under “Group or user names,” and click the “Edit” button.

- Under “Permissions for Everyone,” check the box next to “Write” in the column titled “Allow,” then click “Apply -> OK” to save the changes.

- You should be able to transfer the files from your Windows PC to the USB drive.
FYI: learn how to add a Recycle Bin to a USB or other external drive.
5. Use the DiskPart Utility to Remove Write Protection
The attributes of a USB drive can be modified from the Command Prompt using the built-in Windows tool called DiskPart. Try using it to remove write protection if it was previously applied.
- Press the Win + X keys on your computer, then click “Terminal (Admin)” from the pop-up menu to launch PowerShell.

- Type
diskpartand press the Enter key.

- Type the below command, and press Enter to get the list of drives on your PC.
list disk

- Make a note of the disk number for the USB drive. You won’t see the brand of your USB drive here.
- To select your USB drive, use the below command and press Enter. Replace the number next to “disk” with the number that belongs to your respective USB drive.
select disk 1

- To remove the read-only permissions of the drive, type the following command, and press Enter.
attributes clear disk readonly

- After you see the success message, exit the PowerShell, and check whether the write-protected error is resolved by plugging in the USB drive.
FYI: is DiskPart not working properly? Learn the fixes.
Reclaiming Your USB Drive
If you’re not keen on trying out all the solutions mentioned above, alternative file transfer options, like Google Drive, Dropbox, and other free cloud storage services, are available. You can also opt for an external hard drive to back up your data. If you face any issues accessing the external hard drive, check out our guide for solutions. However, if you prefer using a USB drive after all, learn how to swipe it clean by formatting it.
Image credit: Pexels. All screenshots by Meenatchi Nagasubramanian.
Meenatchi is always passionate about learning new technological advancements and would love to try out new gadgets, software, and apps. After quitting her career as an Embedded Software Developer in 2009, she took up a career in content writing.
Subscribe to our newsletter!
Our latest tutorials delivered straight to your inbox
Sign up for all newsletters.
By signing up, you agree to our Privacy Policy and European users agree to the data transfer policy. We will not share your data and you can unsubscribe at any time. Subscribe
