SFC – or System File Checker – is one of the most recommended tools for fixing corrupted system files. But what do you do when the SFC scan itself starts throwing errors like “Windows resource protection could not perform the requested operation?” There are a few fixes you can try that will most likely resolve the root cause behind the error on your Windows PC.
Content
- Why Is SFC Scan Not Working?
- 1. Check Status of Windows Modules Installer
- 2. Run CHKDSK
- 3. Run SFC Scan in Safe Mode
- 4. Run SFC Scan in Windows RE
- Frequently Asked Questions
Why Is SFC Scan Not Working?
The oft-encountered Windows Resource Protection (WRP) error occurs when WRP blocks certain operations that it deems harmful to the system. WRP is a Windows service that protects critical system files from being modified or replaced. Sometimes it incorrectly blocks the execution of diagnostics tools like the SFC scan that are otherwise known to be completely safe.
There can be multiple reasons for this, ranging from an sfc /scannow command malfunction to a Windows service error or even conflicts with other programs. The following fixes target these potential causes to try to resolve the error and revert the SFC scan back to normal working conditions.
1. Check Status of Windows Modules Installer
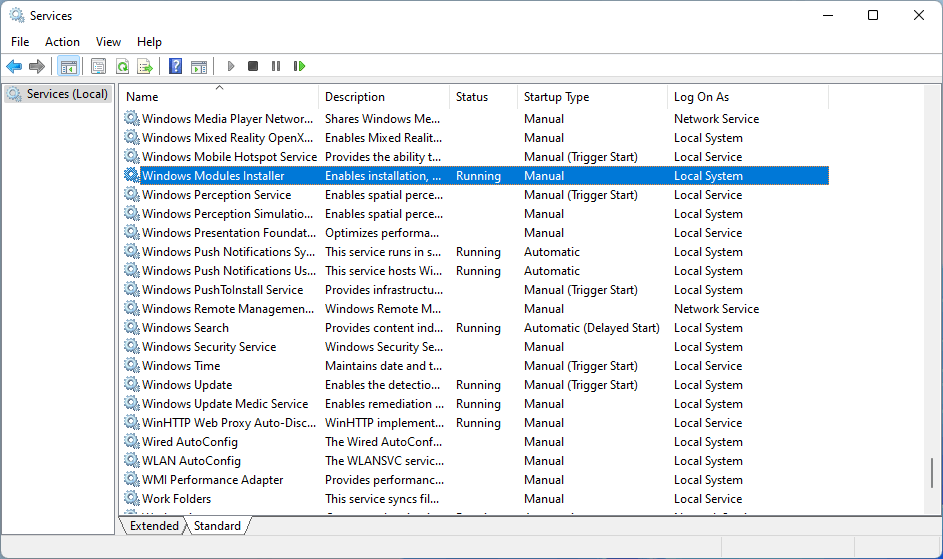
The “Windows Modules Installer” service should be enabled and running for the SFC scan to make changes to WRP resources. The SFC scan actually triggers the service, but if, for some reason, the service is disabled on your system, then the SFC scan might show the WRP error.
To ensure that the “Windows Modules Installer” service is up and running, follow the steps below:
- Open a Run dialog box by pressing Win + R. Type
services.mscand press Enter to launch the Services window.

- Find the “Windows Modules Installer” service and double-click on it to open its properties dialog box.

- Make sure the “Startup type” drop-down is set to “Manual.” If it’s set to “Disabled,” this could be the reason for the SFC scan not working correctly.

- Click “OK” and close the window. Try running the SFC scan now in a Command Prompt window to check whether the error is fixed.

Tip: need to resize or delete a partition? These are the best free disk partition tools for Windows that are up for the job.
2. Run CHKDSK
The Chkdsk tool is used to scan your disk drives for hardware errors that might be causing a variety of system issues. In this case, using the Chkdsk tool will let you know if your drive is riddled with physical errors that might be behind the SFC scan error.

Refer to our guide on checking hard disk health in Windows for detailed instructions on running a Chkdsk scan. Once the scan is completed, try running the SFC scan again to see if the issue persists.
3. Run SFC Scan in Safe Mode
The WRP service can encounter conflicts with other Windows programs. To eliminate this as the source of the error, try running the SFC scan in Safe Mode. Doing so will provide you with a clean environment with minimal Windows components loaded so that you can be sure that nothing is conflicting with the SFC scan.
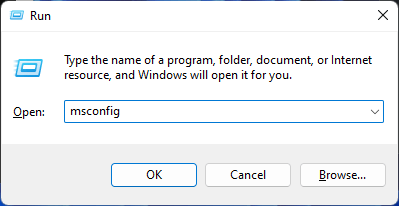
- Open a Run dialog box by pressing Win + R. Type
msconfigand press Enter to launch “System Configuration.”

- In the “Boot” tab, head to the “Boot options,” and select “Safe boot.” From the options below it, choose “Minimal,” click “OK,” and reboot your computer.

- Your system will boot into Safe Mode. Open a Command Prompt window and run an SFC scan to see whether it runs successfully. If it does, you’ll can fix whatever issue you needed an SFC scan for. If not, proceed to the following fix.
Good to know: if you’re constantly tweaking the registry on your Windows PC, it may be a good idea to learn how to back up and restore your registry.
4. Run SFC Scan in Windows RE
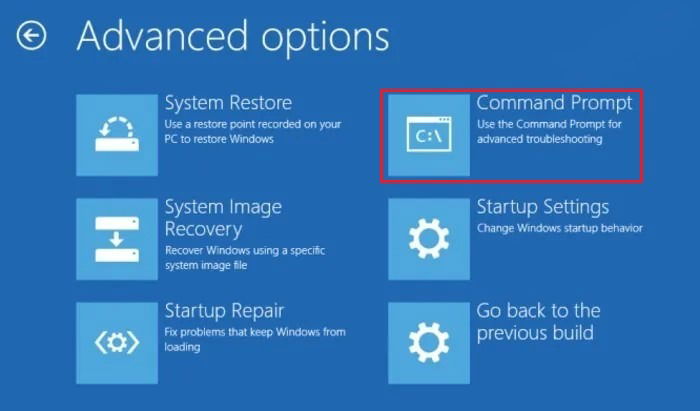
The Windows Recovery Environment (RE) provides you with a set of diagnostics and repair tools to fix common Windows errors. One of the tools available in Windows RE is the Command Prompt, which you can use to run the SFC scan. Similar to Safe Mode, Windows RE is a clean environment that prevents other Windows elements from conflicting with the SFC scan. Follow the steps below to enter the Windows RE and run the SFC scan:
- Press Win + I to open Settings and click “Windows Update -> Advanced options.”

- Under “Additional options,” click “Recovery.”

- Under “Recovery options,” click “Restart now” next to “Advanced startup” to restart the computer. Your computer will boot into the Windows Recovery Environment.

- On the new screen, follow the path “Troubleshoot -> Advanced options -> Command Prompt” to open a Command Prompt window.

- Run the SFC scan now and check whether you’re able to execute it successfully.
If you’re unable to run an SFC scan even now, there are likely deeper issues with your Windows installation that will need a complete reinstall. You can check our Reset/Reinstall Windows guide to safely reinstall Windows without losing your important data.
Tip: not sure whether you should install the latest Windows version? This list includes good reasons you should upgrade to Windows 11.
Frequently Asked Questions
How does an SFC scan fix corrupt files?
The sfc /scannow command is often used to fix common Windows errors caused by corrupt system files. It does this is by scanning all protected system files, identifying the corrupted ones, and replacing them with cached copies located in a compressed folder at “WindowsSystem32dllcache.”
Is it necessary to restart the computer after an SFC scan?
A successful SFC will either replace corrupt files with cached copies or won’t find any corrupted files to replace. Restarting your computer is only required in the former case where the SFC scan makes changes to protected system files. In the case of no changes being made to the system, a restart is not really required.
Why is a DISM scan recommended along with an SFC scan?
The Deployment Image Servicing and Management (DISM) scan is a command line tool used to repair issues in the Windows system image. It’s often recommended to run it after you’ve run an SFC scan to fix critical issues identified by the SFC scan. It’s advisable to run a DISM scan only after you’ve already run an SFC scan and failed to fix an error. DISM is an advanced tool that makes changes to critical components of your Windows image.
What does CHKDSK do?
The goal behind running a Chkdsk scan is to scan the filesystem on your disk drives and check the filesystem integrity. This includes elements like filesystem metadata. On top of that, Chkdsk fixes any logical filesystem errors it can find. These errors include corrupt files from your Windows volume’s master file table (MFT), corrupt security descriptors, or incorrect file property information about individual files. When it comes to fixing bad sectors on the disk, Chkdsk can fix soft bad sectors that occur when data is written badly to the disk. On the other hand, hard bad sectors involve physical damage that cannot be repaired by Chkdsk, but it can make them unusable so that they don’t cause issues in the future.
Image credit: Unsplash. All screenshots by Tanveer Singh.
After a 7-year corporate stint, Tanveer found his love for writing and tech too much to resist. An MBA in Marketing and the owner of a PC building business, he writes on PC hardware, technology, video games, and Windows. When not scouring the web for ideas, he can be found building PCs, watching anime, or playing Smash Karts on his RTX 3080 (sigh).
Subscribe to our newsletter!
Our latest tutorials delivered straight to your inbox
Sign up for all newsletters.
By signing up, you agree to our Privacy Policy and European users agree to the data transfer policy. We will not share your data and you can unsubscribe at any time. Subscribe
