External storage devices are usually where users store their backups, but what happens if you encounter an “External Hard Drive Access Denied” error on Windows when trying to access yours? Several variations of this error include “Location is not accessible, Access is denied,” or “Location or drive is not accessible.” They all indicate a problem with your PC or hard drive. This guide takes you through the causes and solutions.
Tip: noticed your HDD-based PC has been slow? Try defragmenting your Windows hard drive.
Content
- What Causes Access Denied for Hard Drive Error in Windows?
- 1. Try the Error-Checking Tool
- 2. Give Access Permission to the External Hard Drive
- 3. Modify the Drive Letter
- 4. Check Disk Utility
- 5. Format the External Hard Drive
- 6. Use Another Computer and Check the Cable
- Frequently Asked Questions
What Causes Access Denied for Hard Drive Error in Windows?
It is difficult to pinpoint the exact error causing this problem because of the wide range of factors causing it. Some of the most frequent causes of this error message are listed below:
- Damaged external hard drive cable
- Corrupt file system
- Access to the external hard drive is not permitted
1. Try the Error-Checking Tool
There is an error-checking feature in Windows that allows you to pinpoint the cause of your external drive problems.
- Click on the Start menu and select the File Explorer app.
- Click on “This PC.”
- Right-click on your external hard drive and select “Properties.”

- Go to the “Tools” tab and click the “Check” button in the “Error checking” section.

- Select “Repair Drive.”
Tip: need to create a bootable flash drive? You can use Rufus to easily do that.
2. Give Access Permission to the External Hard Drive
Sometimes Windows’s strict protective policies may get in the way of accessing external hard drives, but you can simply fix this by changing permission settings, as shown below.
- Open File Explorer and click on “This PC.”
- Bring up your external hard drive’s Properties.

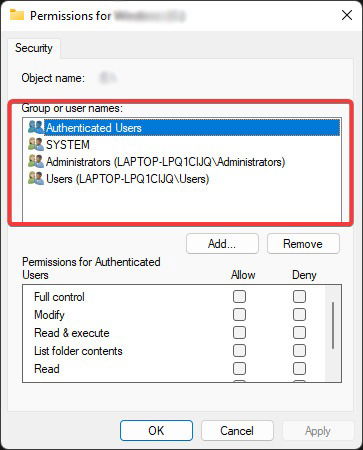
- Go to the “Security” tab and click on “Edit.”

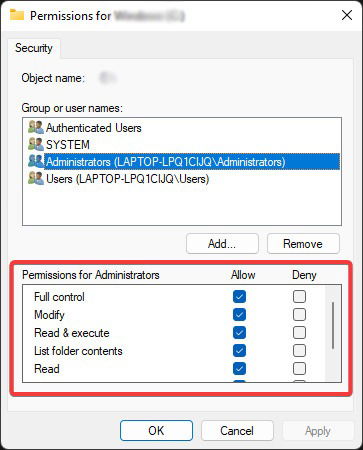
- Look for your profile name under “Group or User names” and click on it.

- Make sure you’ve ticked all of the “Allow” column boxes, including “Full control,” then click “Apply.”

- Click “OK” to get full access of the external hard drive.
3. Modify the Drive Letter
Drive letters are automatically assigned to external storage devices. When a device’s path changes, it becomes unavailable. Changing the drive letter in disk management helps to reconfigure the modification.
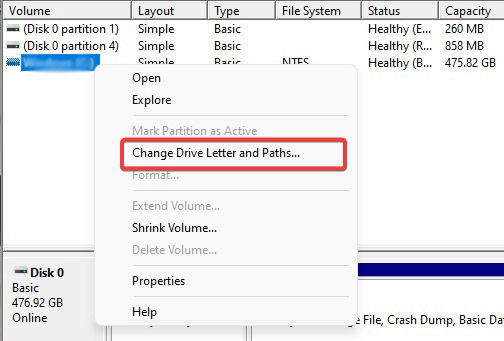
- Type “Disk Management” in Windows Search and select the “Create and format hard disk partitions” options.

- Locate the inaccessible external hard drive and right-click on the partition. Among the options, select “Change Drive Letter and Path.”

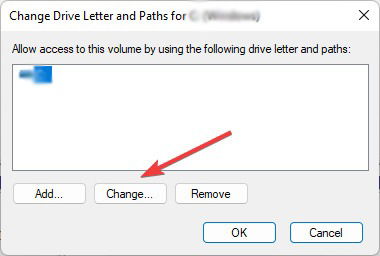
- Hit the “Change” button in the following window.

- Click “OK” after selecting the new drive letter.
4. Check Disk Utility
If you are unsure whether file system issues are causing your external hard drive to be inaccessible in Windows, run the check disk utility.
- Right-click on the Start menu and select “Windows Terminal (Admin).”

- Type the following command, then hit Enter. Make sure to replace the “g” with your external hard disk letter.
chkdsk g: /f

- The tool will scan, fix problems and let you know if it has found a bigger problem that it can’t handle.
Tip: optimize your PC by removing old and useless drivers in Windows.
5. Format the External Hard Drive
Simply formatting the external hard drive is one of the best ways to resolve the access denied error. This will remove all of your data. However, you can simply recover your data if you format the drive with Quick Format and scan it with a data recovery application.
- Open “Disk Management” as shown previously.
- Right-click on your external drive and select the “Format” option. On the confirmation prompt, select “Yes.”

- Select “Perform a Quick Format” and click “OK -> Yes.”

6. Use Another Computer and Check the Cable
A broken USB port or poorly connected cables are frequently at blame when you can’t access your external hard drive. To determine whether this is the case and solve the issue, try the following:
- Connect your HDD directly to your motherboard’s USB ports and avoid using any splitters or docks.
- Replace the USB cord, then reconnect the drive.
 Image source:
Amazon
- Connect the external hard drive to a different computer and check to see whether the disk access is still denied. Don’t forget to always take good care of your cables.
If your hard drive a lost cause? Get a new external drive for all your backup and data storage needs.
Frequently Asked Questions
How can I check my hard drive’s health stats?
Check Disk Utility is the best way to check your hard drive’s health. Plus, it will fix any issues in your hard drive, ultimately solving inaccessibility issues. To learn how to deploy this utility, check solution #4. There are also other ways to check hard disk health on Windows. Note that these methods target internal hard drives.
Can I connect my external hard drive to a Mac?
Of course, you can connect your external hard drive to your Mac using Thunderbolt, USB, or USB-C cables.
Should I get an SSD to avoid the “External Hard Drive Access Denied” issue?
SSDs are commonly used as internal storage devices, but you can also use portable SSDs externally. These storage devices cause fewer problems than HDDs, so you may still encounter issues with SSDs, but the likelihood is relatively lower, as the data read and write mechanism is completely different.
Image credit: Pexels. All screenshots by Farhad Pashaei.
As a technophile, Farhad has spent the last decade getting hands-on experience with a variety of electronic devices, including smartphones, laptops, accessories, wearables, printers, and so on. When he isn’t writing, you can bet he’s devouring information on products making their market foray, demonstrating his unquenchable thirst for technology.
Subscribe to our newsletter!
Our latest tutorials delivered straight to your inbox
Sign up for all newsletters.
By signing up, you agree to our Privacy Policy and European users agree to the data transfer policy. We will not share your data and you can unsubscribe at any time. Subscribe
