The Desktop Window Manager (DWM) is a component of the Windows operating system responsible for managing the visual effects and rendering of the user interface. It doesn’t consume too many resources under normal conditions. Still, if you notice Desktop Window Manager high memory usage, apply these solutions to see if they will help.
Good to know: did you know that Windows processes can look like malware? Learn how to verify that they’re not.
Content
- 1. Restart Desktop Window Manager
- 2. Turn Off Fast Startup
- 3. Disable Visual Effects
- 4. Turn Off HDR
- 5. Configure Resolution and Display Settings
- 6. Disable Hardware-Accelerated GPU Scheduling
What Is Desktop Window Manager, and How Much Should It Consume?
The Desktop Window Manager is an essential Windows process that enables features such as transparent windows, animations, live window previews, taskbar thumbnails, and Windows themes. It exists on your PC as a system file called “dwm.exe,” located in the System32 folder of your computer.
You can check the memory, CPU, and GPU usage of DWM via the Task Manager. It should use no more than 100MB of RAM and 1% of CPU, and somewhere between 0.1 – 3% of GPU resources. These are normal values that may fluctuate from time to time.

If these values are much higher, your PC may be dealing with malware, corrupt or outdated graphics drivers, incorrect HDR settings, or hardware acceleration. Check the solutions below to deal with the issue.
Preliminary Fixes
First, go through this checklist before diving into the more specific fixes.
- Run an SFC scan – a possible reason you are seeing DWM high memory usage is because “dwm.exe” has become corrupted. To check whether that’s the case and repair the issue with this system file, use the built-in SFC tool.
- Update your graphics driver – Intel has acknowledged that Desktop Window Manager produces a memory leak with certain drivers (newer than 27.20.100.8587). The company’s recommended fix is to update the driver to version Windows DCH Drivers driver 30.0.101.1191 or later. If your PC relies on a different GPU, update its graphics driver via the Device Manager.
- Scan for malware – DWM can become corrupted or damaged by malware. Use the Windows Security app or your preferred anti-malware program to perform a virus scan.
Tip: has your Task Manager been disabled by an administrator? Learn how to regain access to it.
1. Restart Desktop Window Manager
A temporary but quick fix is to restart DWM via Task Manager. Begin by right-clicking the Start button and choosing Task Manager from the WinX menu.
Click the search bar at the top, and type “dwm.exe.” Select Desktop Window Manager in the Processes section.

Click the End task button at the top right of Task Manager. Your computer screen will black out, other than your mouse cursor, for a few moments.

Desktop Window Manager will restart and restore your screen.
2. Turn Off Fast Startup
If you have the Fast Startup feature enabled on your PC, your computer won’t go for a full shutdown when you turn it off. Instead, it enters a hibernation-like state. This results in a faster boot-up for your PC when you turn it back on. Unfortunately, this feature may interfere with proper functioning of the Desktop Window Manager.
Open the Start menu, and type “control panel.” Select the best match below. Go to System and Security -> Power Options, then click the Choose what the power button does link on the left.

Click Change settings that are currently unavailable to edit your options. Under Shutdown settings, uncheck the box for Turn on fast startup (recommended).

Click the Save changes button at the bottom.
FYI: learn how to use the Windows 11 Performance monitor to check whether your PC is performing as well as it should.
3. Disable Visual Effects
As mentioned, DWM handles the graphics-related processes on your computer, and if your PC is set to prioritize appearance over performance, it can consume more resources than normal.
Instead, opt to switch focus on performance. This will turn off visual effects and reduce the load on the GPU, allowing DWM to run smoother.
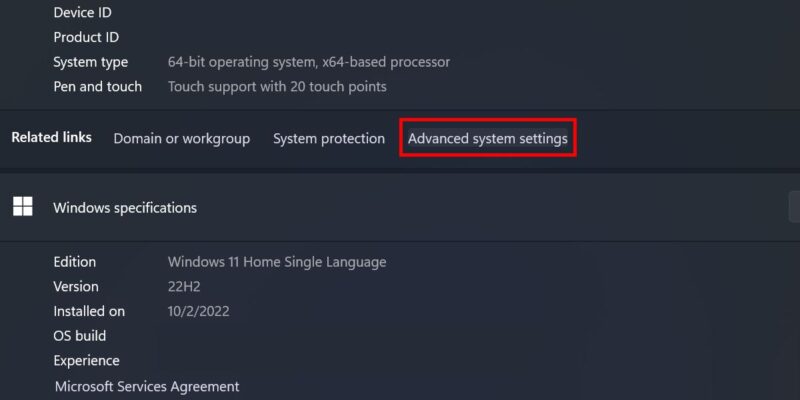
Right-click the Start button, and choose System from the WinX menu. Under Device specifications, click Advanced system settings to open the System Properties window on your screen.

Click the Settings button under Performance. Select the Adjust for best performance option in the new window. Click Apply -> OK to save your changes.

4. Turn Off HDR
DWM may also hog your PC’s GPU resources. One quick adjustment you could make to spin things in the right direction is to turn off the high dynamic range (HDR) feature.
Go to Settings -> System -> Display. If HDR is turned on for your display, simply toggle the switch off.
Windows 10 users should navigate to the same location and look under Windows HD Color to turn off the switch for Use HDR.
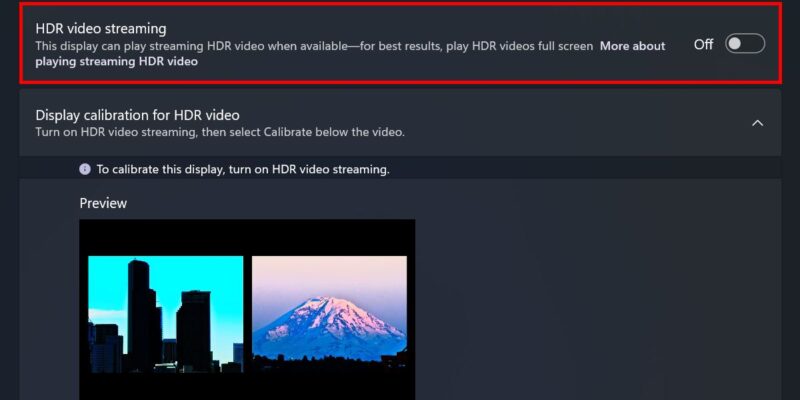
Meanwhile, if HDR isn’t supported for your current go to System -> Display -> HDR. Disable the toggle next to HDR video streaming (if applicable).

Tip: is HDR looking bad on your display? Learn how to fix it.
5. Configure Resolution and Display Settings
By default, Windows sets your resolution and scaling options to the optimal values. Setting them to higher values may lead to increased GPU usage. Follow the instructions below to reconfigure them:
Launch the Settings app, and navigate to System -> Display. Under Scale & layout, make sure to select the recommended values for Scale and Display resolution.

If you’re on Windows 10, go to the same location, and select the recommended options under Change the size of text, apps, and other items and Display resolution.
6. Disable Hardware-Accelerated GPU Scheduling
Hardware-accelerated GPU scheduling is a feature in Windows meant to reduce the load on your CPU by directing the GPU to handle high-priority tasks. While this boosts graphics card performance, it may trigger the DWM high memory usage. Any activity that uses the GPU can possibly lead to increased Desktop Window Manager resource consumption.
In the Settings app, navigate to System -> Display -> Graphics. Under the Default settings section, click the link for Change default graphics settings.

In the next sub-menu, turn off the switch for Hardware-accelerated GPU scheduling.

For Windows 10, go to System -> Display. Click the link for Graphics settings under the Multiple displays section to see the option.
Tip: got a new GPU? Check out our guide on how to install your graphics card in your PC.
7. Switch to a Basic Theme
Some desktop themes can consume many GPU resources, and switching to a more basic theme could reverse the situation.
Go to Settings -> Personalization -> Themes. Select one of the preinstalled themes on your PC, such as Windows (light).

Bringing Desktop Window Manager Back to Normal
Desktop Window Manager is essential for your PC to function smoothly. However, if it starts to consume more memory than usual, it may affect other processes on your PC that are essential. Aside from DWM, Windows Superfetch and Wmpnetwk.exe may also cause memory and CPU usage issues. Check out our dedicated articles to learn how to troubleshoot.
Image credit: Unsplash. All screenshots by Princess Angolluan.
Princess is a freelance writer based in Croatia. She used to work as an English teacher in Hokkaido, Japan before she finally changed careers and focused on content writing & copywriting, while running their own digital marketing company in Europe. For 5 years, she has written many articles and web pages on various niches like technology, finance, digital marketing, etc. Princess loves playing FPS games, watching anime, and singing.
Subscribe to our newsletter!
Our latest tutorials delivered straight to your inbox
Sign up for all newsletters.
By signing up, you agree to our Privacy Policy and European users agree to the data transfer policy. We will not share your data and you can unsubscribe at any time. Subscribe
