System restore points in Windows help you to restore your system to its previous good state. You can either create a system restore point manually, or in some cases they are automatically created for you during software or driver installations, major system changes, etc. In fact, starting from Windows 7, Windows has a scheduled task that automatically creates a system restore point if there is no other restore point in the last seven days. You can see that task by opening the Task Scheduler and navigating to the “Task Scheduler Library -> Microsoft -> Windows -> SystemRestore” folder.

If you are experimenting with a lot of apps and settings or if you think you’d benefit from daily restore points, all you have to do is create a new trigger in the Task Scheduler so that Windows creates a new restore point every time you start your computer. The downside of this method is that it is very easy to create a bunch of unnecessary duplicated system restore points if you shut down and restart your computer multiple times a day.
Alternatively, you can use the Windows Defender to create daily system restore points. This is because Windows Defender will scan your computer for malware once every day. Using a bit of Group Policy or Registry magic, you can make Windows Defender create a system restore point every time it does a malware scan.
Since system restore uses a significant amount of disk space, it is disabled by default. However, for this article I assume that you already have system restore enabled on your system. If you are not sure, check out our guide on how to configure system restore in Windows.
Create Daily Restore Points Using Group Policy
If you are a Windows Pro user, you can follow this method:
- Open Group Policy Editor by searching for
gpedit.mscin the Start menu. - Navigate to “Computer Configuration -> Administrative Templates -> Windows Components -> Windows Defender Antivirus -> Scan” in the Group Policy Editor.

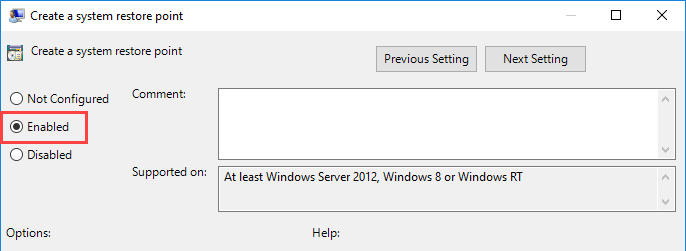
- Find and double-click on the policy “Create a system restore point” appearing on the right-panel. In the policy properties window select the radio option “Enabled” and click on the OK button to save the changes.

Restart your system to make the policy active. From now on, as Windows Defender scans your system on a daily basis, a restore point is automatically created for you. If you ever want to disable daily restore points, just select “Disabled” or “Not configured” in the policy settings window.
Create Daily Restore Points Using Registry
You can do the same thing by adding a new key and value to the Windows Registry. Before proceeding back up Windows Registry so that you can restore it if need be. To open Windows Registry, press Win + R, type regedit and press Enter.

In the Registry, navigate to the following key:
HKEY_LOCAL_MACHINESOFTWAREPoliciesMicrosoftWindows Defender
Right-click on the “Windows Defender” key and select “New -> Key.” Name the new key “Scan” and press Enter. This is how it looks once you create the key.

Right-click on the right panel, select “New -> DWORD (32-bit) Value” and name it “DisableRestorePoint.”

By default, the value will have a value data of “0.” There is no need for any change. Just restart your system, and Windows Defender will create a daily restore point when it scans your system for malware.

If you want to stop Windows from making daily system restore points, all you have to do is change the value data from “0” to “1.” Alternatively, you can simply delete the “DisableRestorePoint” value.
Comment below sharing your thoughts and experiences regarding using the above method to create daily system restore points in Windows.
Vamsi is a tech and WordPress geek who enjoys writing how-to guides and messing with his computer and software in general. When not writing for MTE, he writes for he shares tips, tricks, and lifehacks on his own blog Stugon.
Subscribe to our newsletter!
Our latest tutorials delivered straight to your inbox
Sign up for all newsletters.
By signing up, you agree to our Privacy Policy and European users agree to the data transfer policy. We will not share your data and you can unsubscribe at any time. Subscribe
