
The first time you configure and connect to a network, Windows stores that information as a network profile and gives it the most generic name like “Network,” “Network 1,” and so on. In fact, this is the name you’ll see when you click on the network icon in the taskbar or when you open the Network and Sharing center in Control Panel. Though the default name is not a big thing for the most part, it can be quite confusing if you have multiple network profiles. The good thing is you can customize the network profile name.
Note: unfortunately, there are no straightforward options to do so. You have to meddle with Local Security Policy or Registry Editor to change the network profile name in Windows 10.
Change the Network Profile Name – Local Security Policy Method
The easiest way to change the network profile name in Windows is to modify the Local Security Policy settings. Local Security Policy is a part of Group Policy Editor. However, unlike Group Policy Editor where you can configure settings for all computers and users in your domain, Local Security Policy is used to set and modify settings for your particular local machine. To start, press Win + R, type secpol.msc and press the Enter button.

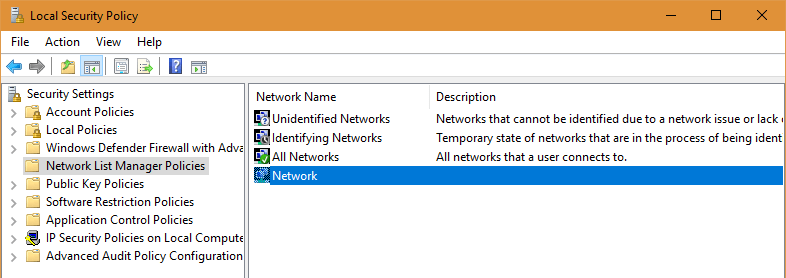
The above action will open Local Security Policy editor. Here, navigate to the folder “Network List Manager Policies” appearing on the left panel. Find and double-click on your network profile name appearing on the right panel. By default, the network will be listed with the default profile name. e.g., “Network.”
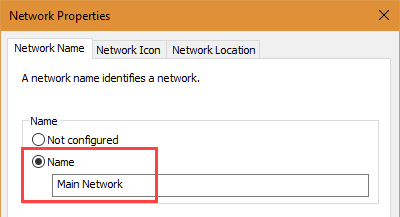
In the network properties window select the radio option “Name,” enter the name of your choice and click on the “OK” button to save the changes. Do not use any special characters in the name.
That’s it. The change is instant, and you should see the new name when you click on the network icon in the taskbar.

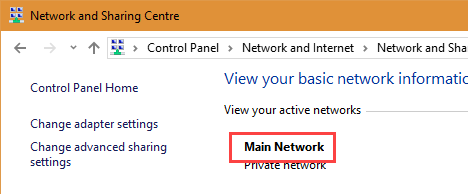
The new network profile name is also reflected in the Network and Sharing Center. If you don’t see the changes, restart your system.
Change the Network Profile Name – Registry Method
Being a sub-group of Group Policy Editor, you won’t have access to Local Security Policy if you are using the Windows Home version. Alternatively, you can use Registry Editor to change the network profile name. To open Registry Editor, press Win + R, type regedit and press the Enter button.
In the Registry Editor navigate to the following location. If you are using Windows 10, copy and paste the below path in the address bar and press the Enter button.
HKEY_LOCAL_MACHINESOFTWAREMicrosoftWindows NTCurrentVersionNetworkListProfiles
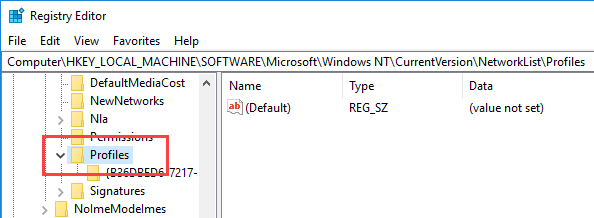
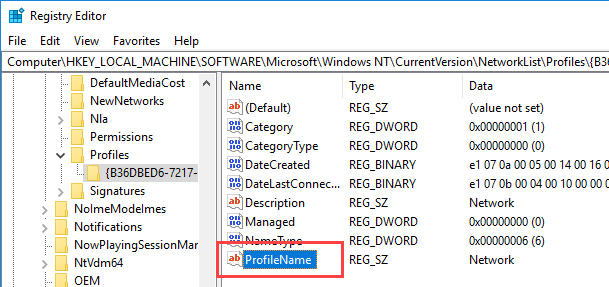
Under the Profiles key you will see subkey(s) with alpha-numeric names. Windows sets a new key for each network profile in your system. Since my system only has one network profile, I have only one corresponding key. If you have multiple keys under the Profile key, then go through them and find the key related to the target network profile. You can identify the specific key by looking at the “ProfileName” value in the right panel.
Once you have found the key, double-click on the value “ProfileName.”
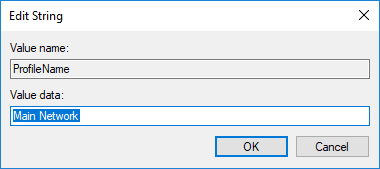
Now, enter the new network profile name in the Value Data field and click on the “OK” button to save the changes. Again, don’t use any special characters in the name.
Restart your system, and you should see the new network profile name.
Comment below sharing your thoughts and experiences about using the above method to change the network profile name in Windows.
Vamsi is a tech and WordPress geek who enjoys writing how-to guides and messing with his computer and software in general. When not writing for MTE, he writes for he shares tips, tricks, and lifehacks on his own blog Stugon.
Subscribe to our newsletter!
Our latest tutorials delivered straight to your inbox
Sign up for all newsletters.
By signing up, you agree to our Privacy Policy and European users agree to the data transfer policy. We will not share your data and you can unsubscribe at any time. Subscribe
