
While many Windows 11 features are highly publicized, they’re not always the most useful for power users. From keyboard shortcuts to hidden menus, there are a variety of hidden Windows 11 features that make using Windows easier and more productive overall. If you’re a true power user, you might recognize a few of these from Windows 10.
Content
- 1. Secret Start Menu
- 2. Improved Multitasking
- 3. Keyboard Shortcuts on the Taskbar
- 4. App Sound Level Adjustment
- 5. Quick Screenshot Options
- 6. Inactive Scrolling
- 7. More Powerful Clipboard
- 8. Background Power Hogs Removal
- 9. Old Apps Cleanup
- 10. Focus Assist
- Frequently Asked Questions
Also read: The Ultimate Guide to Check Windows 11 Compatibility with Your PC
1. Secret Start Menu
The Windows 11 Start menu is nice enough, but all the fun features are in the secret Start menu. Even though this existed in Windows 10, many users still haven’t discovered it. The menu includes some incredibly useful shortcuts, such as Run, Windows Terminal, Disk Management, Power Options, Event Viewer, Task Manager, and more.
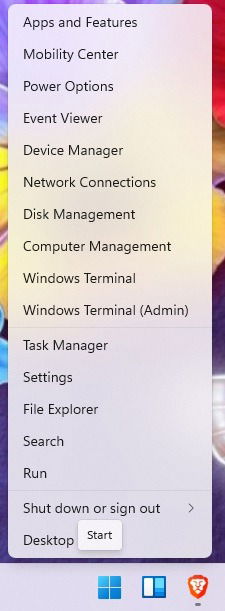
You can access this menu by right-clicking the Start menu icon. It’ll appear in place of your normal Start menu.
2. Improved Multitasking
Among Windows 11 hidden features, multitasking is a true gem. Some of the settings are turned off by default, but multitasking gives you a variety of ways to quickly access windows, snap windows, manage multiple desktops, and minimize everything except your active window. The latter is rather useful if you tend to have numerous windows open while working.
- Access all the multitasking settings by going to “Start -> Settings -> System -> Multitasking.” Alternatively, simply search for “Multitasking” using the Windows Search function.

- From here you can customize Snap windows. The feature lets you choose how windows react to snap layouts. While Windows 10 had these, they were much more limited. Now you can just hover over the maximize button of a window to see available snap layouts. This lets you organize your desktop in a way that’s most productive for you.
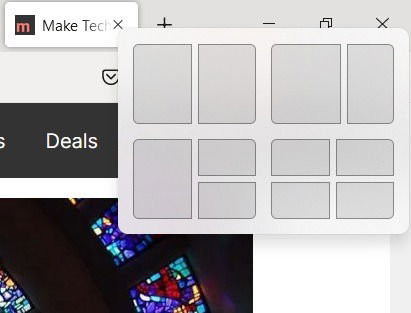
- You can also choose how to manage multiple desktops, such as what your taskbar shows and how Alt + Tab reacts. If you use Microsoft Edge, which is surprisingly better than it was when it was first released, you can now use Alt + Tab to navigate your five most recent tabs in addition to open apps. This makes jumping from tabs to apps much faster.
- And finally, minimize all windows just by clicking the top of the window you want to stay open and gently shaking it with your mouse. Other open windows instantly minimize.
Also read: How to Safely Bypass the TPM 2.0 Requirement in Windows 11
3. Keyboard Shortcuts on the Taskbar
Taskbar shortcuts make getting to your most used apps and files faster. But what if you could simply use a quick keyboard shortcut to open your taskbar shortcuts?
All you have to do is remember the order of your shortcuts. Press the Win key plus the corresponding number of the taskbar shortcut. For example, my shortcuts are:

- Brave Browser
- File Explorer
- Everything
- CherryNote
- LibreOffice Writer
- LibreOffice Calc
- Calculator
To open LibreOffice Writer, I’d press Win + 5. Obviously, if you re-order your shortcuts, the corresponding number will change. Also, the numbers don’t apply to your Start menu or Widgets icons on your taskbar.
4. App Sound Level Adjustment
If you hate web pages that randomly play loud ads or music, you’ll love this hidden Windows 11 feature. Instead of just quickly muting all sound, adjust the sound at the app level. The Volume Mixer lets you change the sound levels for individual apps without changing your overall system volume. So if you want Spotify to be loud, but Chrome quiet, no problem.
- Go to “Start -> Settings -> System -> Sounds.” Select “Volume Mixer.”
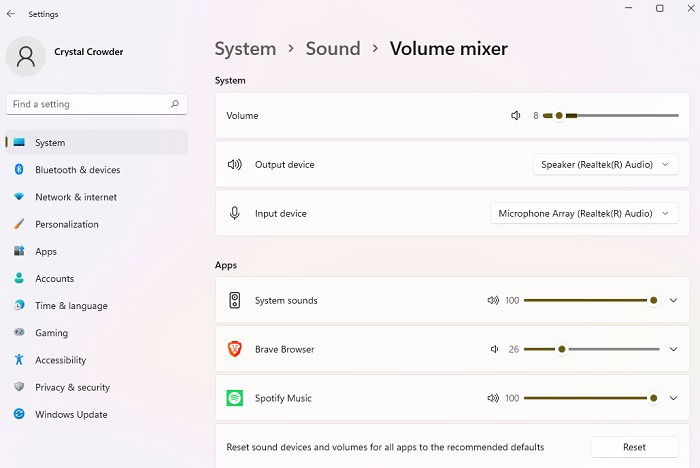
- There is one trick to using Volume Mixer. When you change the volume on the app, it must be open with an active sound playing. For instance, you might open a YouTube video in your browser to make it show up. However, your sound preferences stay in place after you’ve set them.
Also read: How to Get Classic Volume Mixer Back in Windows 11
5. Quick Screenshot Options
Actually, this worked just as well in Windows 10, but while many users know about the Win + PrtScr or Print Screen button, some never tried the Snipping tool. This lets you take a screenshot of only a desire part of the screen.
Open the Snipping Tool like any other app via the Start menu or Search. Alternatively, just press Win + Shift + S to get started, then just draw the shape you want to capture.

If you’re trying to take a screenshot of the Windows login screen, this won’t work. However, there is a workaround if you need screenshots for troubleshooting or a tutorial.
Also read: How to Capture a Scrolling Screenshot in Windows
6. Inactive Scrolling
It might not be a feature you use often, but inactive scrolling works well if you need to scroll through an inactive window. If you have multiple windows open on your desktop, you don’t always need to bring another window to the foreground just to scroll it.
To use inactive scrolling, you’ll need to have both windows open at the same time. Simply hover your mouse over the inactive window and scroll using your mouse wheel.
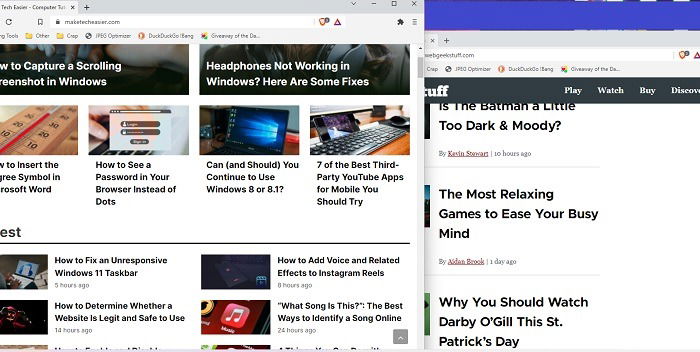
This works well for quick comparisons between pages or to look up information without switching active windows back and forth.
The feature should work without having to change any settings, but if it’s not working, follow these steps:
- Go to “Start -> Settings -> Bluetooth & devices -> Mouse.”
- Turn on “Scroll inactive windows when I hover over them.”

Also read: Best Free Clipboard Managers for Windows
7. More Powerful Clipboard
The new and improved clipboard is one of the best hidden Windows 11 features. It’s no longer just a place to store multiple copied items. While that’s useful enough, it now features emojis, classic ASCII emoticons, symbols, and GIFs. If you have to use a lot of symbols, such as “©,” “â,” or “é,” you’ll save a lot of time by using the clipboard versus trying to remember the right code to type it.
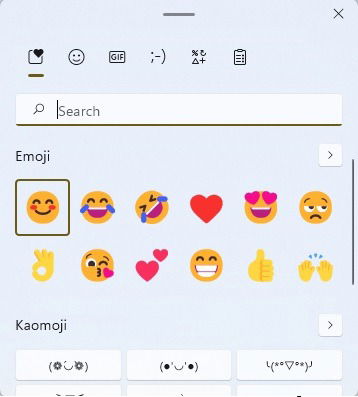
Press Win + V to open and turn on the clipboard feature. All your recently used items are saved within each section of the clipboard and on the favorites area of the clipboard.
8. Background Power Hogs Removal
If you’re using a desktop, you might not be too concerned with background apps using power. However, they still take up other valuable resources, which can slow performance. Windows 11 lets you easily adjust which apps can run in the background, giving you more CPU, RAM, and battery life. There are two ways to manage background apps.
- First, go to “Start -> Settings -> System -> Power & battery.” Select “Battery Saver” under Battery. By default, it turns on when your battery power reaches 20%. If you’re not running on battery power, you can’t turn this on. However, you can change the percentage by using the “Turn battery saver on automatically at.”

- The next option is to manage apps individually. You can do this from “Battery Usage” – but only if the apps ran on battery power within the last seven days.
- The alternative is to go to “Settings -> Apps -> Apps & features.”
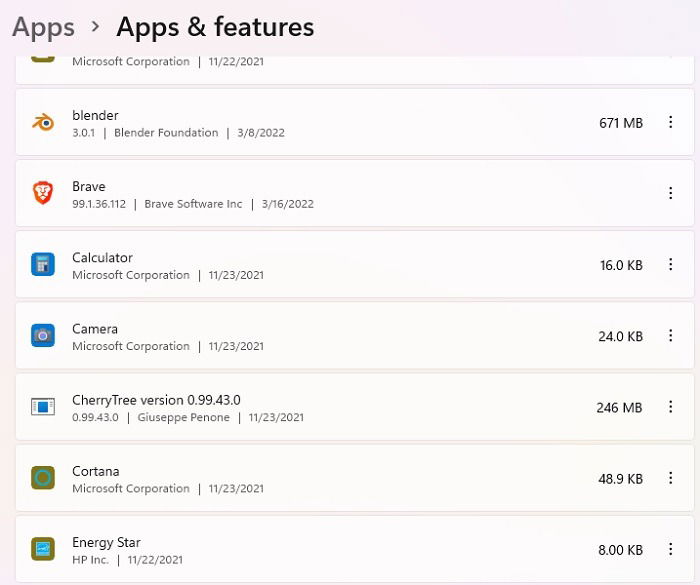
- Click the settings icon beside an app (the three dots) and choose “Advanced options.” This won’t be available for every app, such as system apps.

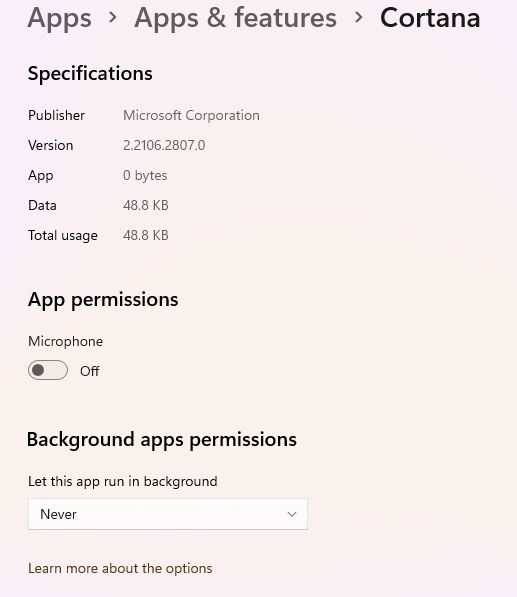
- Scroll down to “Background apps permissions.”
- Select “Never” to prevent the app from running in the background or “Power Optimized” to only run if you have enough battery power. (This is based on the percentage you choose in the Battery Saver settings.)
Also read: How to Use Windows 11 without a Microsoft Account
9. Old Apps Cleanup
Mobile devices give you recommendations on what to delete to free up storage space. Now, Windows 11 does the same thing. If you tend to download a lot of apps, Windows will suggest apps to delete based on your usage history. You can use Storage Sense to automatically delete temporary files, but Cleanup Recommendations is where suggestions come from.
- Go to “Start -> Settings -> System -> Storage.” You’ll see a breakdown of your storage usage, including documents, apps and features, desktop, and temporary files.
- Click “Show more categories” to see a more detailed breakdown.

- Select “Cleanup recommendations” to view recommended files and apps to delete.

Click any category to view suggested things to remove. I have very few apps, so I don’t have any app recommendations and recently deleted a lot of old files, so my PC was looking pretty clean at the moment.
10. Focus Assist
Nothing’s more annoying than trying to stay focused while being bombarded with notification dings. Stay thoroughly focused by silencing notifications during set times with Focus Assist. Windows 10 users may remember this as Quiet Times.
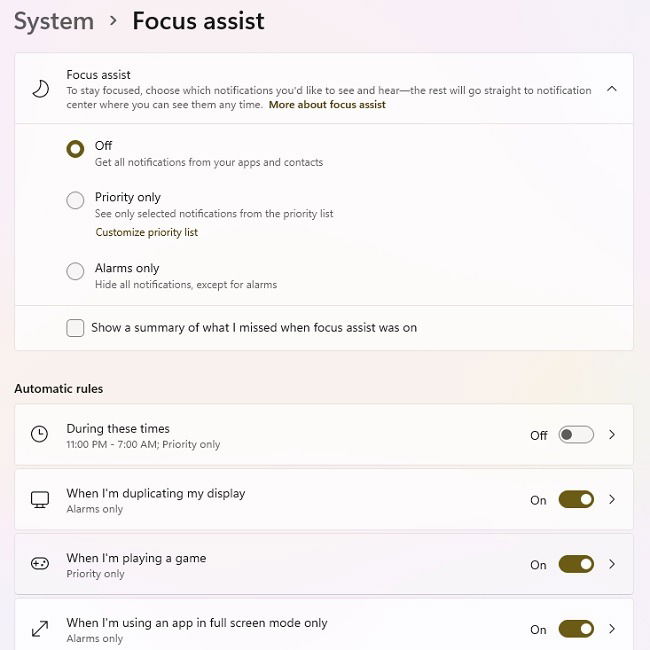
- Windows 11 now has this as part of your Clock settings. Right-click your clock in your notification tray and choose “Notifications settings.”

- Expand “Focus Assist” to view available options for silencing notifications. Choose just notifications from your most important contacts or apps, get just alarms only, or set specific time periods. You can also adjust Focus Assist for specific activities, such as when an app is open full screen or you’re playing a game.
Also read: 12 Windows Apps You Should Uninstall Immediately
Frequently Asked Questions
1. I can’t find Control Panel in the hidden Start Menu. Is it still a part of Windows 11?
You may have noticed Control Panel isn’t listed in the hidden Start menu. Actually, it was removed from the Windows 10 hidden Start menu as well, at least in later versions. However, Control Panel is still in Windows 11. There are several ways to access it, but the easiest is to open the Start menu and search for “Control Panel.”
2.What happens to my notifications when Focus Assist is on?
All your notifications still exist. You just won’t be disturbed with sounds or pop-ups. Open your notification window to view everything you’ve missed. You can even check the “Show a summary of what I missed when focus assist was on” box in the Focus Assist settings to view everything you missed.
3. Why isn’t my clipboard saving items?
The Clipboard isn’t turned on by default. While you can still copy and paste individual items, nothing saves (outside of recently used emojis, symbols, and GIFs within the Clipboard) for you to use later unless you turn the feature on. Press Win + V, and you’ll see a button that says “Turn on” if the clipboard hasn’t been turned on yet. Once on, press Win + V again to quickly access your history and choose which item to paste.
4. Why don’t I have Focus Sessions yet?
One of the more useful hidden Windows 11 features is Focus Sessions, but it’s not available to all users yet. However, once released, it’ll let you integrate tasks and even Spotify to stay better focused for set periods, such as setting pomodoros using the Pomodoro Technique. It’s a highly anticipated feature that released in fall 2021 to Dev Channel users, so it could still be a few feature updates away for regular users. Until then, you can try some of these mobile apps for creating your own focus sessions.
Image credit: Unsplash

Crystal Crowder –
Staff Writer
Crystal Crowder has spent over 15 years working in the tech industry, first as an IT technician and then as a writer. She works to help teach others how to get the most from their devices, systems, and apps. She stays on top of the latest trends and is always finding solutions to common tech problems.
Subscribe to our newsletter!
Our latest tutorials delivered straight to your inbox
Sign up for all newsletters.
By signing up, you agree to our Privacy Policy and European users agree to the data transfer policy. We will not share your data and you can unsubscribe at any time. Subscribe