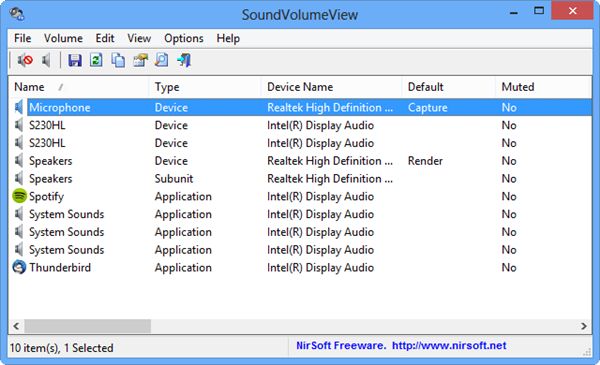
Microsoft has never evolved the built-in sound tools in Windows to be something more useful. That’s where SoundVolumeView comes in handy. SoundVolumeView is a freeware program that allows Windows users to create multiple sound profiles. This lets you switch between profiles as your day changes. Imagine having one sound profile for listening to music at the office, another for watching videos at home and even one that mutes all sound on your PC when necessary. SoundVolumeView can make it possible.
How to Use SoundVolumeView in Windows
1. Download SoundVolumeView from NirSoft’s web site.
2. Extract the contents of the download to its own folder on your PC, then double-click on the EXE included.

SoundVolumeView is simple to use and the UI makes it even easier to get started. You’ll see all applications and devices, including microphones, that utilize sound on your PC. From here, you’re able to turn off sound for individual application or device.
3. Right-click on any device or program in the main window.

4. From here, you can click “Mute Selected Items” to mute the device or program. You can also set specific devices as the default device for your PC, which makes this the quickest way to change default sound devices in Windows.
5. Click “Properties” from the same menu.

This gives you detailed information on the program or device. This can be useful for troubleshooting, updating drivers and knowing specific details about devices and programs on your PC that deal with sound.
6. Once you have gone through each device and program for your sound profile, click “File.”

7. Click “Save Sound Profile.”
You’ll name the profile, choose a place on your computer to save it and click “Save.”
8. Clicking “File” again will allow you to load the sound profile or access it from the Recent Sound Profile sub-menu.
Useful Keyboard Shortcuts for SoundVolumeView
Once you get the basics of SoundVolumeView down, using keyboard shortcuts is the way to take advantage of what the program has to offer.
Here’s some useful keyboard shortcuts to memorize:
- F7 – Mute
- F8 – Unmute
- F9 – Mute/Unmute
- CTRL + 1 – Decrease Volume 1%
- CTRL + 2 – Increase Volume 1%
- CTRL + 3 – Decrease Volume 5%
- CTRL + 4 – Increase Volume 5%
- CTRL + 5 – Decrease Volume 10%
- CTRL + 6 – Increase Volume 10%
These shortcuts will make it much easier to go through each device and program listed in SoundVolumeView’s main window, customize each one and then save a new or existing sound profile.
Conclusion
SoundVolumeView makes it easy for anyone on a Windows PC to create multiple sound profiles and switch between them at will. This is one of the most efficient ways to manage sound profiles in Windows since the OS doesn’t allow users to do it as easily.
Image credit: Volume Control by BigStockPhoto
Melissa Popp has been a freelance writer for over a decade. While she primarily has focused on writing about technology, she’s also written about everything from custom mailboxes to health care to just about anything in between. Melissa is the Content Strategist for Trailerbroker.com, the nation’s leading marketplace for trailers for sale, the Social Media Manager for the best roofing Denver company as well as a Writer here at MakeTechEasier. She’s a proud support of the Denver SEO community and a big fan of online radio.
Subscribe to our newsletter!
Our latest tutorials delivered straight to your inbox
Sign up for all newsletters.
By signing up, you agree to our Privacy Policy and European users agree to the data transfer policy. We will not share your data and you can unsubscribe at any time. Subscribe
