For Windows 8, the Start Screen ticked off many people. Even though Microsoft restored the Start button in Windows 8.1, it is nothing more than a placeholder for the modern Start Screen. While there is a lot of third-party software, like Classic Shell, Start 8, etc., that can bring back the Start button, this software might hog your system resources (especially if you are using low memory systems) and sometimes they come bundled with crapware or adware, which is the last thing you want to install in your computer.
If you don’t want to install yet more software, here is a good trick for you to add a simple Start button option in your Windows 8 system. This will allow you to access all your installed programs without switching back and forth in a modern user interface.
Creating Toolbars in Windows
Creating a custom toolbar for a start menu is very straightforward in Windows. First off, right click on the taskbar and select the option “Toolbars,” and then select “New Toolbar.”

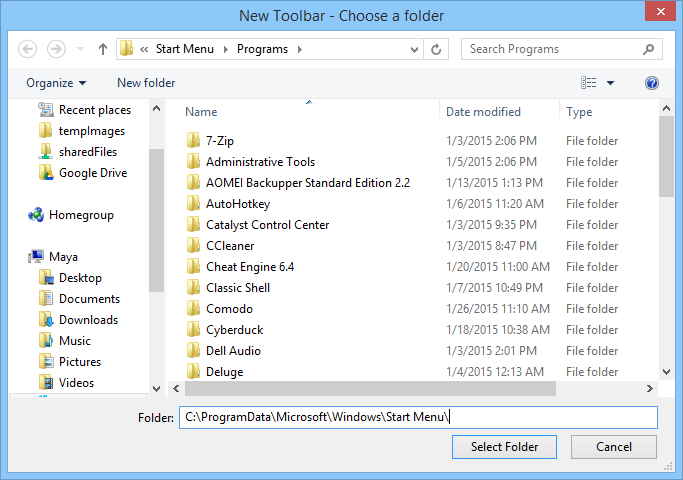
The above action opens up the “New Toolbar” window. Here enter the below folder path and click on the “Select Folder” button. The below folder path represents the “All Programs” option in the Windows 7 start menu.
C:ProgramDataMicrosoftWindowsStart MenuPrograms

As soon as you click on the “Select Folder” button, a new toolbar item named “Programs” will appear on the right hand side of the taskbar. You can access all your installed programs by clicking on the little arrow icon.

If you want to add the entire root folder of the start menu, then create a new toolbar, enter the folder path below and click on the “Select Folder” button.
C:ProgramDataMicrosoftWindowsStart Menu

From this point onward you can access any items in the start menu folder by clicking on that little arrow icon. If you want you can also add your own shortcuts to programs, files, and folders in the respective folder so that you can access them directly from either the start menu toolbar or the programs toolbar.

If you ever want to remove the toolbars, right click on the taskbar, select “Toolbars” and then deselect the toolbar items you want to remove.

That’s it, you have successfully removed the custom toolbars from the taskbar. If you ever want to enable the toolbar again, you need to create it from scratch.

That’s all there is to do, and it is that easy to create new toolbars that can replace the start screen and provide a better and quicker access to your programs and other stuff. The good thing about the custom toolbars feature is that you can create a wide range of toolbars for a variety of needs. Sure, the toolbars don’t look as good as the regular Windows start menu, but it gets the job done, and there will be one less program in your system.
Hopefully that helps, and do comment below sharing your thoughts and experiences about using custom toolbars as a replacement for the start menu.
Vamsi is a tech and WordPress geek who enjoys writing how-to guides and messing with his computer and software in general. When not writing for MTE, he writes for he shares tips, tricks, and lifehacks on his own blog Stugon.
Subscribe to our newsletter!
Our latest tutorials delivered straight to your inbox
Sign up for all newsletters.
By signing up, you agree to our Privacy Policy and European users agree to the data transfer policy. We will not share your data and you can unsubscribe at any time. Subscribe
