Internet speed is one of the most important traits of a computer – so important, that certain operating systems like Chrome OS are now almost completely dependent on it. Windows 10 isn’t quite at that point yet, but you can still do things within it to make your Web experience that much speedier and smoother. Here we’ll take a look at how you can use Windows to improve the speed of your web browsing.
Also read: Fix ERR_CONNECTION_TIMED_OUT Error When Browsing in Windows
1. Turn off P2P Delivery Optimization in Windows 10
So here’s one of those things that you probably didn’t know about Windows 10, and it sounds kind of scary. There is an option in Windows 10 that may be switched on by default which ties your PC into a Microsoft-handled P2P network, which uploads your installed Windows updates and distributes them to speed up updates on your home network and for strangers online.
Locally, this means that if you have a Windows update installed on one PC, bits of it can be fed through to a Windows update on another PC on your network, saving bandwidth. The bad side to this is the option that does the same thing but for other Windows users across the whole Internet, tying your PC into a P2P network that helps Windows update download speeds for strangers but hogs your bandwidth.
So you should turn it off.

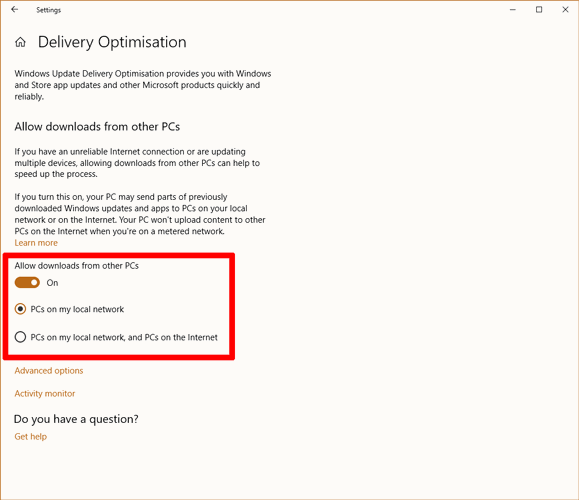
Go to “Settings -> Update & Security -> Advanced options -> Delivery Optimization.” Here you should either switch the “Allow downloads from other PCs” toggle to Off, or leave it On but make sure you select “PCs on my local network.”
2. Disable or Enable Windows Auto-Tuning
Windows Auto-Tuning is one of those features that has caused vastly varying results for users in the way of Internet browsing speed. It’s a feature that dynamically adjusts the buffer size and latency for TCP-based applications communicating with the Internet.
Even though Microsoft has said that disabling this will slow down your Internet speed, users with older hardware and weaker connections have reported that disabling it can improve Internet speeds. Conversely, other users (usually on powerful machines) who reported that it was disabled have said that enabling it increased their Internet speeds vastly.
The following shows how to enable and disable auto-tuning.
Open an elevated command prompt window (right-click command prompt in the Start menu and click ‘Run as administrator’), and enter the following command:
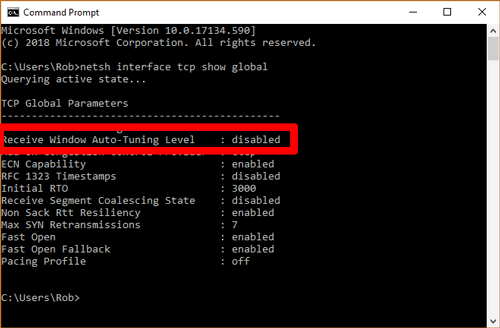
netsh interface tcp show global
Check to see what it says in the highlighted area in the image below.
 If it says ‘normal,’ and you want to disable it, type the following:
netsh int tcp set global autotuninglevel=disabled
If, on the other hand, your Auto-Tuning is disabled and you want to enable it, type the following command:
netsh int tcp set global autotuninglevel=normal

Now, run a speed test to see if it’s made a difference. If it’s sped things up, then great! If it’s slowed things down, then just do the reverse command to get things back to normal.
3. Check Your Resource Monitor for Network-Hogging Processes
This is a good one. You can quickly and easily check which processes and apps on Windows 10 are using the most resources in terms of CPU, Memory and – you guessed it – Network bandwidth. You can find all this stuff out in something called Resource Monitor.
To open Resource Monitor, hit Win + R and enter resmon into the box. In the Resource Monitor, click the Network tab to see which processes are using the most bandwidth.

You can see in my list that the gaming platform Origin is hogging a lot of bandwidth. (I didn’t realise it chose to start up each time I booted into Windows.) You can end any processes using too much bandwidth by checking the boxes for each one you want closed, right-clicking one of them, and clicking “End process.”
4. Turn Off Background Apps and Processes
Speaking of apps that run in the background, Windows apps you download from the Microsoft store, as well as the myriad Windows apps that come pre-installed on your system are among the biggest culprits. By default, these apps are allowed to listen to incoming Internet communications all the time so that they can receive updates.
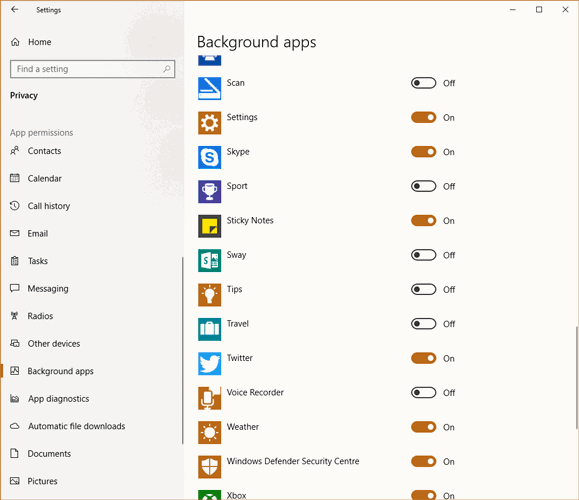
You can find out how to uninstall preinstalled Windows apps here, but a more lightweight solution is to just stop them from running in the background. To do this, go to “Settings -> Privacy,” then select “Background apps” in the pane on the left.

Here you’ll see a long list of apps that are running in the background. Switch off every single app you don’t want on (you may find there are twenty or more) to ease some strain of your bandwidth and speed up your browsing.
Conclusion
These are some of the little tricks you can do to speed up your web browsing (and Internet speeds as a whole) in Windows 10. Remember that there are also things you can do in individual browsers to improve performance. To find out more, check out our lists of the best Chrome flags and about:config Firefox tips.
Tech writer at Make Tech Easier. Enjoys Android, Windows, and tinkering with retro console emulation to breaking point.
Subscribe to our newsletter!
Our latest tutorials delivered straight to your inbox
Sign up for all newsletters.
By signing up, you agree to our Privacy Policy and European users agree to the data transfer policy. We will not share your data and you can unsubscribe at any time. Subscribe
