Windows XP came with the Show Desktop icon, a component that many users got used to. It helped as a make easy tool for accessing the desktop while working on some other open window. On clicking on the icon, the window got minimized and the desktop appeared for easy access to the user.
However, Microsoft came up with a different alternative in Windows 7, one that is not as user friendly as it was in Windows XP. We’ll see why it is so and how we can fix this up.

The Show Desktop Alternative in Windows 7
In Windows 7, the “Show Desktop” functionality is located in a small rectangular area at the far right corner of the taskbar, just beyond the time and date display. Unlike the clearly labeled icon in Windows XP, this area lacks any visible label or icon, making its purpose less obvious.
Hovering your mouse over this section reveals its function, and clicking it minimizes all open windows, providing quick access to the desktop. Clicking it again restores the windows to their previous state. While this implementation is functional and streamlines the taskbar’s appearance, its subtle design often causes it to be overlooked by users unfamiliar with its placement or purpose.

Recreating the Show Desktop Icon in Windows 7
If you prefer the ease and familiarity of the Show Desktop icon from Windows XP, you can recreate it in Windows 7 for quick desktop access. Here’s how to do it:
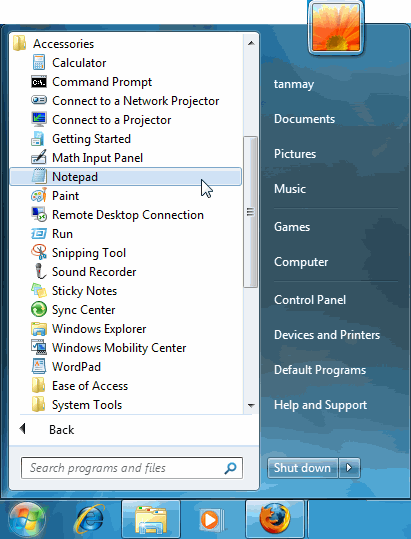
- Open the Start Menu and navigate to All Programs.
- Go to Accessories and select Notepad.
This method allows you to restore the classic icon functionality, making it easier to minimize all windows with a single click.

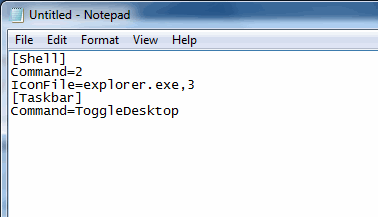
A Notepad window will open. Copy and paste the following code into the Notepad file:
[Shell]
Command=2
IconFile=explorer.exe,3
[Taskbar]
Command=ToggleDesktop
Important: Ensure there is no space between the comma (,) and the number 3 in the third line of the code.

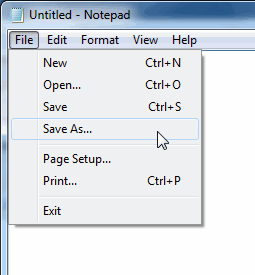
In the Notepad window, click on the File menu and choose Save As…
Name the file Show Desktop.scf and set the location to Desktop for easy access.

Once saved, a file named Show Desktop.scf will appear on your desktop. With this step, the creation of the Show Desktop icon in Windows 7 is complete.

Using the Show Desktop Icon
Leaving the created file on your desktop isn’t practical, as you’d need to minimize all windows to use it. For easier access, you can either pin the file to the Start menu or add it as a toolbar on the taskbar.
Pin to Start Menu: Simply drag the file onto the Start button. Windows will automatically pin it to the Start menu for quick access.

Adding the Show Desktop Icon to the Taskbar as a Toolbar
To make the Show Desktop icon easily accessible from the taskbar, follow these steps:
- Create a new folder anywhere on your computer and name it Show Desktop.
- Copy the Show Desktop.scf file you created earlier into this folder.
- Right-click on the taskbar, then go to Toolbars > New toolbar.
- Navigate to the folder containing the Show Desktop.scf file, select it, and click OK.
This will add the Show Desktop icon as a toolbar in the taskbar for convenient access.

You can now effortlessly access your desktop while working with open windows. Simply open the Start Menu and select Show Desktop, or click on the Show Desktop icon in the taskbar toolbar. This setup replicates the familiar functionality from Windows XP, making it much easier to navigate to your desktop in Windows 7.
