Do you know of the traceroute or “tracert” command in Windows? It’s a tool that allows you to see the path your connection takes when heading to a specific destination. While it’s very interesting to see where your packets go when connecting to a website, its primary use is to see where along the path packets are being lost.
What Is Traceroute?
Before we jump into how traceroute can be used, let’s talk about what traceroute does to begin with. When tracing a route, you’re monitoring the path a packet takes and seeing where it ends up. If you’ve ever ordered a parcel with tracking available, you’ve probably watched (with excitement!) the path the package took to your door. Traceroute is a similar process, except we can’t put a tracking device on a packet of data. We need to get a little more inventive to track data packets.
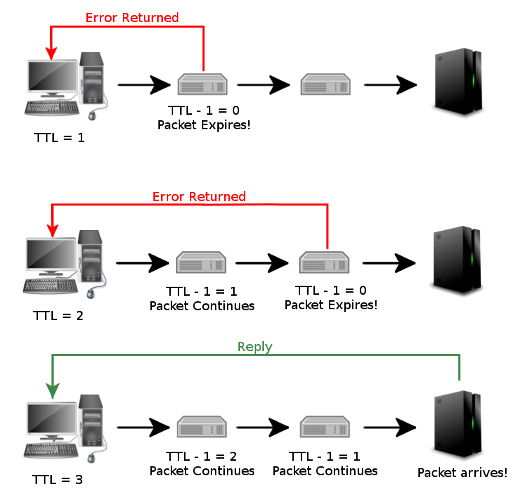
If a packet expires while being held by a router, the router calls back to where the packet came from to say the packet expired. While we can’t watch a packet go around a network directly like a tracked parcel, we can send out packets that expire on each router as it arrives. The routers send back an error message, and we can analyse the locations that are reporting a dead packet. Then we can use this to estimate where the packet is going.
To do this, we use a property of packets called TTL. TTL means “Time To Live,” and it dictates how many routers a packet can arrive at before it expires. When a router handles a packet, it decrements the TTL by one before passing it on. If the TTL reaches 0, the packet expires, and the router reports its expiration. During a traceroute, a packet with TTL of 1 is sent out. This is handled by the first router and immediately expires. The router sends back its error, and traceroute logs its location. Traceroute then sends a packet of TTL 2 which makes it past the first router but expires on the second. Then a packet with a TTL of 3 is sent, and so on.
An Example of Traceroute in Action
Let’s take a look at an example of what happens during a traceroute.
Computer sends packet at TTL 1 -> Router A decreases by 1, to 0 -> TTL is 0, so the packet dies -> Router A reports its location
Computer sends packet at TTL 2 -> Router A decreases by 1, to 1 -> Sends to Router B -> Router B decreases by 1, to 0 -> TTL is 0, so the packet dies ->Router B reports its location
Computer sends packet at TTL 3 -> Router A decreases by 1, to 2 -> Sends to Router B -> Router B decreases by 1, to 1 -> Sends to Server -> Server sends back confirmation of connection.

You can see that we’re already building an idea of where our packet is going from this. Once traceroute receives an error from the destination, it then stops the traceroute, and you can analyse where the packet went. Very useful!
How to Perform a Traceroute
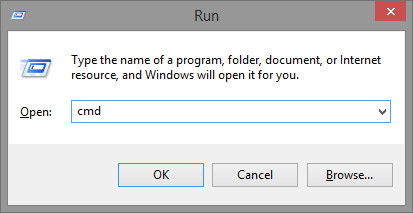
So, let’s go ahead and look at how to do a traceroute. First, bring up your command window. This can be done by clicking Start, then typing cmd in the search, then pressing Enter. You can also bring up the command window by pressing the Windows Key+R, then typing cmd in the new window.

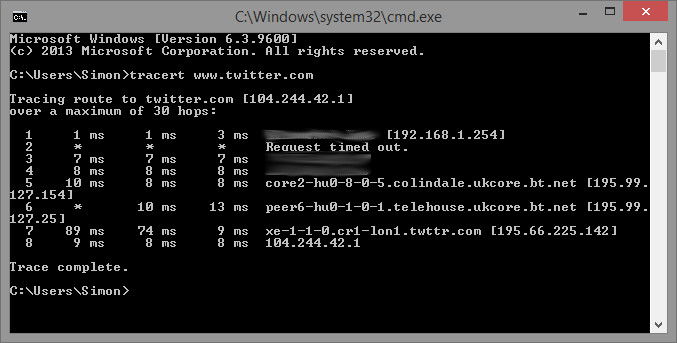
Here, type tracert then a destination, either as a URL or an IP (www.twitter.com or 104.244.42.1). Press Enter. The traceroute will start logging the connection toward the destination you set. Sit back and watch it go!

How to Use Traceroute to Diagnose Problems
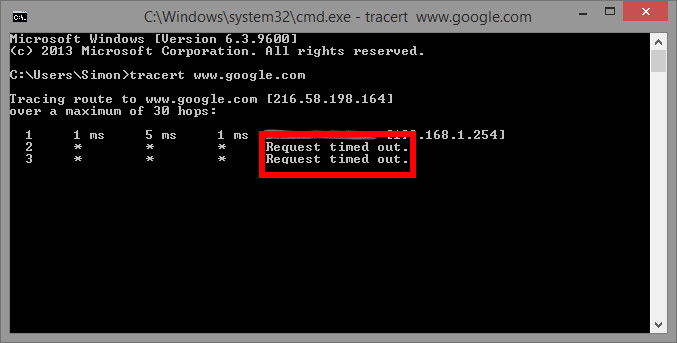
Now that we know what traceroute does, we can use it to discover where connections are being dropped. Imagine if we sent out packets with increasing TTL, but when we get to a specific TTL level, we don’t receive any error messages from the next router at all. This likely means the next router isn’t receiving the packet whatsoever. The computer will wait for the router to talk to it; if it fails to receive an error, it will report with a “Request Timed Out.”

How Is This Useful?
When a connection dies, you can use traceroute to see where along the route it’s dying. If the packets aren’t making it out of your router before timing out, something’s going wrong with your router. If the packet gets out of your router successfully but dies somewhere in the exchange, it’s likely to be an ISP problem.
When you’re having trouble connecting to a website, you can tell traceroute to check the connection. If you’re getting zero errors from your router or exchange, but the timeout happens later along in the chain, it’s probably not your router or ISP at fault.
One thing you should note when using traceroute – packets don’t always take the same route every time they go to a specific website. Make sure to keep that in mind when performing a traceroute and trying to draw conclusive evidence from it.
Conclusion
While a fun tool to see where your packets go, traceroute can also be used to see where they’re faulting. Now that you know how traceroute works, you can use it to better diagnose where along the connection the packets are being lost and where the problem may lie. Good luck with your diagnostics!
Simon Batt is a Computer Science graduate with a passion for cybersecurity.
Subscribe to our newsletter!
Our latest tutorials delivered straight to your inbox
Sign up for all newsletters.
By signing up, you agree to our Privacy Policy and European users agree to the data transfer policy. We will not share your data and you can unsubscribe at any time. Subscribe
