Do you have top-secret or sensitive files you want to encrypt? If you are uploading or syncing the files to third-party cloud storage services, it’s recommended to do that for security purposes. CloudFogger allows you to encrypt and protect your data for free. While we can also encrypt files using EFS for Windows users, here is another way to do it regardless of the system you’re using. Plus, it’s also available for Android and iOS devices.
CloudFogger encrypts not just Dropbox files but also “Google Drive and others” as stated in the official website. It’s using a 256-AES (Advanced Encryption Standard) and is available on Mac OS X- and Windows-powered computers.
1. Download CloudFogger and install it.

2. Launch the app and you’ll see the three options. In this tutorial I created an account to fully access the features.

3. After registration you will receive a confirmation in your e-mail box and will be asked to validate your account (a link will be given to you).

4. Launch the app, and log in using the details you’ve created.
How does it work?
Note: in this tutorial I’m using Mac OS X v.10.10.
CloudFogger is simple to use and comes with straightforward features; indeed, anyone can use it and won’t have a hard time figuring out how it works. Let’s say you want to encrypt a file.
Click the “Folder UP” or the search folder button beside the URL bar to find the folders or files you wish to encrypt.

Keep in mind that you cannot encrypt the folder at once like what I did in this tutorial. You need to select the exact document (.doc), or photo (.jpg) for example. When I select the July folder and click the “Encrypt” button, nothing happens. So you need to select the exact file(s). For example, we will encrypt one of my 500 Words per Day files as seen below.

An encrypted file will have the dot-cfog extension which is accessible only with the unique keys or by the CloudFogger decrypt option.

However, I found two caveats while using the Mac version. The first is that it’s still in beta, and I experienced a few glitches while navigating it. By renaming the file back to its original extension, (by deleting the <.cfog>), you can open the file in a snap and it will be decrypted. So if you want to take a look how it works in Windows, download the client that is more stable.
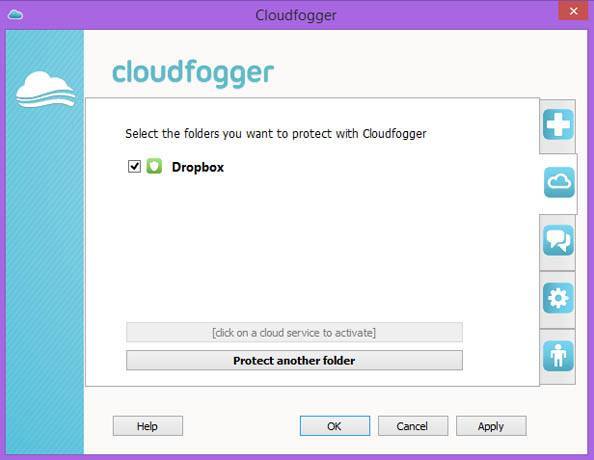
Here is what it looks like in Windows (Windows 8.1 powered-computer). When you launch it, it will prompt you to add the folder you wish to encrypt.

And any file that is not included in the path; just right click, then select CloudFogger and choose “Fogg file(s).”

It also supports file sharing, while each file has a unique key for decryption.
How to Encrypt your Dropbox and other files
Once you install CloudFogger, encrypting the files is simple. If you want to encrypt your Dropbox files, click the (+), and it will prompt you to add the folders you wish to protect.

Click the “Protect another folder” option to add a path (Google Drive, OneDrive, or local folders). The syncing and encrypting features are automatic when you add a cloud service.
Let us know what you think of CloudFogger. What other free encryption tools that have similar features do you use?
Krisette is a technology writer who loves to cover disruptive technologies, trends, and a myriad of rumors and news updates. To satiate the inconsolable longing to feed her gadget addiction, she simply writes and tinker her gadgets for reviews. You may follow her blurbs, too! @krisettecapati
Subscribe to our newsletter!
Our latest tutorials delivered straight to your inbox
Sign up for all newsletters.
By signing up, you agree to our Privacy Policy and European users agree to the data transfer policy. We will not share your data and you can unsubscribe at any time. Subscribe
