Before setting up RAID in any capacity, here are some prerequisites you need to have on hand:
- Two or more hard drives of the same size and speed. The same brand or model isn’t necessary, though it is an easy way to ensure that the specs are all matching. Combining an SSD with a hard drive, for instance, will merely make the SSD run as slow as the HDD and limit the storage space to the SSD’s relatively tiny capacity, effectively ruining the benefits of both options.
- You will need a compatible operating system. This guide will cover the options available in Windows 7 and 8; however, it should be noted that people running Windows Server will have access to more RAID array options than home users.
- (Optional) An external storage device for making a backup, should anything go wrong.
Creating a System Backup (IMPORTANT)
First thing’s first; make a backup. RAID is not a substitute for having a backup drive, and setting up RAID can be a risky process – do not risk your personal information and computer stability unnecessarily. We have guides on creating system backups for both Windows 7 and Windows 8.1.
Preparing Your Drives
Make sure that all your hard drives are properly hooked up and secured into your computer. If the drives you want to use for your RAID array are already formatted or in use, you’re going to need to wipe the drives clean before setting them up for RAID. To do this:
1. Hit the Windows key and type “Disk Management,” then select “Create and format hard disk partitions.”
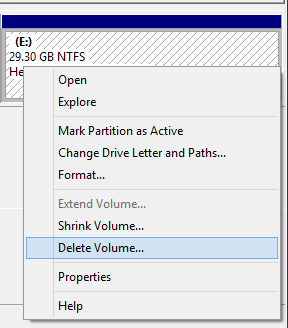
2. Right click the drive(s) you intend to use for your RAID array, and then select “Delete Volume.”

Once all the drives you intend to use are displayed as unallocated space, you’re ready to continue. Note that you shouldn’t be using your primary hard drive (the one with your operating system) in a RAID array at this point.
Choosing Your RAID Array
First, you’ll need to know what versions of RAID your OS supports.
Windows 7 has:
- RAID 0 – Increases performance by spreading data across multiple drives. This technique is called “data striping.” (Pro/Ultimate Only)
- RAID 1 – Mirrors the disks, making all their contents identical. Provides a performance boost in read times, but write times remain the same.
- JBOD – Stands for “Just A Bunch Of Disks;” just treats multiple hard drives as one. Not technically a RAID configuration.
Windows Server has all of these options as well, with the addition of RAID 5, which requires three or more disks and offers superior performance and fault tolerance. Consumers usually prefer 0 or 1, however.
Windows 8 has RAID 0, 1 and 5 equivalents in the form of Storage Spaces, which we will elaborate on soon.
Once you’ve decided what version of RAID you want, it’s time to get it set up.
Setting Up RAID (Windows 7)

With the unallocated space you’ve created in Disk Manager, right click and select New Spanned, Striped or Mirrored Volume.
Spanned Volume is JBOD, combining multiple disk’s storage into one. Use this if you want more storage.
Striped Volume is RAID 0, which uses your combined drive for a performance increase and a storage space. Use this if you want more speed out of your drive.
Mirrored Volume is RAID 1, which boosts read time performance and clones the drives to each other without expanding write time or storage. Use this if you want a speed boost and added security but don’t need more storage.
After selecting your option, you will need to follow Window’s instructions by assigning a drive letter of your choice and formatting the drives in question. No settings need to be changed here, but you will need to add the disks you want to use for your array at this time.
Once you finish, you’re done. If you check “My Computer” or “Disk Management,” you should see a single, new drive displayed based on the RAID option you selected.
Setting Up RAID (Windows 8)
The steps above can also be performed in Windows 8 through “Storage Spaces” if you don’t want to use Disk Management. Storage Spaces aren’t technically RAID, but they work in essentially the same manner – they offer Simple, Mirror and Parity spaces, which are each equivalents to RAID 0, RAID 1 and RAID 5, respectively.
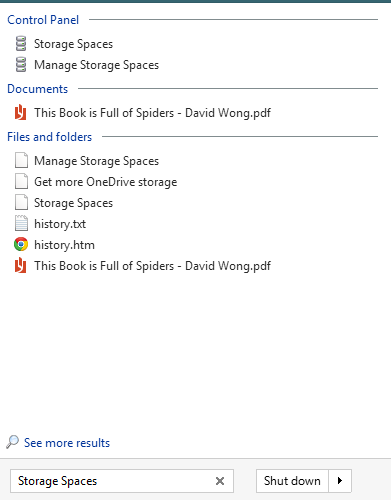
To open “Storage Spaces,” press the Windows Key, type in “Storage Spaces,” and select it.

Once in Storage Spaces, you need only select “Create new pool and storage space,” then the drives you want in your new array.
After this, you’ll need to select what kind of Resiliency you want: Simple (RAID 0), Two/Three-way Mirror (RAID 1), or even Parity (RAID 5).
Once you’ve finished selecting your options, just click “Create storage space,” and you’re done!
I’m a longtime gamer, computer nerd, and general tech enthusiast.
Subscribe to our newsletter!
Our latest tutorials delivered straight to your inbox
Sign up for all newsletters.
By signing up, you agree to our Privacy Policy and European users agree to the data transfer policy. We will not share your data and you can unsubscribe at any time. Subscribe
