We previously went over how to create a system image in Windows. However, if you upgraded to Windows 8.1, you may have found out the toll isn’t where it used to be. If you want to use the System image tool in Windows 8.1, here’s where to find it:
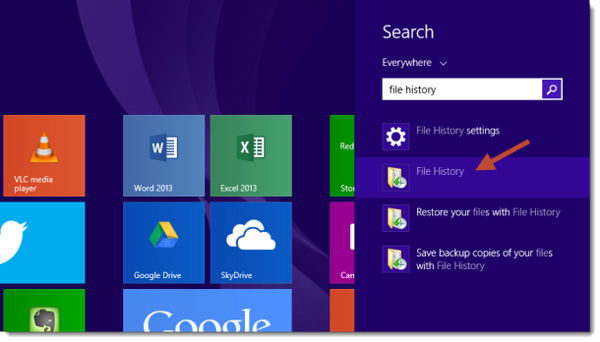
1. Navigate to the Windows 8.1 Start screen, and search for “File History.” Select it. You can also access it through the Control Panel by going to “System -> Security and File History”.

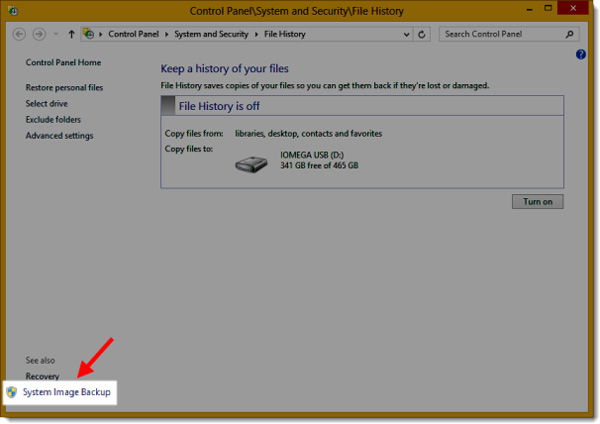
2. Select “System Image Backup” from the lower left-hand corner of the window.

3. Create a system image backup.
The system image tool present in Windows 8 works the same as it did in Windows 8.1, so just select where you want to save the backup, and then simply click “Start Backup.”
Whenever you need to use the system image for any reason whatsoever, simply navigate to “Settings -> Change PC Settings -> Update and Recovery -> Recovery”, and then select the “Restart Now” option under Advanced Setup. When it boots up to the menu, go to “Troubleshoot -> Advanced Options -> System image recovery”.
You can also use a Windows USB flash recovery drive, if you’re unable to boot into Windows.
Shujaa Imran is MakeTechEasier’s resident Mac tutorial writer. He’s currently training to follow his other passion become a commercial pilot. You can check his content out on Youtube
Subscribe to our newsletter!
Our latest tutorials delivered straight to your inbox
Sign up for all newsletters.
By signing up, you agree to our Privacy Policy and European users agree to the data transfer policy. We will not share your data and you can unsubscribe at any time. Subscribe
