Each successive version of Windows has many features that poke into things you’ve opened recently, such as the jump lists that allow you to open things you’ve been working on with certain applications. As great as they are, these features also present serious headaches to those who put a high price on their privacy. If you truly want to clear all of your recent file history in Windows, this guide shows some options!
Content
- Clear Recent Files from File Explorer
- Delete Histories from The Registry
- Disable Jump Lists From Settings
Clear Recent Files from File Explorer
The File Explorer is the “nerve center” for everything you’ve accessed. If you want to clear all of your recent files from Windows, this is probably where you should start.
Your history will show up in the left panel and in the Home screen, underneath the Quick access section.
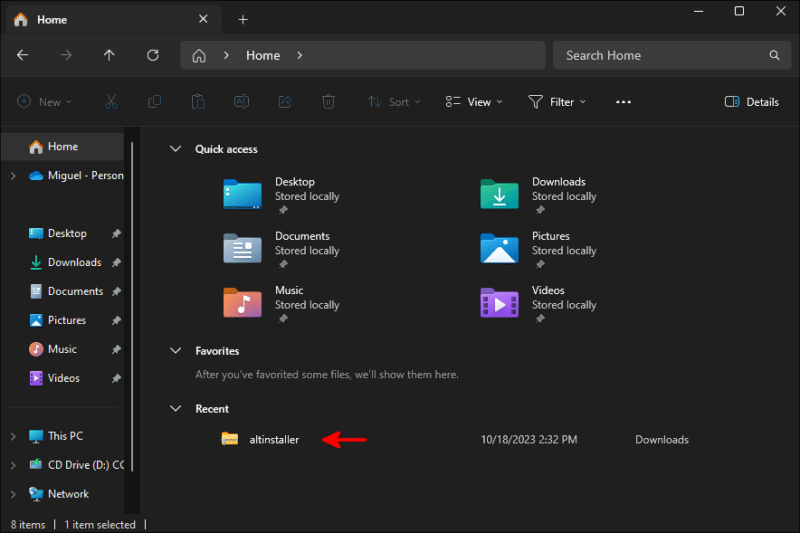
If you just want to clear one item, right-click on it, then click Remove from Recent. But you’re probably here to permanently erase your history.
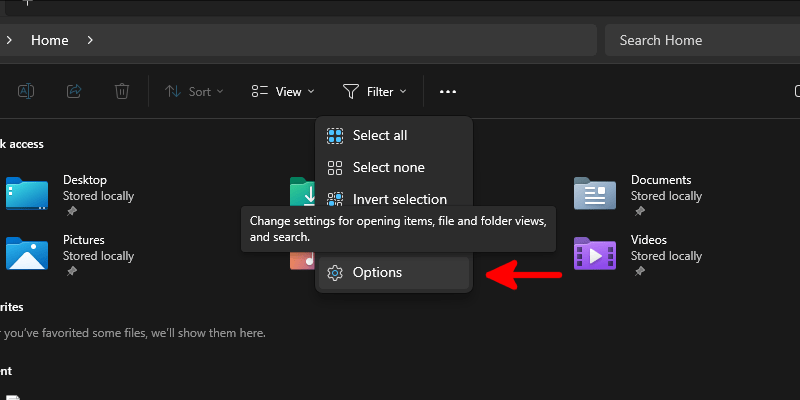
If that’s the case, click on the three dots close to the top of your file list, then click Options.
Inside Windows Explorer’s options dialog in the General tab, deselect all of the options near the bottom under the Privacy section, then click the Clear button next to Clear File Explorer history.
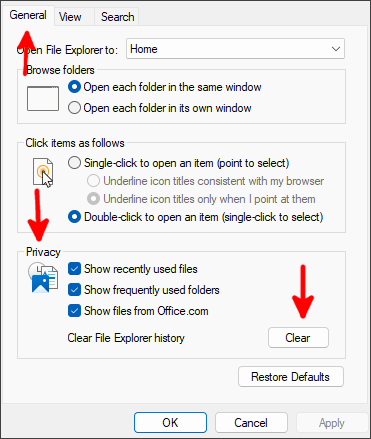
Click OK and watch your history vanish in real time!
Delete Histories from The Registry
Besides your file explorer’s Recent list, your registry also stores keys that contain the history of what you typed in its URL bar, as well as all of the commands you’ve run out of the Run window (Win + R).
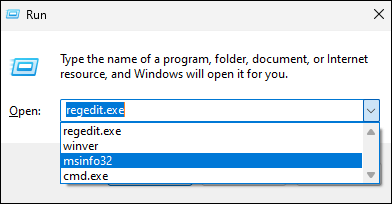
To access the registry, head to your Start menu, type regedit, then press Enter.
Navigate to:
HKEY_CURRENT_USERSoftwareMicrosoftWindowsCurrentVersionExplorer
Within the Explorer registry section, find a key with the icon of a folder called RunMRU. Right-click it and delete it.
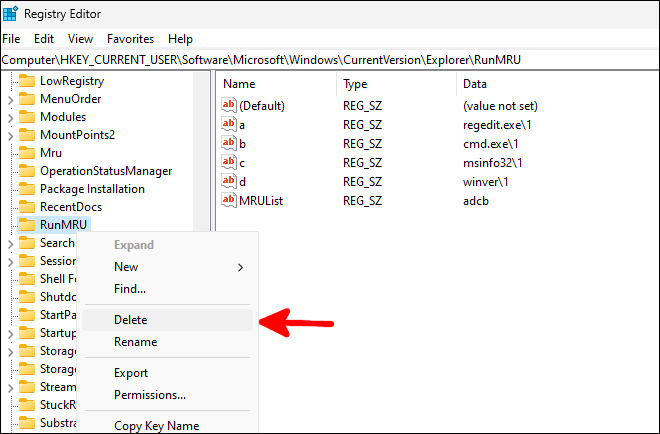
This will immediately vaporize all of your command history.
To delete your path history in the file explorer, scroll down to TypedPaths, and delete that one just like you deleted RunMRU.
If you want to introduce some automation in this process, create a new text file, open it in Notepad, and add the following to it:
To clear your command history:
reg delete HKCUSOFTWAREMicrosoftWindowsCurrentVersionExplorerRunMRU /F 2>nul
To clear your path history in the file explorer:
reg delete HKCUSOFTWAREMicrosoftWindowsCurrentVersionExplorerTypedPaths /F 2>nul
After you’ve added the lines you wish to add to your batch file, save it as deletehistory.bat or whatever you’d like to call it, and make sure to select All files under Save as type.

Once saved, just double-click the file, and let it fire. It will open a command window and quickly disappear after it’s done deleting your history entries.
If you want this batch file to run every time you start your system, open the Run window and run shell:startup. This takes you to the folder that contains all of the scripts and goodies you run on boot. Drag your newly-made batch file there, and enjoy the automated removal of your history every time you log in to Windows!
Should you ever want to delete your history on demand, you’ll need to access the batch file, and run it manually. For your convenience, you may want to create a copy of it in a more easily accessible place than your startup directory.
Disable Jump Lists From Settings
Beyond the histories stored in your registry and file management utility, you also have some that Microsoft stores specifically to provide recommendations in your Start menu, jump lists, and other quick navigation features that the file explorer has.
To get rid of these, enter your Settings app through your Start menu, and click on Personalization in the left panel.
Among the options available to your right, scroll down, and select Start.
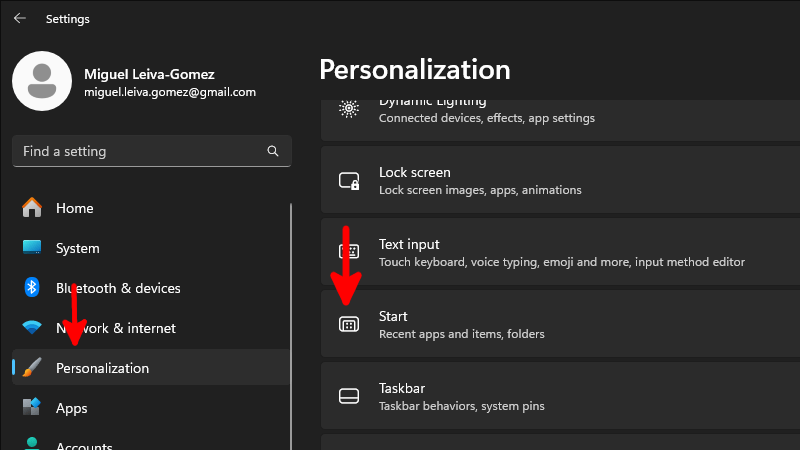
Within this menu, toggle off the option to Show recently opened items in Start, Jump Lists, and File Explorer.
That’s it! You can close the Settings window, and go about your day. Windows will delete whatever history you have in the areas you just disabled, and stop collecting it to provide recommendations.
If you’re using Windows 10, the procedure is still the same, though the interface will look a little different than Windows 11.
Want More Privacy?
If you plan to install Windows on a system that doesn’t sit in a very trustworthy environment (public workplace, a living situation with roommates you aren’t entirely familiar with, etc.), you may want to consider adding another layer of privacy to it by installing it without a Microsoft account.
Don’t forget to enhance your experience even further by applying these privacy settings for Windows that add more protection.
All screenshots and images by Miguel Leiva-Gomez.
Miguel has been a business growth and technology expert for more than a decade and has written software for even longer. From his little castle in Romania, he presents cold and analytical perspectives to things that affect the tech world.
Subscribe to our newsletter!
Our latest tutorials delivered straight to your inbox
Sign up for all newsletters.
By signing up, you agree to our Privacy Policy and European users agree to the data transfer policy. We will not share your data and you can unsubscribe at any time. Subscribe
