
The Microsoft Compatibility Telemetry is a process that collects information about how the device and its associate programs work. If you’ve noticed Microsoft Compatibility Telemetry high CPU usage in Task Manager, this article will help you troubleshoot the issue. One of the reasons this can happen is the “CompatTelRunner.exe” file that runs the telemetry process. Read this tutorial to learn what to do if this happens.
Good to know: spotted a process named SysMain in Task Manager but don’t know what it is? Find out in our post.
Content
- 1. Disable Microsoft Compatibility Telemetry via Task Scheduler
- 2. Limit the Amount of Data Microsoft Can Collect
- 3. Refresh the Telemetry Service
- 4. Replace CompatTelRunner.exe
- 5. Decide When Telemetry Service Runs at Full Capacity
- 6. Disable Microsoft Compatibility Telemetry via Group Policy Editor
1. Disable Microsoft Compatibility Telemetry via Task Scheduler
The telemetry service sends data to Microsoft on a regular basis, with the stated aim to improve your overall system performance and experience. But since the process can cause acute performance slowdown on your PC and collects your private information, it’s a good idea to disable it. Removing it entirely from your computer is not recommended, as the process is part of your Windows OS and digitally signed, so its absence may cause system stability issues.
Note: the method outlined below may not work on your PC, depending on the version of Windows you’re running. Microsoft has worked around this solution in recent updates, in which case you should give the Group Policy solution a go instead. But first, try these steps.
Open Task Scheduler from Windows Search, and navigate to Task Scheduler Library -> Microsoft -> Windows -> Application Experience in the left side menu.
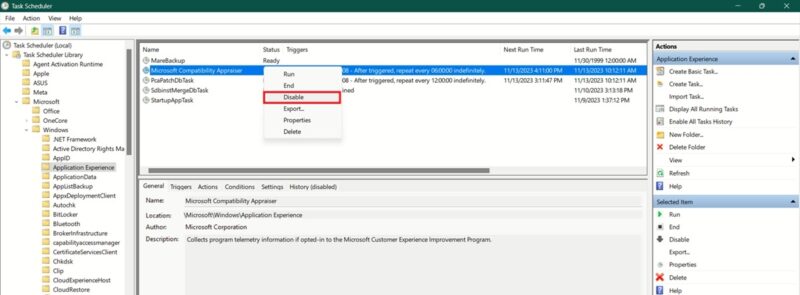
On the right side, look for the Microsoft Compatibility Appraiser, right-click it, and select Disable from the context menu. Confirm that you wish to disable the process.
Doing this should have the effect of forcibly shutting down Microsoft’s Telemetry Service process, effectively blocking Microsoft from collecting any data regarding issues that affect your PC.
Tip: get rid of ads in Windows with these handy tips.
2. Limit the Amount of Data Microsoft Can Collect
You can block data-sharing services from transmitting (some) information to Microsoft via Settings. Doing so will hopefully reduce Microsoft Telemetry Service activity significantly.
Navigate to Settings -> Privacy & security -> Diagnostics and feedback.
To limit Microsoft’s access to your data, disable the toggle next to Send optional diagnostic data. Also, expand Tailored experiences, and turn off the Let Microsoft use your diagnostic data toggle.
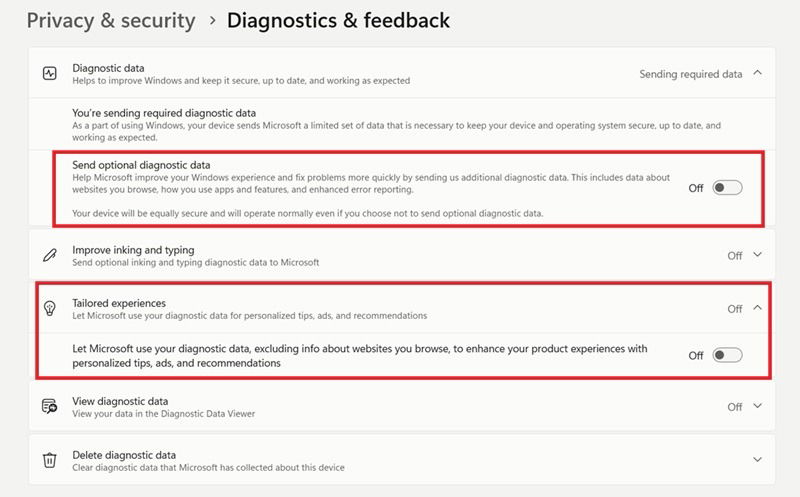
You can also delete the data that Microsoft has collected so far by pressing the Delete button next to Delete diagnostic data. But before you rush to wipe out this information, keep in mind that doing so may deprive you of tailored updates and security fixes that Microsoft provides for improved system efficiency and security. Do this as a last resort, in case the Microsoft Telemetry Service high CPU usage issues won’t go away.
Note: for those with a Microsoft account, you may also want to check your Privacy dashboard for additional diagnostic data to delete.
If you’re using Windows 10, go to Settings -> Privacy -> Diagnostic & feedback. Opt for the Required diagnostic data option to send only minimal info about the device. With the Optional diagnostic data option, your device will send much more information, including info about device health, activity and enhanced error reporting.
3. Refresh the Telemetry Service
It’s possible that the Microsoft Telemetry Service has run into some technical difficulties that are now causing the abnormally high CPU usage. In such cases, it can help you refresh the Telemetry Service.
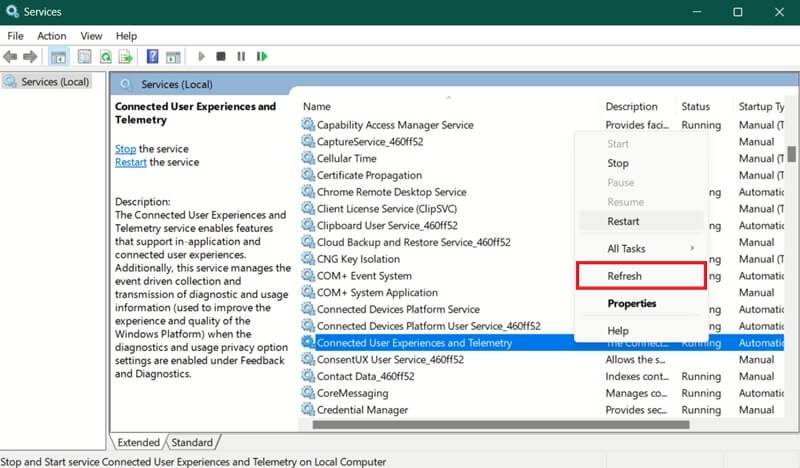
Open the Service app on your PC via Windows Search.
Scroll down until you find the Connected User Experience and Telemetry service. Right-click it, and select Restart from the context menu.
FYI: learn how to access the WindowsApp folder in Windows.
4. Replace CompatTelRunner.exe
As explained above, “CompatTelRunner.exe” is responsible for running the telemetry process. If you suspect corruption, the first step to take would be to run an SFC scan. This should automatically repair the file, but if it does not work, the other solution would be to replace the file yourself.
Open a Command Prompt with administrator rights, type the following command, and press Enter:
takeown /f C:WindowsSystem32CompatTelRunner.exe

This will give you ownership of the “CompatTelRunner.exe” file, allowing you to delete it. Next, copy a healthy “CompatTelRunner.exe” from another device and bring it over to your PC. Naturally, you’ll have to take ownership of the file before you can copy it.
5. Decide When Telemetry Service Runs at Full Capacity
This is a less drastic measure that you should opt for if you don’t want to completely disable Microsoft Telemetry Service. Instead, specify when and for how long to have the process run at full capacity so that it doesn’t take a toll on your system’s resources.
Open Task Scheduler again, and navigate to Microsoft Compatibility Appraiser, as shown in the previous section. Double-click it, switch to Triggers, and double-click the One time trigger.
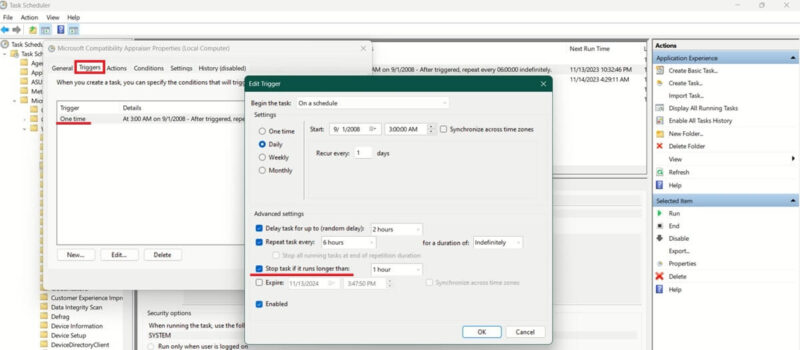
Configure the Telemetry process to run whenever you’re not using your computer. Alternatively, activate the Stop task if it runs longer than, and set a period of time when the process can run on your PC.
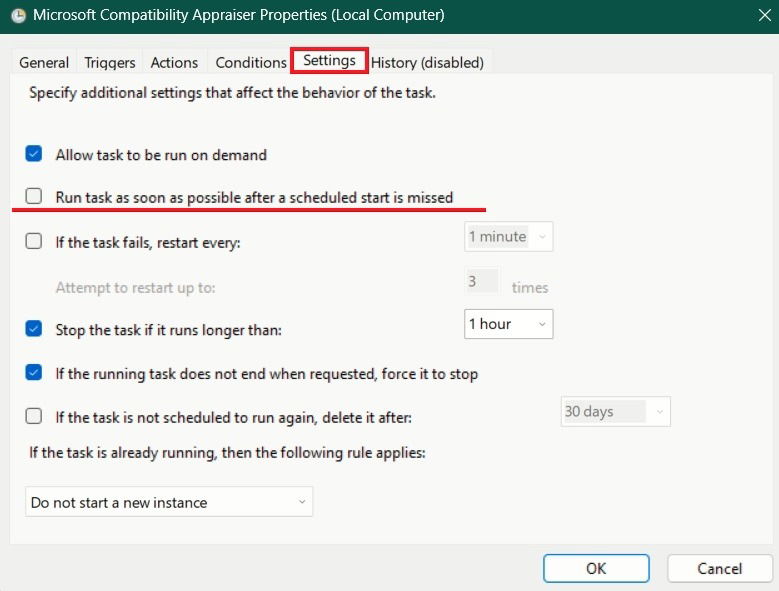
Finally, go back to the Properties window, and switch to Settings. Uncheck the Run task as soon as possible after a scheduled start is missed. This stops the process from running if it misses a scheduled start.
Tip: check out how to back up Local Group Policy Editor settings in Windows.
6. Disable Microsoft Compatibility Telemetry via Group Policy Editor
If you’ve tried all of the above, and the Microsoft Telemetry Service CPU usage continues to be abnormally high, you can attempt to disable the process using the Group Policy Editor.
Type “group policy” in Windows Search, and select the Edit group policy result.
Note: Group Policy Editor is available in Pro/Enterprise versions of Windows. If you have the Home edition, you will need to enable the Group Policy Editor first.
Navigate to Computer Configuration -> Administrative Templates -> Windows Components -> Data Collection and Preview Builds in the left side menu. On the right, click on Allow Diagnostic Data (on Windows 11) or Allow Telemetry (Windows 10).
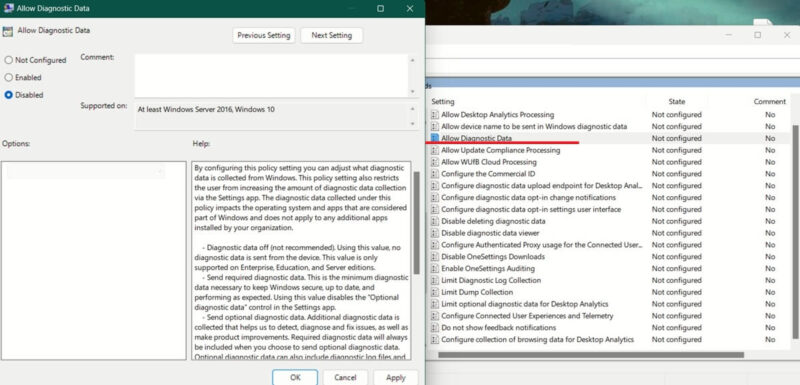
Check the Disabled box, and click Apply.
Tip: wondering what sets a Microsoft Account apart from a Local Account? We highlight the differences in this guide.
There are many other background processes that can put a toll on your CPU and GPU resources. Check out our article to learn how to deal with the Shell Infrastructure Host high CPU usage issue. If you’ve spotted an operation that looks suspicious, first make sure you’re not dealing with a legitimate Windows process that can look like malware before taking any action against it.
Image credit: Freepik. All screenshots by Alexandra Arici.

Alexandra Arici –
Staff Writer
Alexandra is passionate about mobile tech and can be often found fiddling with a smartphone from some obscure company. She kick-started her career in tech journalism in 2013, after working a few years as a middle-school teacher. Constantly driven by curiosity, Alexandra likes to know how things work and to share that knowledge with everyone.
Subscribe to our newsletter!
Our latest tutorials delivered straight to your inbox
Sign up for all newsletters.
By signing up, you agree to our Privacy Policy and European users agree to the data transfer policy. We will not share your data and you can unsubscribe at any time. Subscribe