
The majority of Windows users allow all their apps to access the Internet. However, sometimes it’s better to stop some of these apps from going online to make your experience safer and more productive. If you’d like to know how to turn the Internet off for some of your programs, this article demonstrates that.
Want more apps to enjoy on your PC? Learn how to run Android apps on Windows.
Content
- Why You Should Prevent Apps from Accessing the Internet
- 1. Create Custom Firewall Rules
- 2. Manage the Default Rules
- 3. Use a Dedicated App
- Frequently Asked Questions
Why You Should Prevent Apps from Accessing the Internet
There are many reasons why you would want to prevent certain apps from accessing the Internet, including:
- Staying safe by blocking apps that you don’t trust from going online. Giving this access means that such apps will send and receive data to and from their servers.
- Enjoying a clean experience by blocking annoying ads on apps and games that don’t need an Internet connection to work.
- Preventing kids from using certain apps, such as social media apps.
- Disabling Internet access for apps that you don’t frequently use, so they can’t connect to it secretly, as a precaution.
1. Create Custom Firewall Rules
Windows has its own built-in firewall. This utility allows users to block Internet access for some apps, among other things.
- On your PC, launch Settings from the Start menu or by pressing Win + I on your keyboard.
- Click on “Privacy and security → Windows Security.”
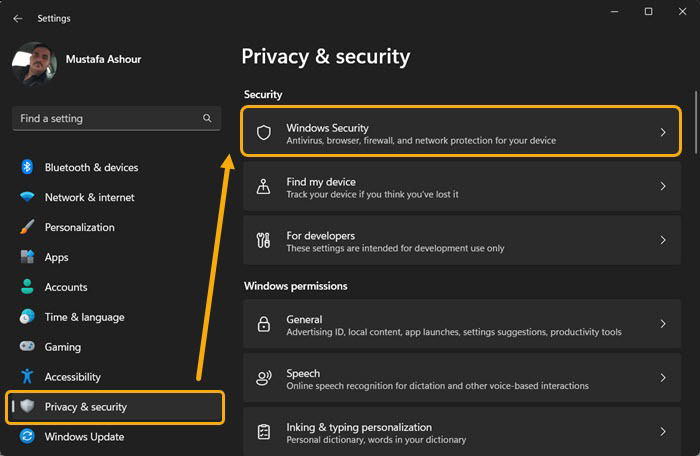
- Click on “Firewall & Network Protection.”
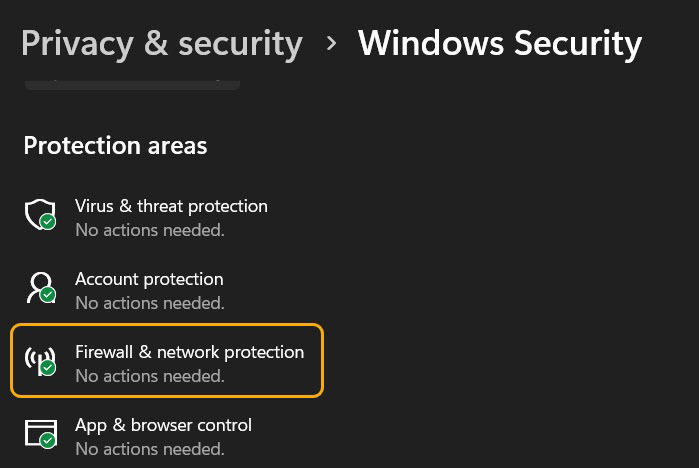
- This will open Windows Defender. Go to the “Advanced Settings” option at the bottom of the window.
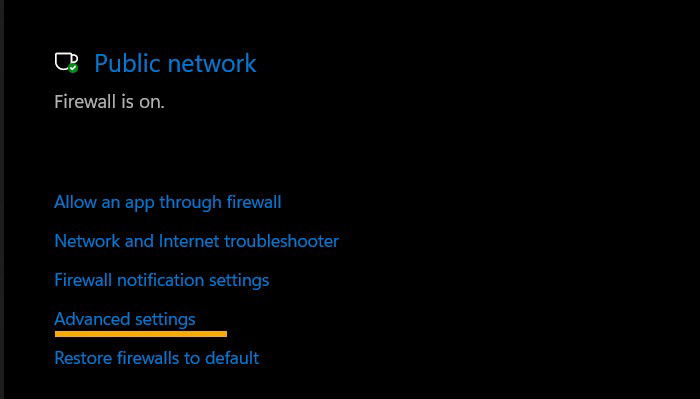
- When “Windows Defender Firewall with Advanced Security” opens, you can manage both “Inbound Rules” and “Outbound Rules,” settings that can be tweaked to allow or block receiving data from external servers.
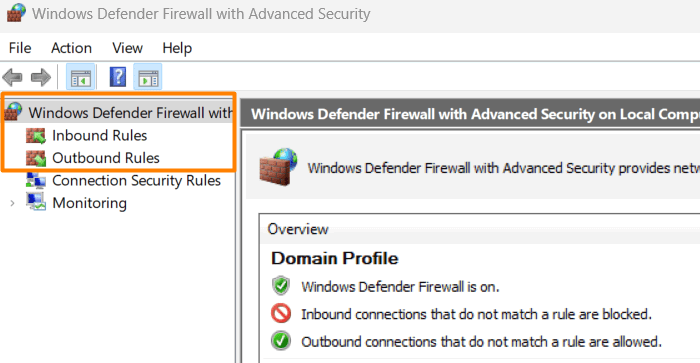
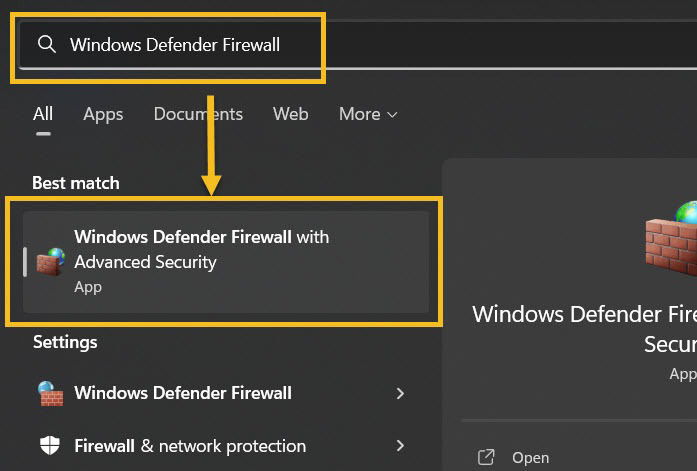
- If you’re on an older version of Windows, you can quickly access your firewall settings via Windows Search by typing “Windows Defender Firewall with Advanced Security.”
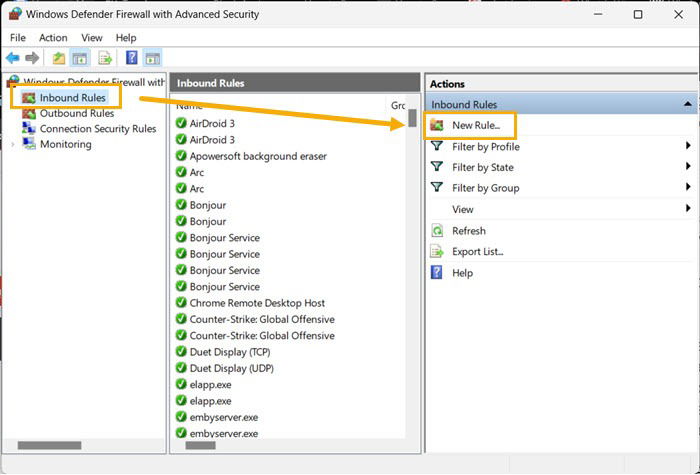
- Choose “Inbound Rules” on the left, then click “New Rules” from the opposite menu.
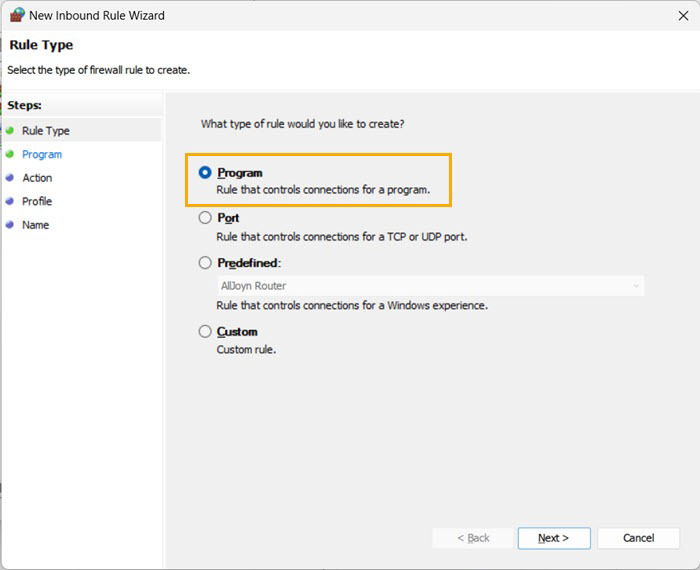
- In the “New Inbound Rule Wizard” window, select the type of rule you want to create. Since we only need to prevent an app from accessing the Internet, we are choosing “Program -> Next.”
- Add the program’s path. It’s worth noting that you must choose an .EXE file, not a shortcut. After selecting the correct file, click “Next.”
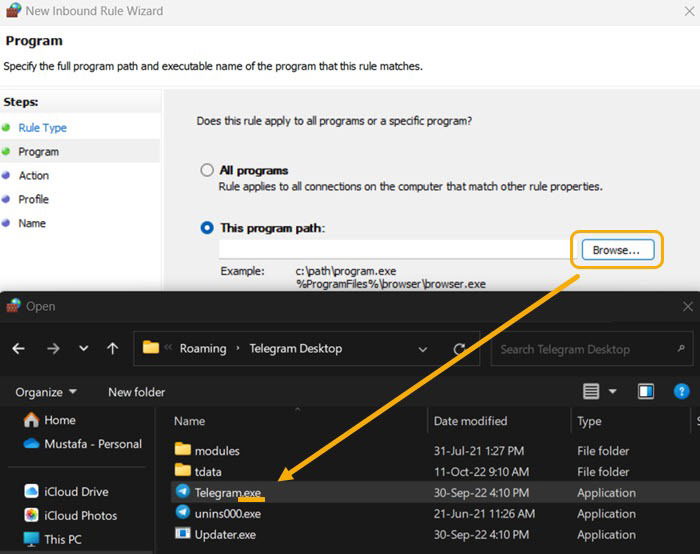
Note: if you’re struggling to find where an application is installed, you can easily right-click its shortcut, choose “Properties,” then click “Show File Location.” This applies to both desktop shortcuts and the Start menu shortcuts.
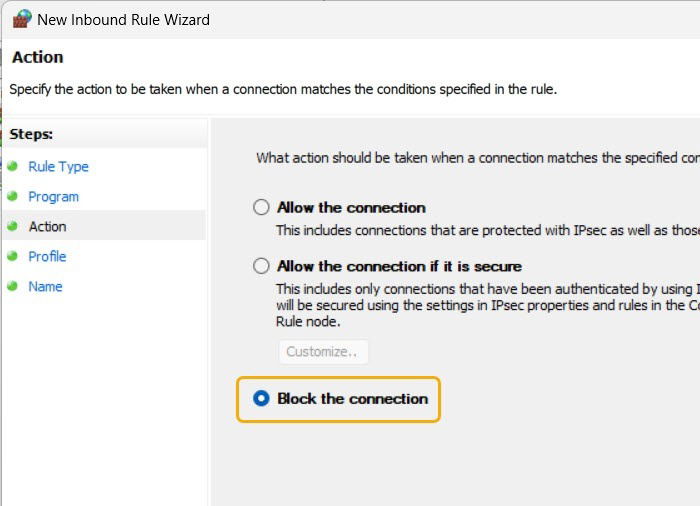
- Windows will ask you to select the action you want to associate with the rule. In our case, it’s “Block this connection -> Next.”
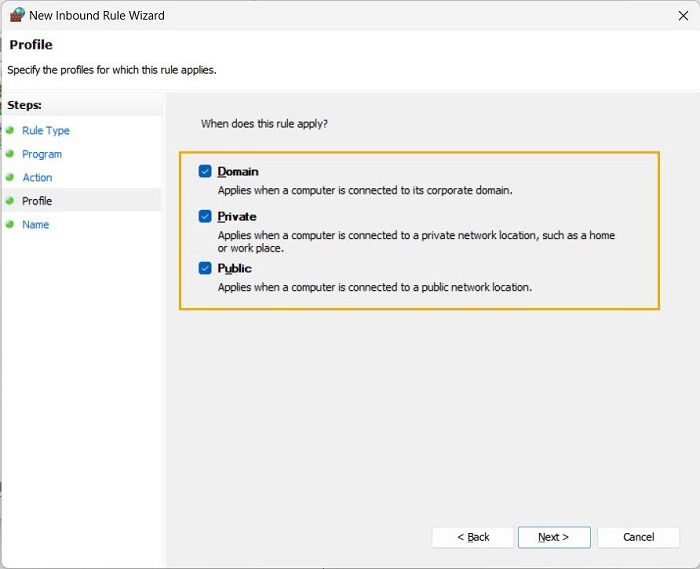
- Decide whether you want to activate this rule only on private networks, public networks, or corporate domains. If you don’t have any specific use case, you may leave them all checked and click “Next.”
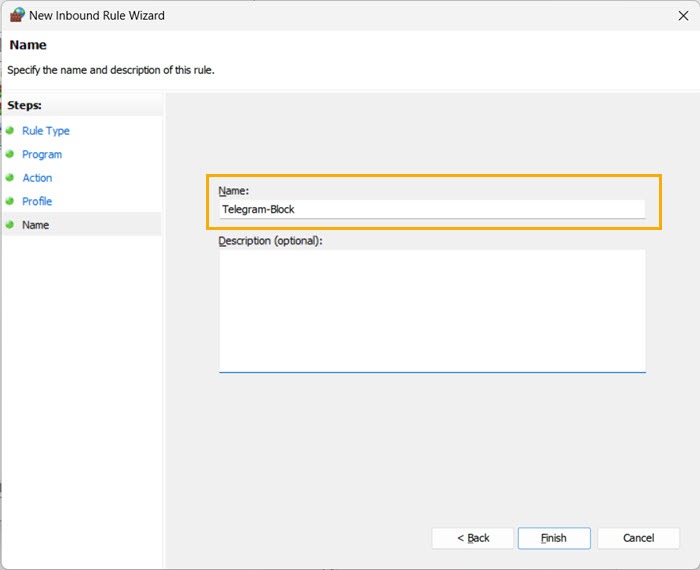
- Name your rule and click “Finish.”
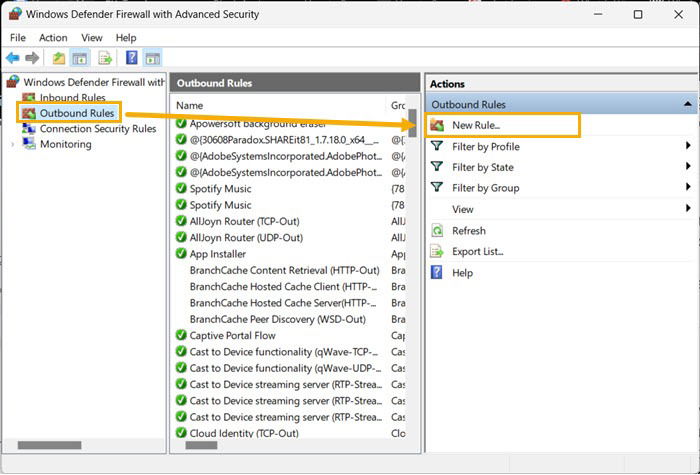
- You’ve created a rule to prevent inbound connections, which means that the app won’t be able to receive data from the Internet. However, it can still send data. To prevent that, you’ need to create an outbound rule to completely block it from accessing the Internet. Go back to “Windows Defender Firewall with Advanced Security,” but this time click on “Outbound Rules -> New Rule,” and repeat the same steps.
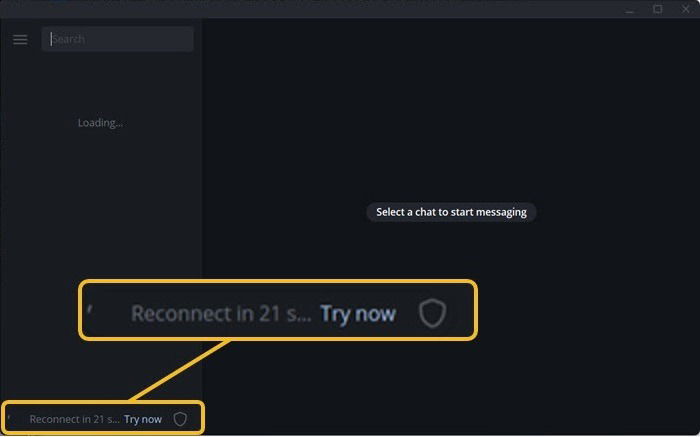
- Open the targeted app to see that it’s completely isolated from the Internet.
Is an antivirus still a must if you’re running Windows 11? Find out if Windows Defender provides enough protection for your system.
Deleting and Disabling the Rules
If you’ve changed your mind and wish to allow the app(s) back online, you’ll need to disable or delete the rules you’ve previously created.
- Go back to “Windows Defender Firewall with Advanced Security.”
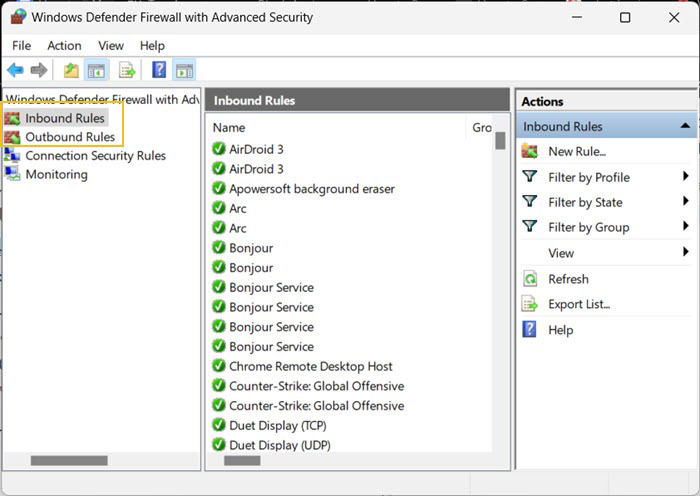
- Select either “Inbound Rules” or “Outbound Rules.” You will have to run through both since you’ve made two rules.
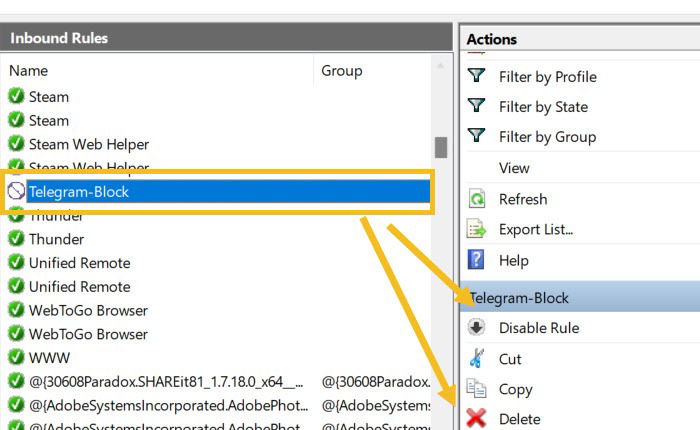
- Search for the rule using its name and click on it. Then, in the Actions menu on the right, you’ll find the options to “Disable” it temporarily or to completely “Delete” it.
2. Manage the Default Rules
Various default rules are automatically assigned to installed apps by Windows, and you can view them via the Windows Defender Firewall app. As a result, you can tweak these rules for any app and prevent it from connecting to the Internet.
However, this method isn’t exactly foolproof, as you may not find a rule for the exact app you want to block, or an app might have many rules associated with it. On the other hand, this method can be useful if you want to stop Microsoft Store apps from accessing the Internet, as these apps don’t have a public .EXE file, and it’s a bit tricky to tackle them via the WindowsApps folder.
- Launch the “Windows Defender Firewall with Advanced Security” utility.
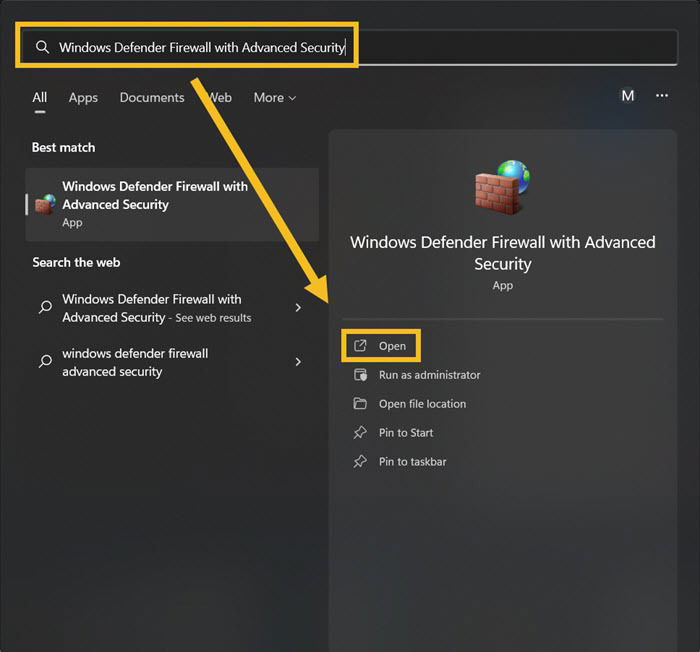
- Click on “Inbound Rules” on the left to check the list of rules already assigned to apps.
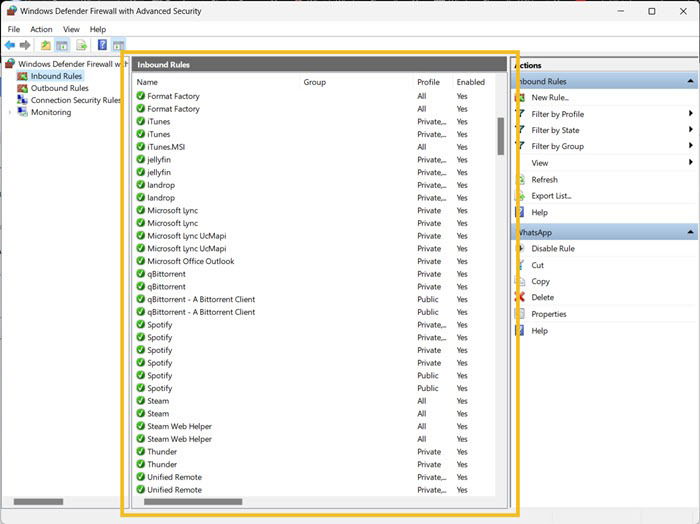
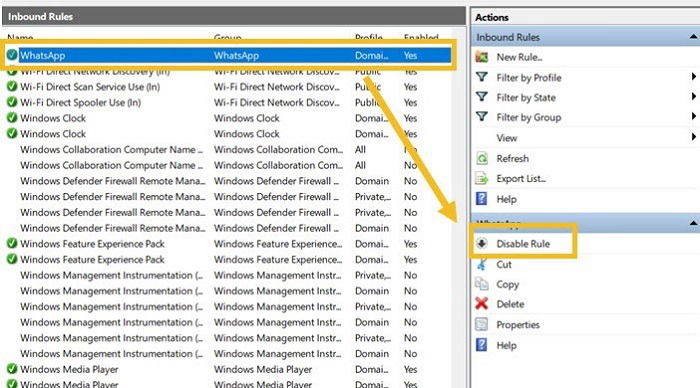
- Find a rule associated with the app you want to restrict and click on it. From the right menu, choose “Disable Rule.” For example, we searched for “WhatsApp” and disabled its rule.
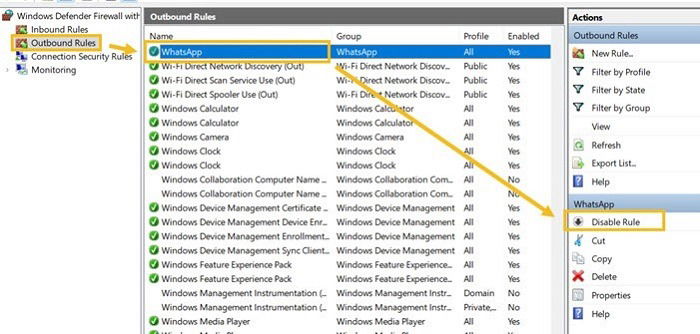
- Do the same for “Outbound Rules.” Remember, this is a must to totally prevent the app from accessing the Internet.
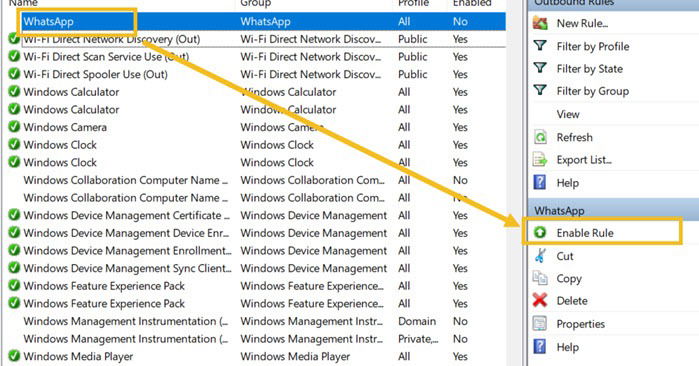
- After this, the app will lose its ability to connect to the Internet. To re-enable that, you’ll need to activate the inbound and outbound rules using the “Enable Rule” button, which will appear instead of the “Disable Rule” button.
Keep your accounts secure with two-factor authentication, even if you don’t have a smartphone at hand. Learn how to use Google Authenticator on PC instead.
3. Use a Dedicated App
Many users prefer to use a specialized app for every task, including cutting off Internet access to some apps. One of the best tools for the job is TinyWall, a free-to-use app with a minimal interface. Additionally, TinyWall has no ads and sports extra features.
- Download TinyWall and install it on your PC.
- The app will advise you to perform the installation locally and not over a remote connection, as it will cut most Internet traffic once installed.
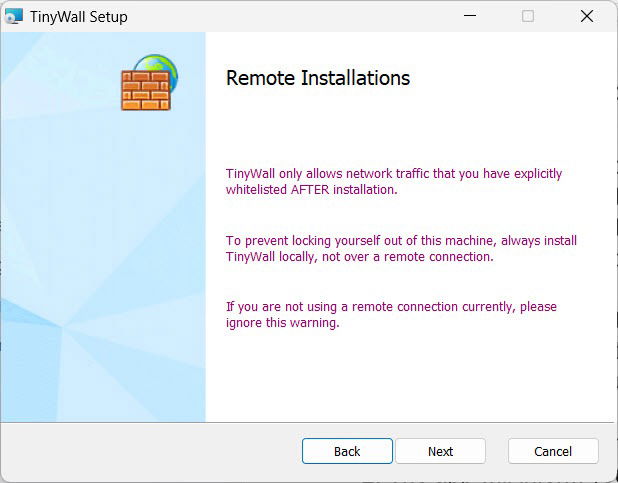
- After installation, the app will notify you that the firewall settings have been updated.

- TinyWall works differently than the Windows Defender Firewall, as it automatically prevents access to the Internet for most of your apps and lets you whitelist only the connections you need. This mechanism will benefit users who are very strict about how their devices go online. To start tweaking TinyWall, right-click its icon on the tray.
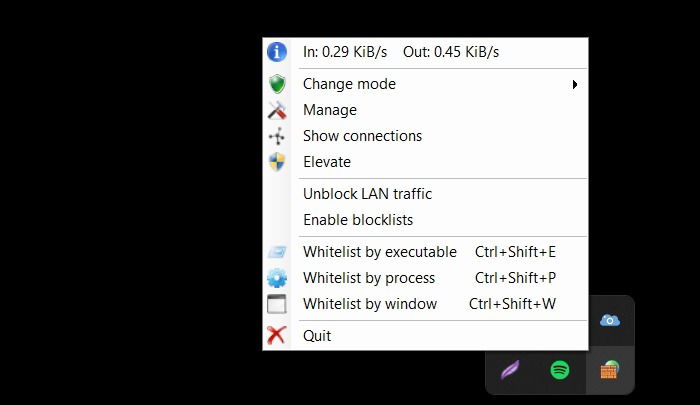
- You’ll first notice the built-in “Internet Speed Monitor.” What’s most helpful about it, is that it gives you an overview of your device’s connection in real time. To allow access to your Windows apps, hover over the “Change Mode” setting.
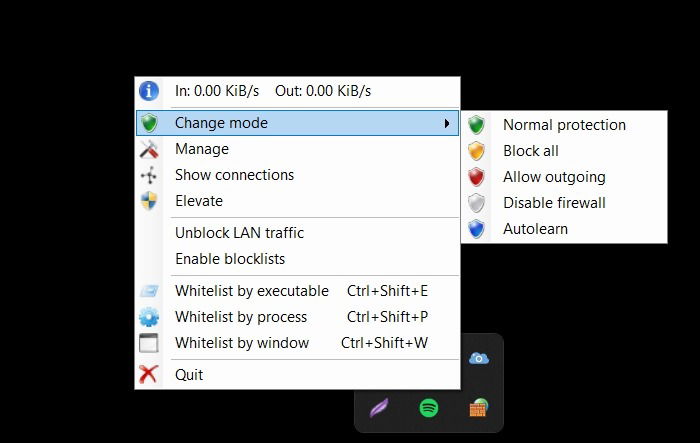
- Enable connections immediately by selecting “Disable firewall.” Alternatively, to continue blocking connections, select “Normal protection.”
Note: the “Disable firewall” option disables TinyWall’s firewall, not Windows’s. What’s more, the settings you’ve applied will still affect your device even if you’ve exited the TinyWall app.
- To add apps that are an exception to the rule, go back to TinyWall’s main tray menu and click “Manage.”
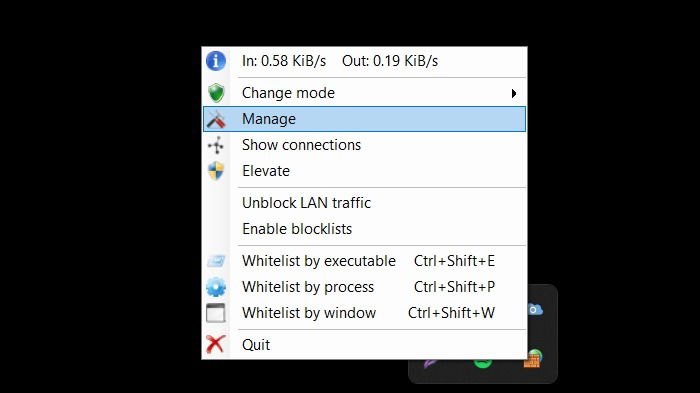
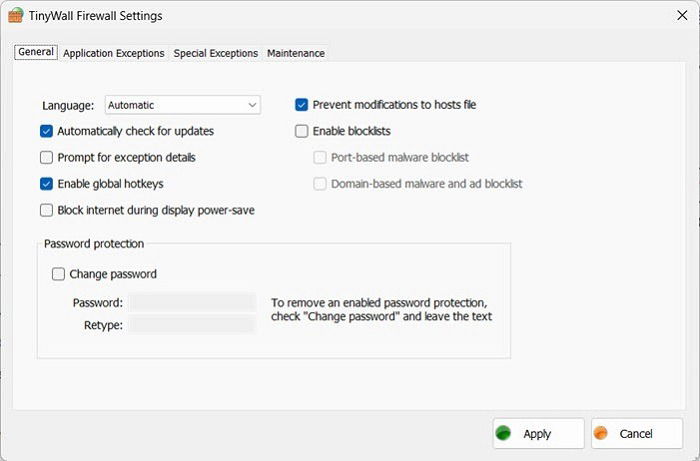
- You can activate the option to block the Internet when the screen is off via the General tab. Additionally, you can set up a password you’ll need when you edit the settings.
- Switch to the “Application Exceptions” tab to manage the apps that you would like to have Internet access. By default, the app will enable connections for web browsers, and you can whitelist more apps by clicking on “Add application.”
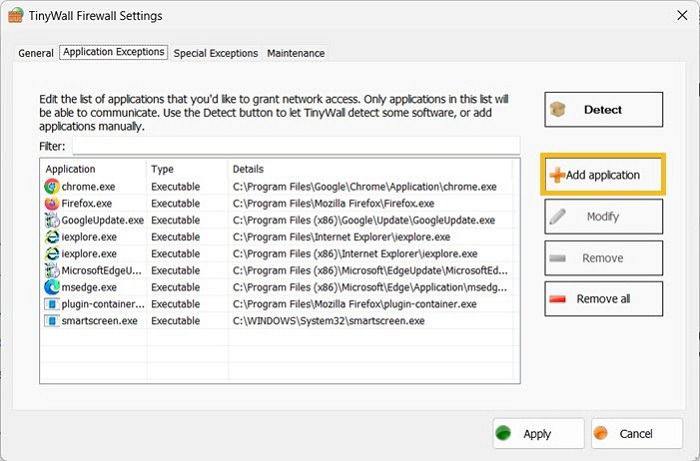
Note: you can click the “Detect” button to let TinyWall find the programs installed on your device instead of manually selecting them. However, this method sometimes fails to find all the apps and takes considerable time.
- Choose the application that you want to have Internet access. TinyWall allows you to choose from the running processes, .EXE files, and even UWP apps, which are the apps downloaded from the Microsoft Store.
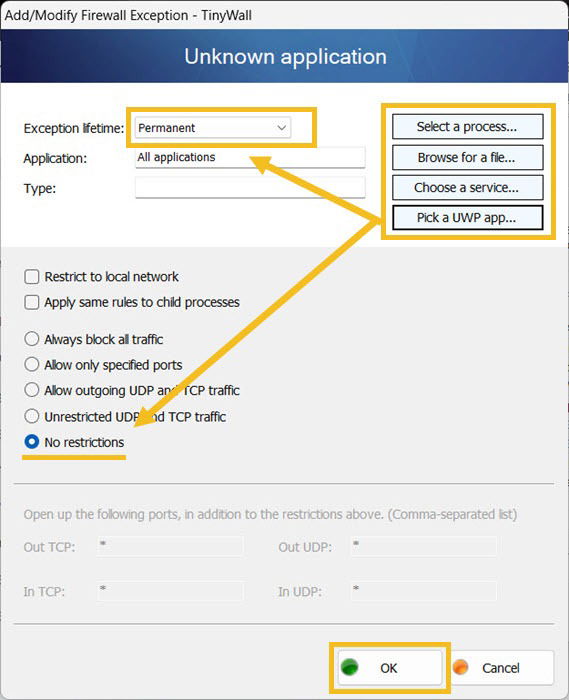
- Tick the “No restrictions” option. Furthermore, from the “Exception Lifetime” drop-down menu, choose whether or not to allow it for a limited time.
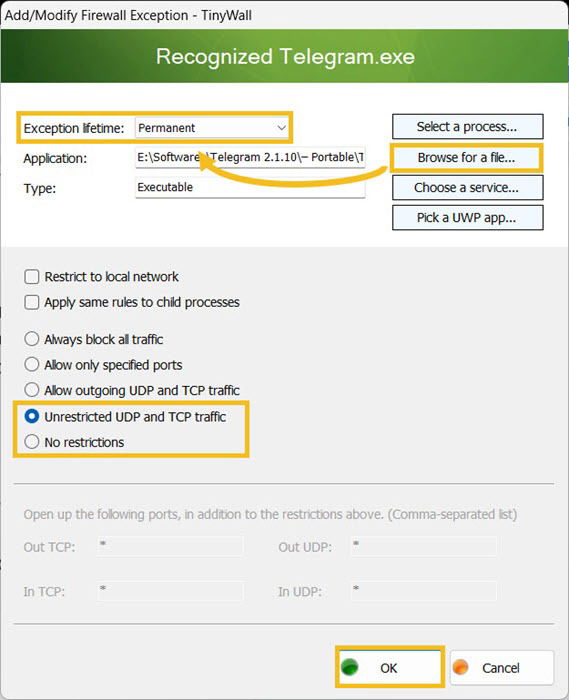
- Repeat the same steps to whitelist all of the apps you usually use, which means that every app you ignore will lose access to the Internet.
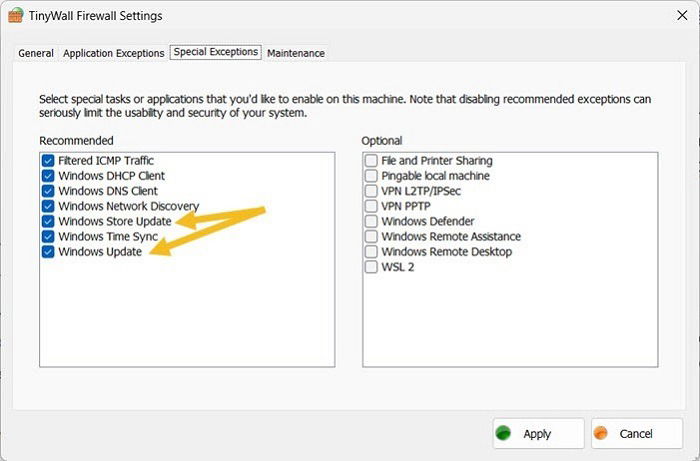
- You can navigate to the “Special Exceptions” menu for additional settings, including stopping Windows Update and Microsoft Store updates.
A friend wants to connect to your Wi-Fi, but you can’t remember the password? Here’s how to view saved Wi-Fi passwords in Windows.
Frequently Asked Questions
Is it safe to block apps from accessing the Internet?
It usually is, unless you rely on the information from notifications sent by certain apps. That’s why you need to make sure you whitelist essential apps when using third-party tools like TinyWall. If you don’t want to get that many alerts, use this method to disable notifications for some apps on Windows.
Can these methods help me cut down on data usage?
Absolutely. When you prevent a data-consuming app from connecting to the Internet, you’ll cut its usage completely.
Is there a difference between Windows Firewall and Windows Defender Firewall?
No. “Windows Firewall” was the tool’s original name until Microsoft changed it to “Windows Defender Firewall” when it released Windows 10.
Image credit: 123rf. All screenshots by Mustafa Ashour.
Mustafa is a tech content writer who’s a geek at heart. His passion lies in writing about technology, especially software-related topics. He’s also interested in digital marketing, business development, and entrepreneurship. He holds a Bachelor’s degree in Accounting and Finance.
Subscribe to our newsletter!
Our latest tutorials delivered straight to your inbox
Sign up for all newsletters.
By signing up, you agree to our Privacy Policy and European users agree to the data transfer policy. We will not share your data and you can unsubscribe at any time. Subscribe
