
There are many reasons your scanner is not working with Windows. This can include anything from disconnected wires, improper scanner installation, and more. In this tutorial, we’ve compiled a list of all of the potential fixes that have proven to be effective for scanners not working in Windows.
Content
- 1. Check Cables
- 2. Update Scanner Drivers
- 3. Add Your Scanner Manually via the Settings
- 4. Set Scanner Services to Open Automatically
- 5. Run Scanner in Compatibility Mode
- 6. Run the Hardware and Devices Troubleshooter
- Frequently Asked Questions
1. Check Cables
First, examine the connection between the scanner and your computer:
- Ensure your scanner’s adapter is safely attached to both the scanner and an active electrical outlet.
- Verify that the PC and scanner are connected to the same network if the scanner is wireless.
- If they are connected via cable, you might have a loose or damaged connection between the scanner and your computer.
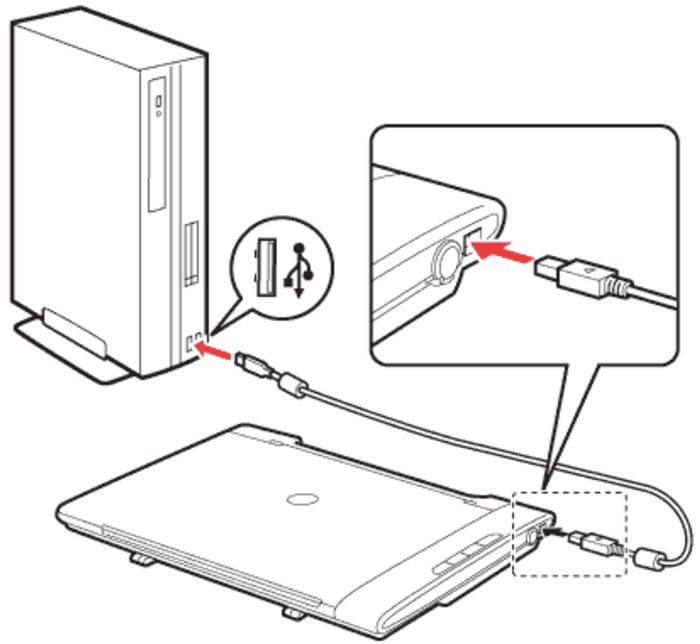 Image source:
Canon
- Ensure that you are using the correct cable for your scanner model.
- Unplug all additional devices attached to your computer (printer, modem, etc.).
- Turn off programs that may interfere with scanning (anti-virus software, firewall, security software, etc.).
2. Update Scanner Drivers
Drivers allow the operating system to properly access and manage the attached devices. If you installed the drivers long ago, there’s a chance they are corrupted or out of date, preventing the system from properly connecting with your scanner. The best way to fix this is to update the driver.
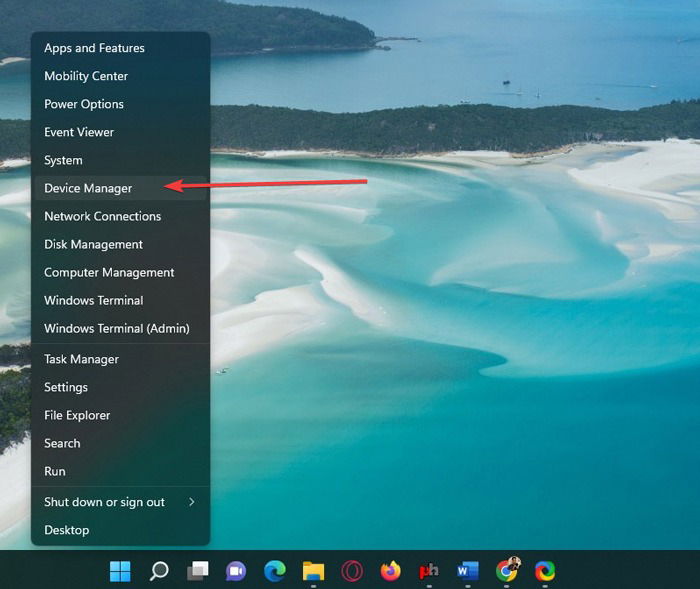
- Right-click on the “Start menu” and select “Device Manager.”
- Again, right-click on the name of your scanner under “Imaging devices.”
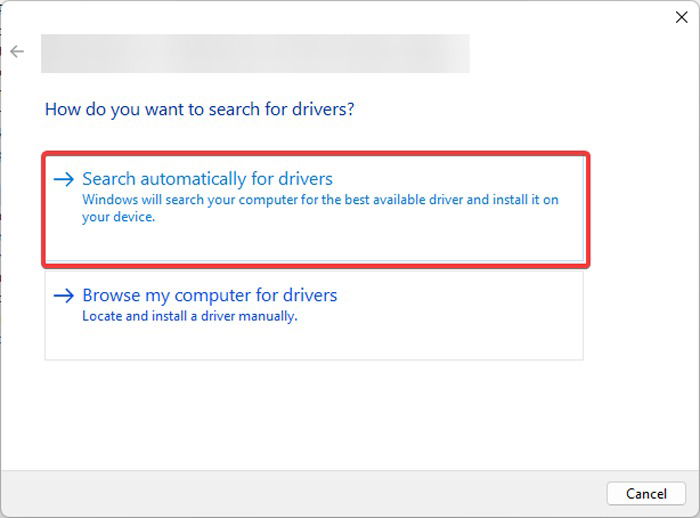
- Now, select “Update driver,” followed by “Search automatically for drivers.”
- Wait a few minutes for Windows to find the appropriate updated drivers for your device. When finished, click “Close.”
- Restart your computer to ensure that the new drivers are correctly installed.
Tip: check out how to install unsigned drivers in Windows, if you want to learn.
3. Add Your Scanner Manually via the Settings
Most of the time, configuring a scanner is as easy as connecting it to your device. Your PC should configure the scanner automatically after you plug it in. This process can, however, occasionally go wrong for no apparent reason. Below, we show how to manually add your scanner from the Windows Settings app.
Note: Although we tested the procedures with a wired scanner, they should also function similarly to those for wireless scanners. If you’re still having trouble connecting your wireless scanner to your home network and PC, check the scanner’s handbook or manufacturer’s website for extra information.
- Press Windows + I to launch the Settings app.
- Select “Printers & Scanners” under “Bluetooth & Devices.”
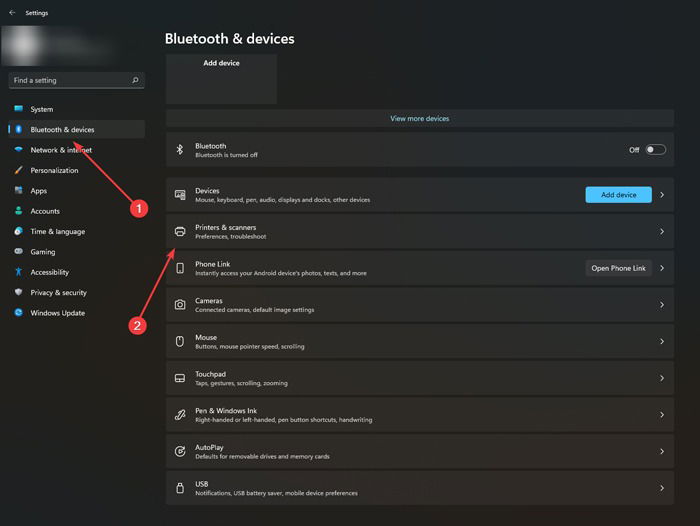
- To find your connected scanner, click “Add device.”
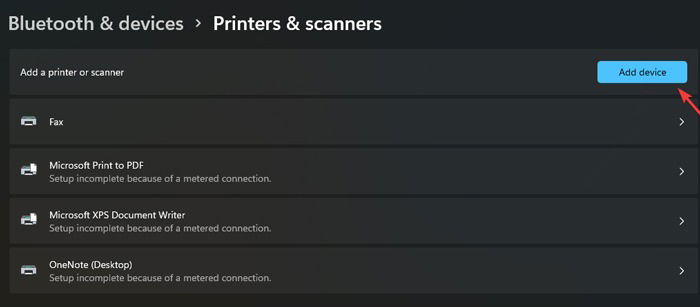
- Give it some time to find nearby scanners. Your scanner will then be instantly added to the list of devices.
- If that doesn’t work, remember that you can also visit the manufacturer’s website, find your scanner, and download the driver there.
4. Set Scanner Services to Open Automatically
For images to display on your screen, the Windows Image Acquisition service must first receive them from a hardware device, such as a camera or scanner.
Your PC won’t be able to receive images from your scanner or camera if you’ve disabled this service. You can restart the Windows Image Acquisition service here if you unintentionally deactivated it to fix the scanner not working on Windows issue:
- Click the Start menu and enter “Services” in the search bar. Select the best result.
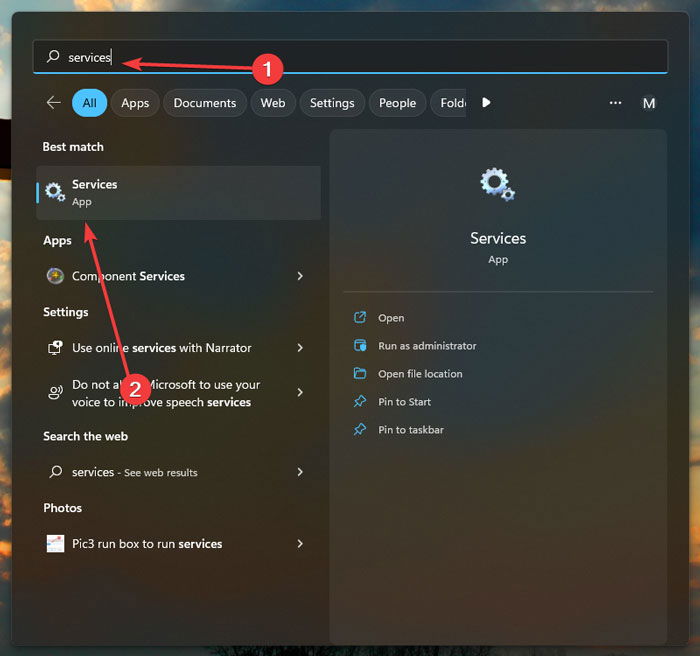
- Locate and double-click “Windows Image Acquisition (WIA).”
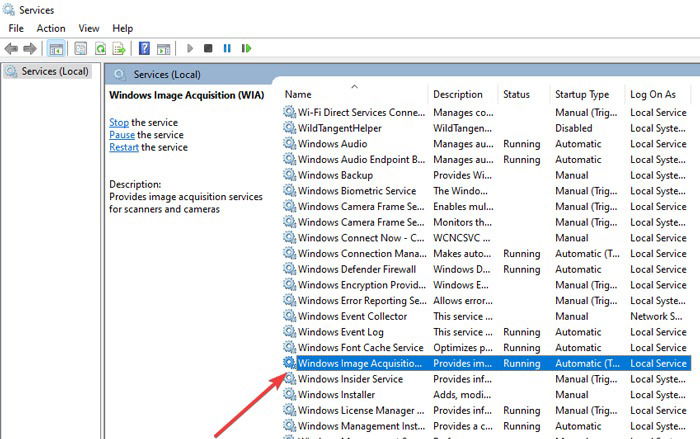
- Toggle or change the “Startup type” to “Automatic.”
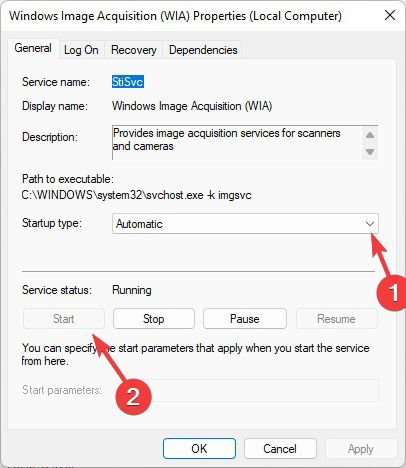
- To restart the WIA service, select “Start” under “Service status.”
- When you’re finished, click “OK” and restart your computer.
Have a QR code you want to scan instead? You don’t even need a mobile device for that, as you can scan with your Windows device.
5. Run Scanner in Compatibility Mode
You can also change the scanner’s compatibility mode to fix a scanner not working with Windows. If you’re unaware, Windows’ compatibility mode enables outdated and old programs to function flawlessly on a new OS. If you’re using the scanner app on Windows 11, this will fix your problem.
- To access the compatibility menu, right-click your scanner’s app and choose “Properties.”
- Select the “Run this program in compatibility mode for” box under the “Compatibility tab.” You can choose any previous version of Windows (select Windows 10 if you are currently on Windows 11) from the drop-down menu.
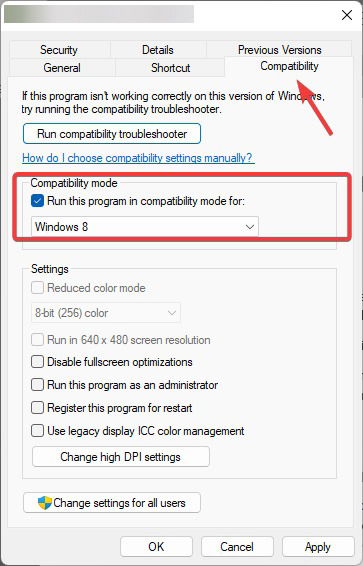
- To save the changes, press “Apply.”
6. Run the Hardware and Devices Troubleshooter
Microsoft includes a hardware and device troubleshooter tool to help you fix any hardware issues. This is one of the troubleshooting options available in the settings menu of Windows 10.
While Microsoft has officially discontinued the Hardware troubleshooter in Windows 11, it is still accessible via a command.
- Right-click on the Start menu to bring up a list of options.
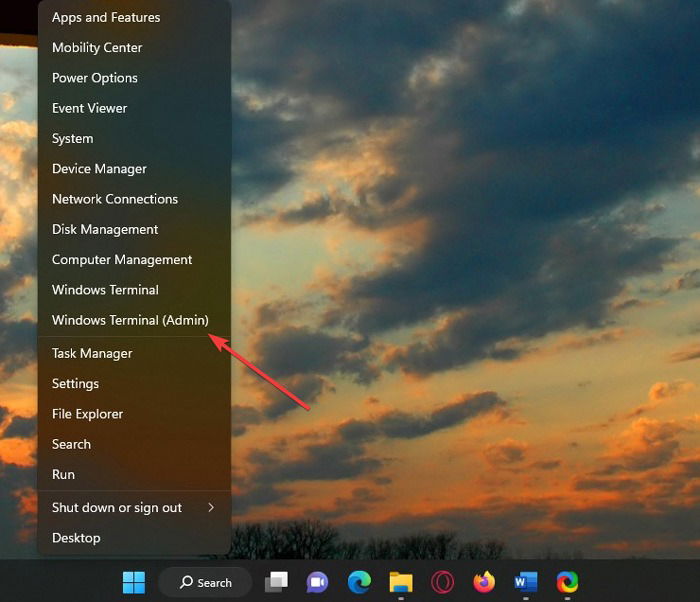
- Click “Windows PowerShell (Admin)” or “Terminal (Admin)” and paste in the following command:
msdt.exe -id DeviceDiagnostic

- To continue after the troubleshooter opens, click “Next.”
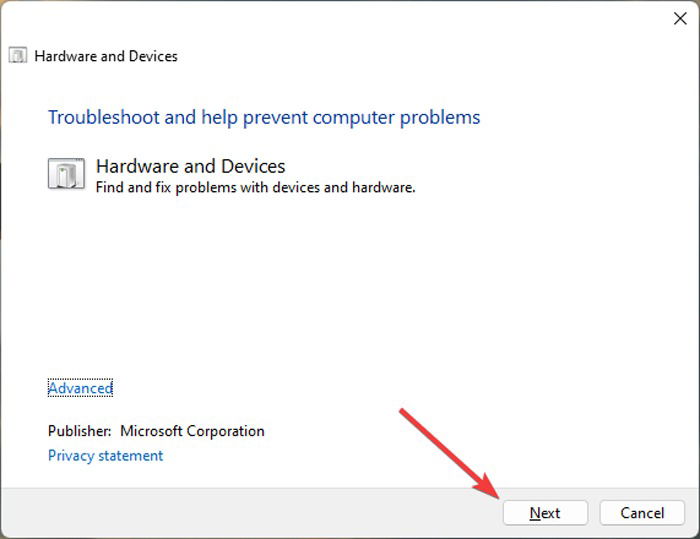
- Wait for the troubleshooter to identify any scanner-related problems. Click “Close” to end the process.
- Finally, restart your computer and check whether your scanner is operating as it should.
- In Windows 10, find the option by going to “Settings -> Update & Security -> Troubleshoot -> Additional troubleshooters.”
Do you need a new scanner? Try a portable scanner this time.
Frequently Asked Questions
How can I create a scanner shortcut on my Windows desktop?
You can create a shortcut for the Windows Fax and Scan app by navigating to “C:/Windows/system32.” Change the drive letter depending on where your operating system is installed. Once there, find and right-click on the “WFS.exe” file and select “Create Shortcut.” The shortcut will be placed on your desktop right away.
Where are my scanned documents saved?
You should go to a specified directory on your computer to find your scanned files. Open File Explorer and go to “C:UsersusernameDocumentsScanned Document.” Replace “username” with your own.
How can I scan documents without a scanner?
You can use your phone or tablet’s camera to take a photo and convert it to PDF. For that, we recommend checking out the best document scanner apps for Android.
Image credit: Pexels. All screenshots by Farhad Pashaei.
As a technophile, Farhad has spent the last decade getting hands-on experience with a variety of electronic devices, including smartphones, laptops, accessories, wearables, printers, and so on. When he isn’t writing, you can bet he’s devouring information on products making their market foray, demonstrating his unquenchable thirst for technology.
Subscribe to our newsletter!
Our latest tutorials delivered straight to your inbox
Sign up for all newsletters.
By signing up, you agree to our Privacy Policy and European users agree to the data transfer policy. We will not share your data and you can unsubscribe at any time. Subscribe
