
Windows 11 contains various accessibility improvements compared to Windows 10, but the most noticeable is the name change. The feature set known as “Ease of Access” in Windows 10 was transformed into Accessibility in the the latest Windows version. Microsoft even changed the icon into a human-shaped one, which is the recognized Accessibility icon in most parts of the world.
In this article, we’ll go through the updated Accessibility offerings in Windows 11, touch on how they can sometime differ from Windows 10, and suggest how these features can be utilized by Windows users.
Content
- Getting to Your Accessibility Center
- Checking Out Your Quick Access Options
- Main Accessibility Menu
- Options for the Blind/Visually Impaired
- Options for the Deaf/Hearing Impaired
- Options for Users with Mobility Impairments
- Frequently Asked Questions
Also read: What Is Windows 11 for ARM and Who Is It For?
Getting to Your Accessibility Center
In Windows 11, the Action Center is a great space for quickly getting to the things you need including your Accessibility settings.
- Click on the Wi-Fi/Volume/Battery in your taskbar in the lower right corner to bring up the Action Center up. Alternatively, use the keyboard shortcut Win + A to open up the Action Center.
- Out of the box, you’ll be able to find the Accessibility icon here, as well as sound control, brightness, airplane mode, and Focus Assist.
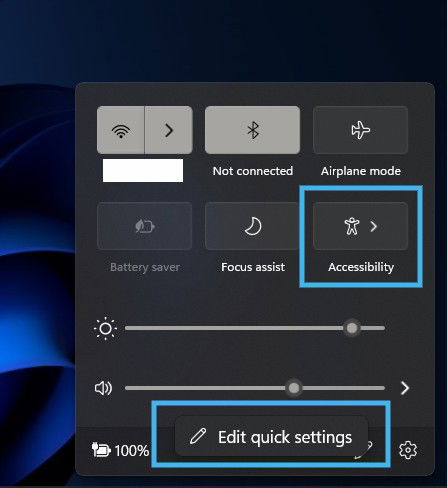
- Now, if you don’t see Accessibility as an option or if you’d like to change what comes up in your Action Center menu, right click anywhere within the menu to bring up the “Edit Quick Settings” button.
- For any tiles you wish to remove, click the Pin icon with the strikethrough.
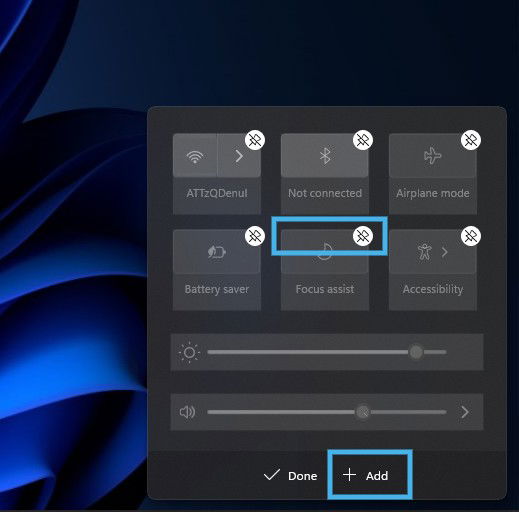
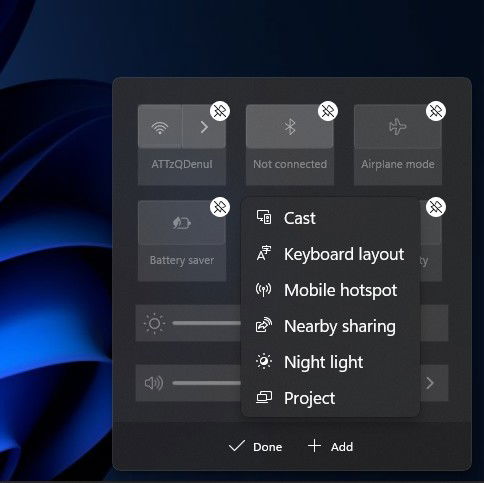
- If you’d like to add tiles to your Quick Access menu, click the “+Add” button to bring up the following menu.
- From here, add the options you use most often to your Quick Access menu bar. You can also find and pin the Accessibility menu from here if for some reason it doesn’t auto populate in your Quick Access menu.
Also read: How to Try Windows 11 Without Nuking Windows 10
Checking Out Your Quick Access Options
If you click on the Accessibility button icon in the Action Center menu, you’ll open up another menu with options to toggle often-used functions on or off.
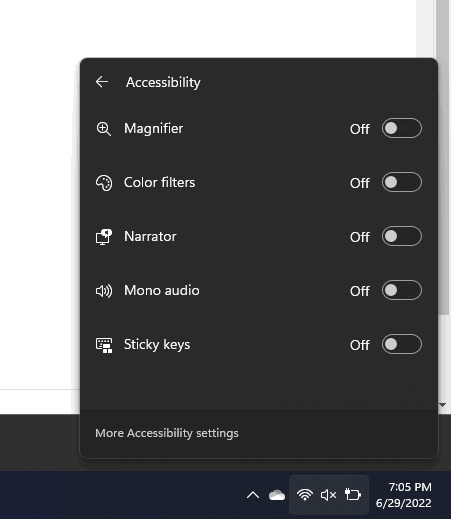
These are far from the only Accessibility tools available on Windows 11, and you can open the full settings menu by either clicking “More Accessibility Settings” in that quick-access menu or by using the Win + U shortcut.
Available Features
The easiest parts of the Accessibility menu to get to are those toggle options that live in the Action Center.
Briefly, these tools offer the following functionalities:
- Magnifier – zooms in on a section of your screen. You can use your mouse to navigate around to different parts of the screen. This is helpful if there are areas with smaller print or buttons that are difficult to make out due to contrast issues.
- Color filters – will lower the saturation on all of the elements on your screen and essentially make it black and white.
- Narrator – reads the text on the screen out loud to you. Narrator outlines the text as it’s reading. You can also choose whether Narrator will tell you about associated keyboard shortcuts.
- Mono audio – brings all of your audio out of one channel instead of the left and right channels, which can be helpful for people who have diminished hearing in one ear but not the other.
- Sticky keys – allows users to press keys one at a time instead of simultaneously and still access the associated commands. For example, instead of having to press Ctrl + C together, “Sticky keys” allows someone to press the Ctrl button and then the C key.
Also read: Your PC Can’t Run Windows 11? Try Changing These Settings
Main Accessibility Menu
Accessibility lives within the Settings menu, and you can quickly navigate to the full list of features. Note that most of these are also available in Windows 10.
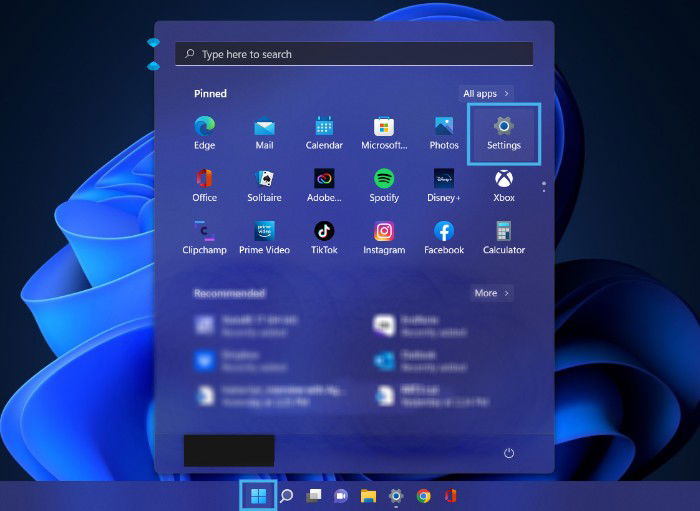
- Hit the Start button and select the Settings app from menu that appears.
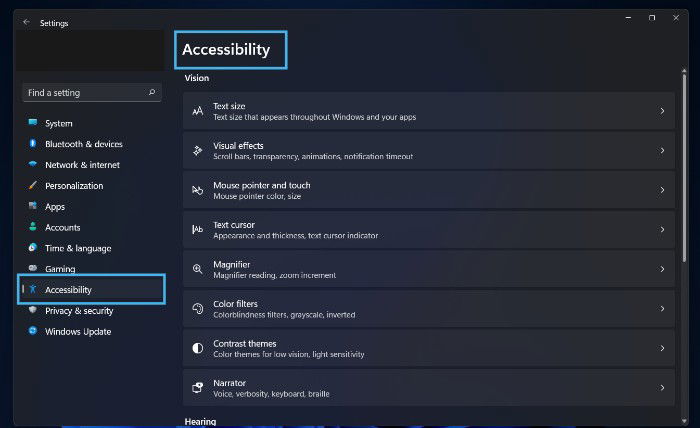
- From there, select Accessibility from the side panel to open the main Accessibility page. You could also use the search function within the Settings menu to quickly search for the setting you need.
- Or you can press the Win + U shortcut to pull up the Accessibility menu.
In what follows, we’ll explore the additional Accessibility options based on the categories of those they’re aimed to help.
Also read: Hidden Windows 11 Features for Power Users
Options for the Blind/Visually Impaired
For most of us, it would seem impossible to navigate a computer if we couldn’t see the screen. Knowing that, Microsoft has included a set of these features to help visually impaired users get the most of their Windows experience.
We’ve already touched on the Narrator and Magnifier features, and now we’ll take a look at some of the additional features included in Windows 11.
1. Text Size, Cursors, and Pointers
Combined, these features make it easier to interact with text and other elements across the computer’s interface.
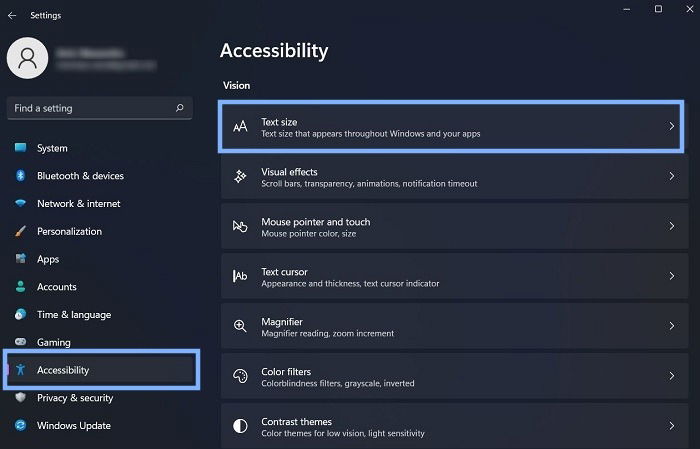
- From Accessibility, select the “Text Size” option.
- From here you can access the text size slider. It is a fairly self-explanatory feature that allows a user to increase the text size over more or less all of Windows instead of having to do zoom individually on various apps they’re using.
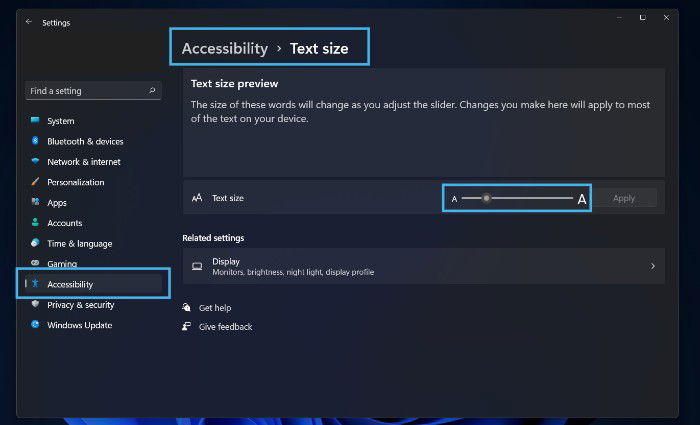
- Be sure to click “Apply” after moving the slider. The changes may take a few seconds to take effect.
- Go back to Accessibility, and select the “Text cursor” menu this time.
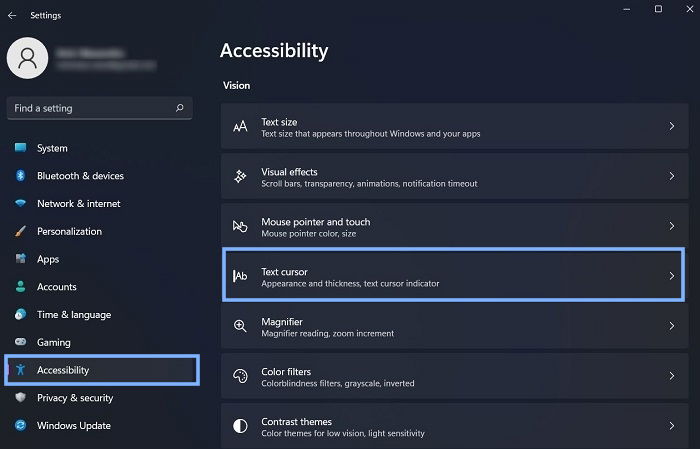
- From here users can also customize the color and thickness of their text input cursor.
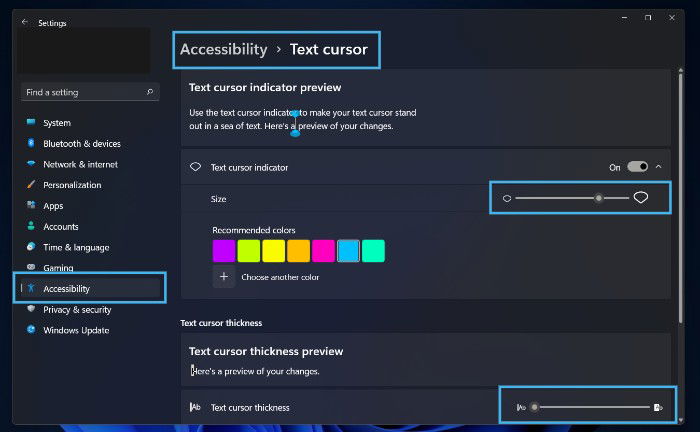
- Additionally, the “Text cursor” indicator option creates visual markers at the top and bottom of the cursor bar, which can be various sizes and colors based on the user’s preference.
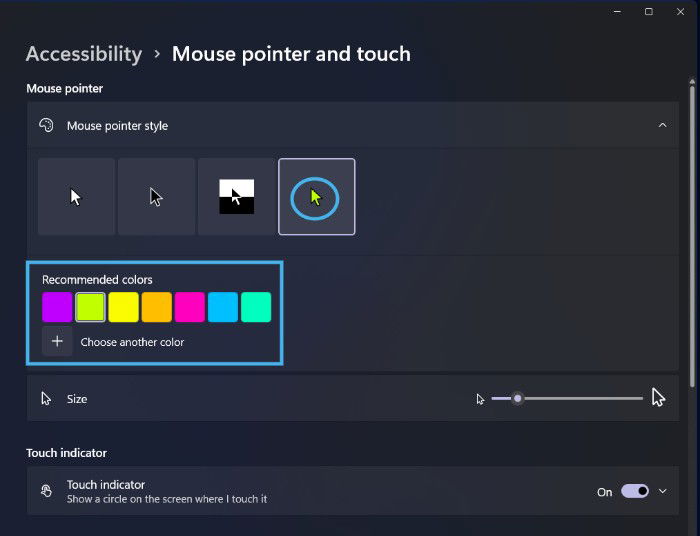
- Users can also customize their mouse pointers to make them more visible by going to “Mouse pointer and touch” from the Accessibility menu.
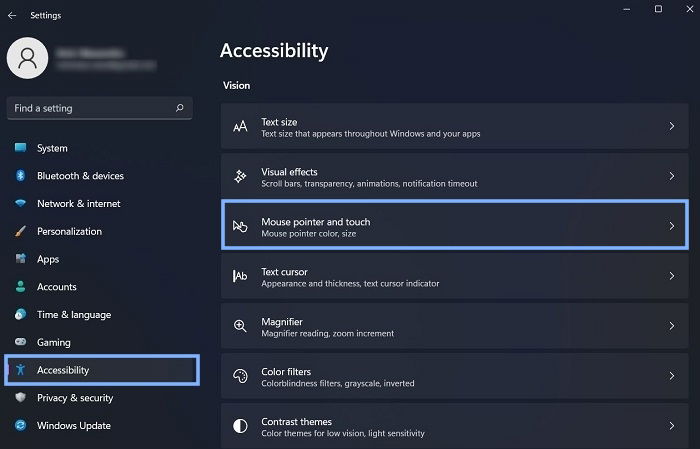
- You can change the mouse pointer’s, style, and color.
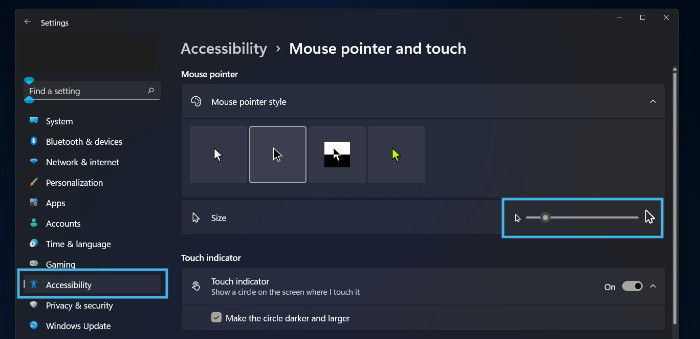
- If you select the last option under “Mouse pointer style”, you will be able to select another color for your mouse pointer.
Also read: 15 Tips to Use and Customize Windows 11 Start Menu Like a Pro
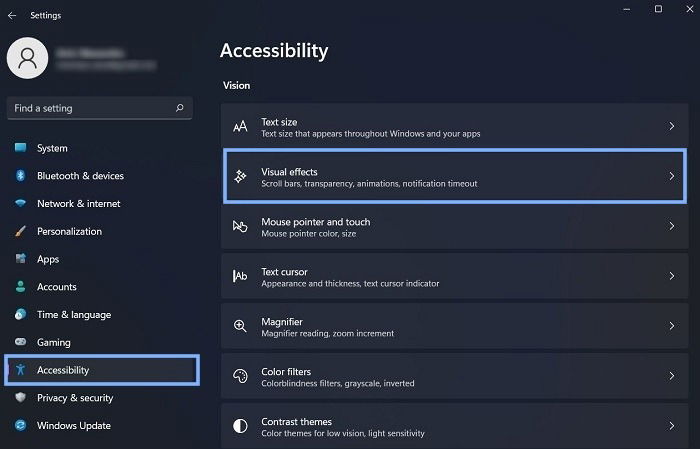
2. Visual Effects
These features can make it easier to distinguish between windows by making them slightly transparent. You can find this option by going to “Accessibility-> Visual effects”.
This, coupled with another feature we’ll touch on in a bit, can really help those with low vision.
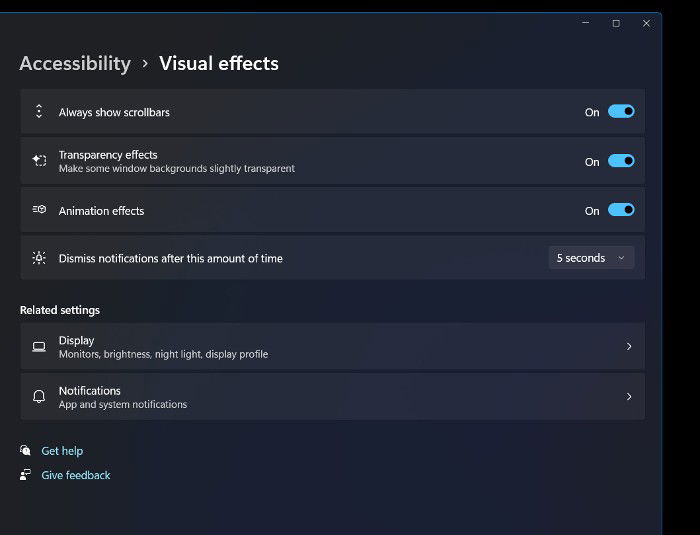
Animation effects make for a nicer UX for most of us, but in some cases, users may wish to simply have the menus appear and disappear on screen.
Also read: Windows 11 Snipping Tool Not Working: 12 Possible Fixes
3. Color Options
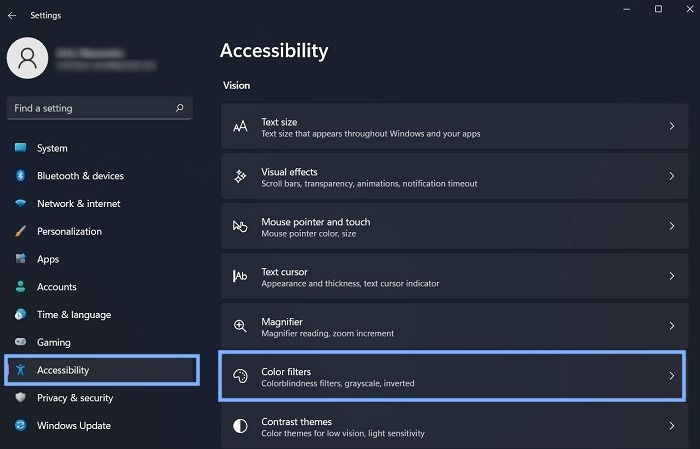
According to the UK-based non-profit organization Color Blind Awareness, 1 in 12 men and 1 in 200 women today suffer from color blindness. On this context, Microsoft has included several filters for various types of colorblindness.
- You can find these profiles under “Color filters” in the Accessibility menu.
- If you scroll down further on this menu and tap on “Colors” you’ll get the option to use even more colors.
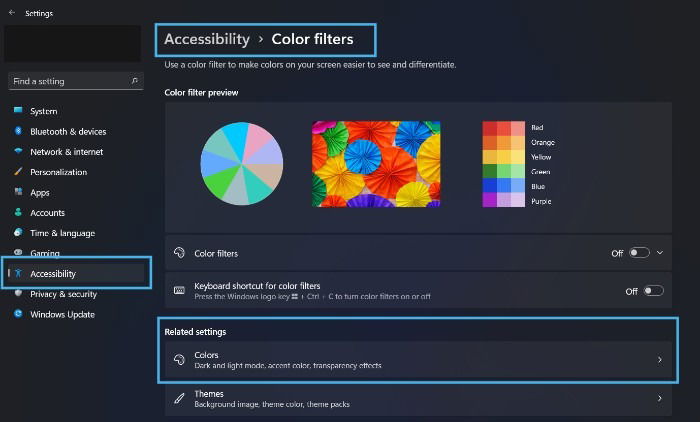
- You’ll be taken to a menu that’s not actually housed within the Accessibility menu. Instead, you’ll head over to the Personalization section.
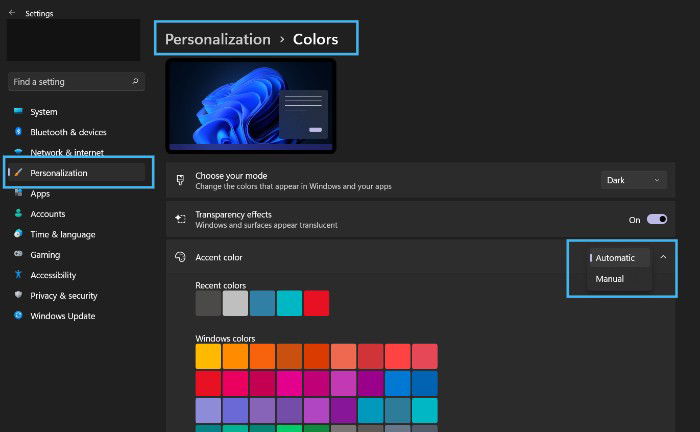
- The accent color on this page can be toggled to Manual or Automatic. Automatic will match the accent color based on your background photo.
- But for those with visual impairments, manual may be a better option. This lets you set your own color that will remain no matter what your background is. The accent color will outline windows, which will work well with the transparency we mentioned earlier as to help users distinguish between multiple windows on one screen. A color such as a bright white will stand out against most background colors.
Also read: How to Get Classic Volume Mixer Back in Windows 11
Another important Accessibility option is “Contrast Themes” which used to be called “High Contrast Themes” in Windows 10. You can access via “Accessibility-> Contrast Themes”.
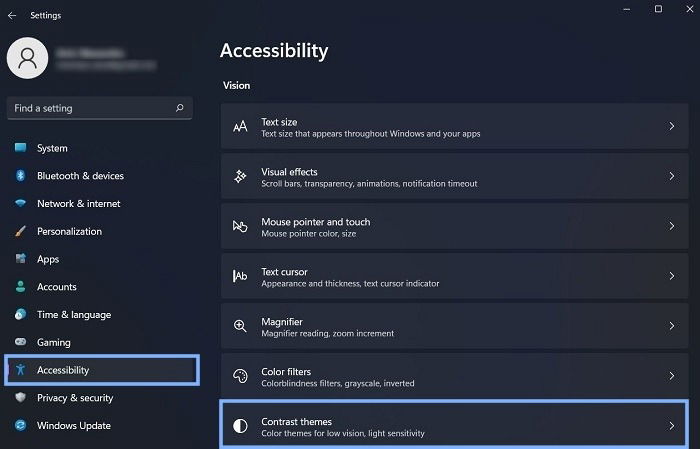
Compared to Windows 10, these themes are much more robust in Windows 11. They’re a lot subtler in Windows 11 while offering enough contrast to be useful to those who need to use higher contrast settings for their vision.
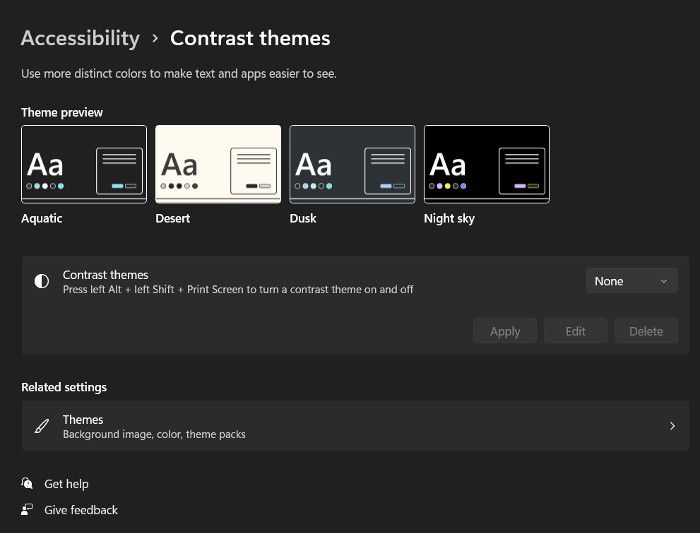
There are four themes, and users can edit from those presets to make unique setups. Microsoft also made a big effort to provide an aesthetic option for those who need more contrast on their computers.
Also read: Why Encryption Is Not Working on Windows 11 Home, and How to Fix It
Options for the Deaf/Hearing Impaired
Those who are deaf or have a hearing impairment rely on visual cues in their digital environments, and Microsoft has created some features specifically for those users. They’re also useful for those who are using their computers in a space where it’s not possible to rely on audio.
1. Audio Effects
- You can find these features by going to “Accessibility-> Audio”.
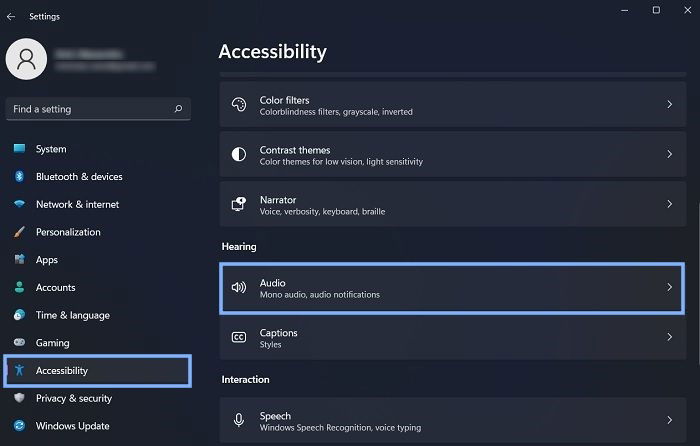
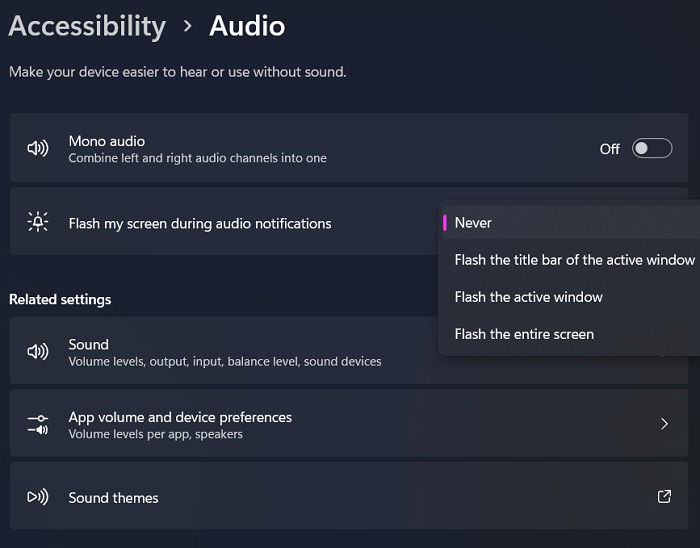
- From here, you can set up notifications from your system via a flashing screen. You can either flash the active window, the title bar of the active window, or the entire screen. This will let you know that something has come in when you can’t hear the ping from the system.
2. Captions
Captions are one of the most widely used tools by those who have audio processing disorders and those who have a hearing impairment.
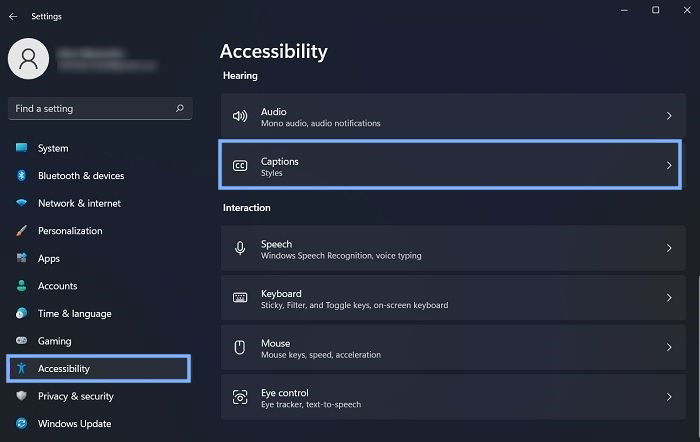
- You can get captions in Windows 11 by visiting the Captions menu under Accessibility.
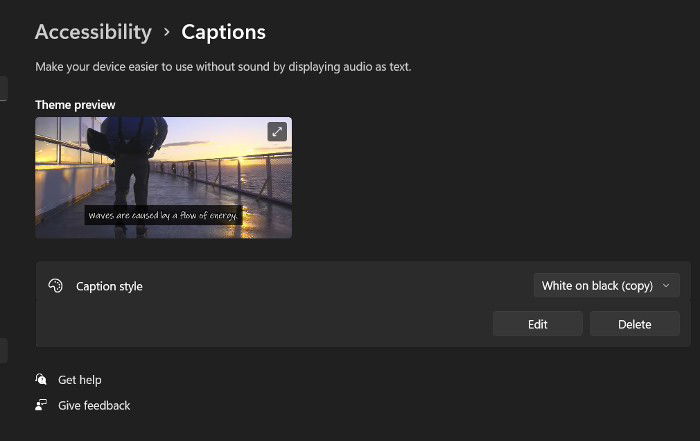
- From here you can customize how your captions look when you’re using them (white on black, large caps, yellow on blue etc).
In the future, Windows 11 users will be able to download a package that allows live captioning. This feature, currently only available to Windows Insiders, will transform any audio into text in real time.
This means that users will be able to take advantage of real-time captions during their Zoom meetings or videos which don’t have captions built into them.
Also read: How to Use Windows 11 without a Microsoft Account
Options for Users with Mobility Impairments
One of the biggest improvements in terms of Accessibility in Windows 11 is related to voice typing and dictation. While the feature was plagued by bugs in Windows 10, the new version finally works as intended.
1. Voice Typing and Dictation
This is a great feature for people affected by mobility impairments involving issues with manipulation of objects by hand who need to create documents or input text. Users can “write” in Notepad, Microsoft Word, and online sites like WordPress and Google Docs.
If you’re in need of more voice functionality than just text input, you can set up the speech recognition. This allows you to control your computer with your voice. It requires some initial setup so that it can recognize your voice.
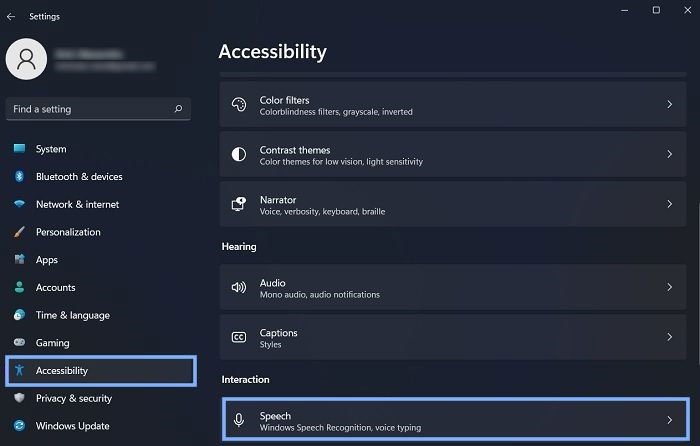
- To get started with the feature, go to “Accessibility-> Speech”.
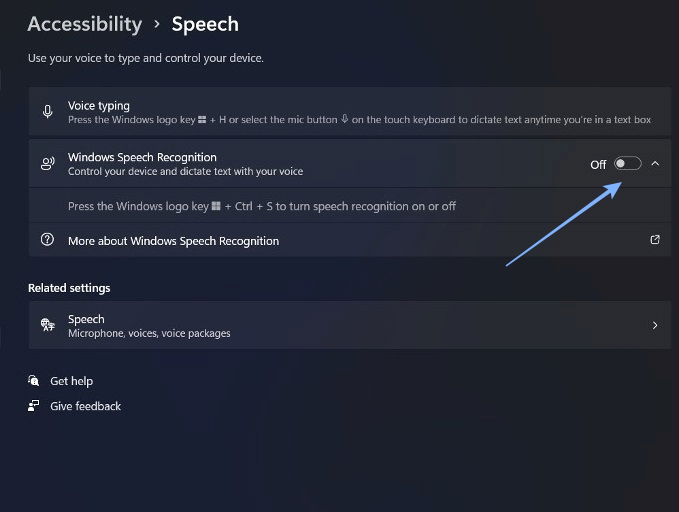
- From here, you will have to turn on the “Windows Speech Recognition” toggle.
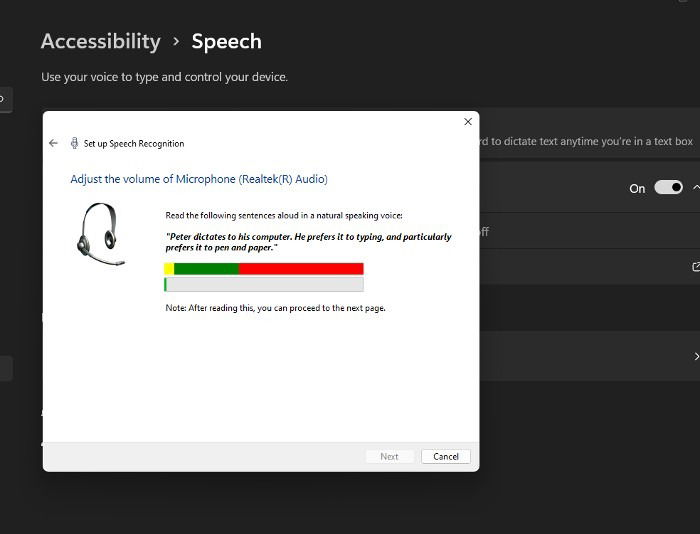
3. Up next, follow the steps to set up the feature.
- If you’d like to use the “Auto Punctuation” function, you need to enable it, as well. To do so, use the Windows and H shortcut to pull up the voice typing menu.
- Click the gear icon to open the “Settings”.
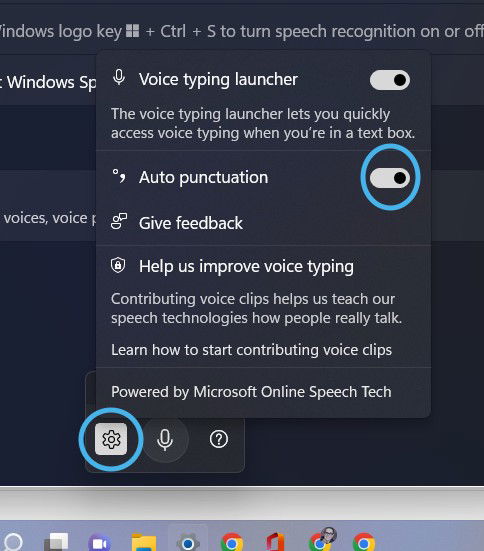
- Next toggle on the “Auto Punctuation” setting.
2. Eye control
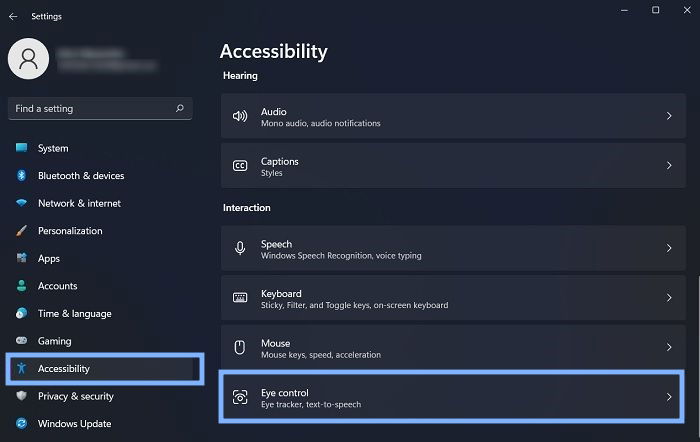
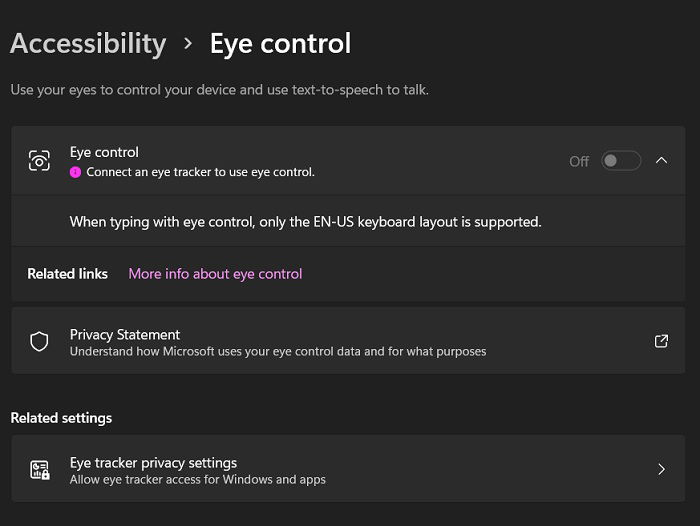
When it comes to acute mobility impairments, Eye control can help patients communicate by typing responses using their eyes. Go to “Accessibility-> Eye control” to find this feature.
You’ll need a compatible eye-tracking device before you can start communicating only with your eyes though and someone to help you set everything up by enabling the “Eye control” toggle.
Also read: How to Downgrade from Windows 11 to Windows 10
Frequently Asked Questions
What is the Disability Answer Desk?
Microsoft created a support center called the Disability Answer Desk that caters to people who want to use the Accessibility features, as well as those who want to make their content more accessible to others.
This webpage acts as a hub for those looking to find out more about Windows Accessibility. Scroll through tips (broken into categories like keyboard shortcuts and YouTube videos) and find resources such as webinars. In addition users can access useful phone numbers, live chat, American sign language support, and download the Be My Eyes app.
Are accessibility features only for those with physical disabilities?
Microsoft spent time developing tools that would also help people with mental health issues and learning disabilities such as dyslexia. Additionally, some of the features are great for all users, especially those who log a lot of computer hours.
Using features like dark mode can help us see better, but most of us still end up squinting to find things, like the cursor bar or pointer. This can lead to eye strain, headaches, and fatigue. Using these features can help alleviate some of the stress that constant computer work puts on our bodies and brains.
How can I suggest Accessibility changes?
Microsoft has a Feedback Hub app where users can request that changes. It’s easily accessible from your PC, just search for it using the magnifying glass icon in the task bar. Here you’ll find multiple sections that allow users to suggest feedback. There is a drop-down menu that allows the user to pick a category, and Accessibility is third on the drop-down list.
Some keys to offering good feedback, according to Microsoft, are making sure you have a concise and descriptive title and keep each piece of feedback limited to one issue only. Be aware that device, OS, and app information are automatically submitted with your feedback.
Image credits: Unsplash All screenshots by Amy Yoder
Writer living and working in San Antonio, Texas. Full-time freelancer since 2021. Graduate of UTSA with a major in English and minors in Technical and Creative Writing.
Subscribe to our newsletter!
Our latest tutorials delivered straight to your inbox
Sign up for all newsletters.
By signing up, you agree to our Privacy Policy and European users agree to the data transfer policy. We will not share your data and you can unsubscribe at any time. Subscribe
