Windows 11 brings several improvements over Windows 10. You have the Android apps integration, better organization, and a new Start Menu. Let’s take a look at various tips to use, edit, and customize the Start Menu in Windows 11.
Content
- 1. Move Start Menu to Left
- 2. Open Important Windows Features
- 3. Pin Apps
- 4. Unpin Apps
- 5. Rearrange Pinned Items
- 6. Pin Websites
- 7. Show Important Icons
- 8. Pin Folders
- 9. View Full List of Recommended Items
- 10. Remove Recommended Items
- 11. Hide Recently Added Files
- 12. Turn off Most Used Apps Section
- 13. Uninstall Apps
- 14. Access App’s Recent Files or Tasks
- 15. Change Start Menu Color
- Frequently Asked Questions
Also read: 10 Major Improvements in Windows 11 over Windows 10
1. Move Start Menu to Left
The first change that you notice after updating to Windows 11 is the placement of the Start Menu and other icons on the taskbar. They are found in the center of the screen, unlike Windows 10 where they were on the left side. If you wish to change the alignment of your Start Menu to something more familiar, follow these steps:
- Open Settings quickly by using the Windows search button (the magnifying glass).
- Go to “Personalization → Taskbar.”
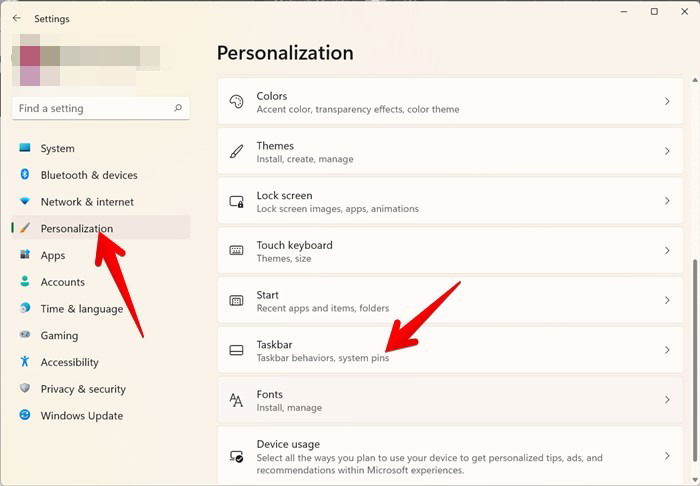
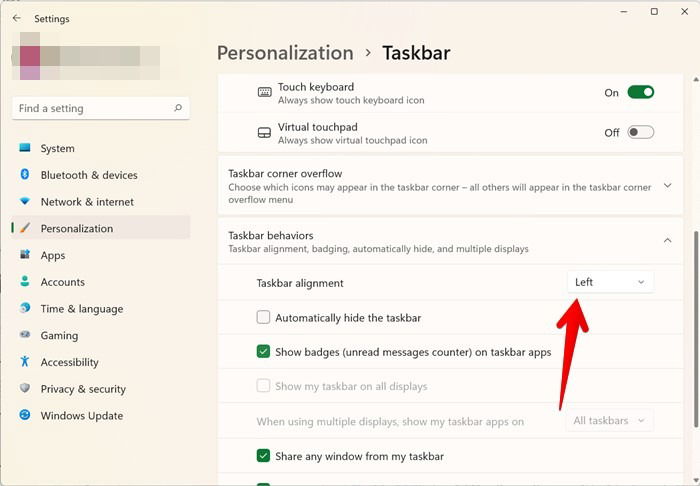
- Expand the Taskbar behaviors section by clicking on it.
- Choose “Left” from the drop-down box next to “Taskbar alignment” to move the Start Menu and taskbar icons to the left.
Also read: How to Install Google Play Store on Windows 11
2. Open Important Windows Features
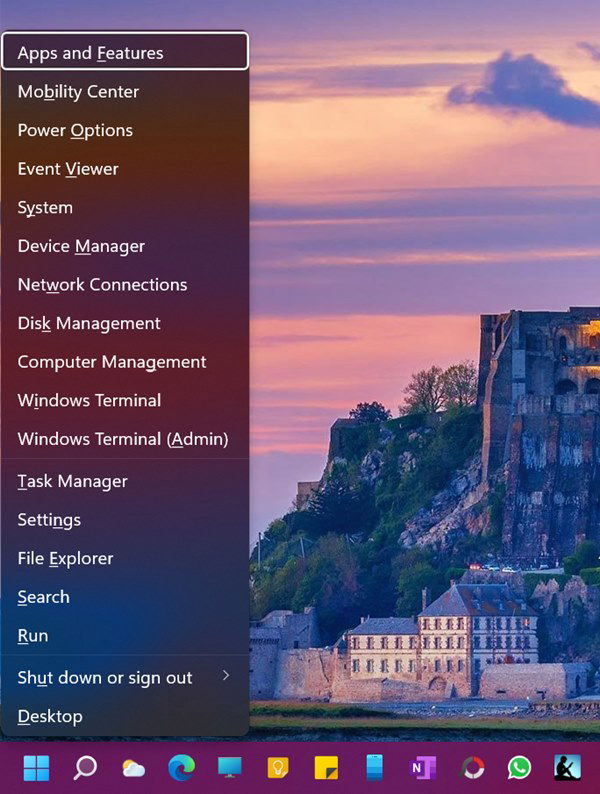
Right-click on the Start Menu to access many important Windows features, like Task Manager, Device Manager, Apps & features, Settings, etc. This feature is available on Windows 10 as well.
3. Pin Apps
You can pin apps in the Start Menu on Windows 11 in addition to pinning them on the taskbar.
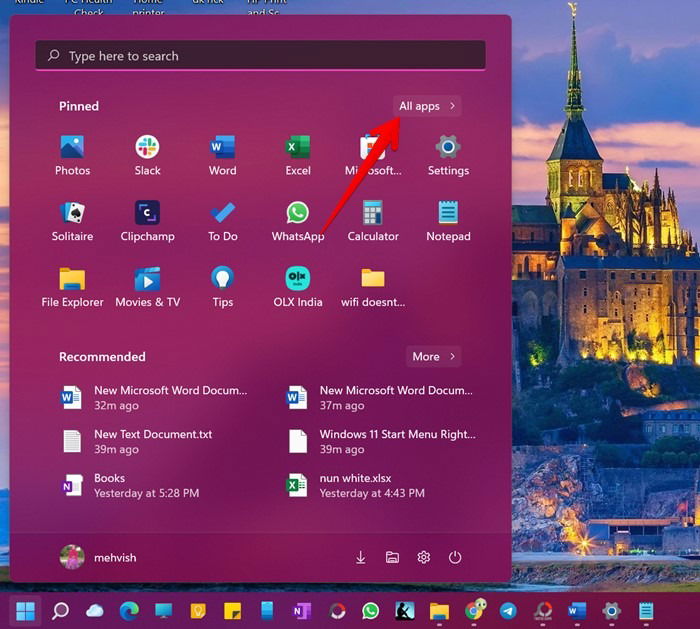
- Open the Start Menu and click on the “All apps” button.
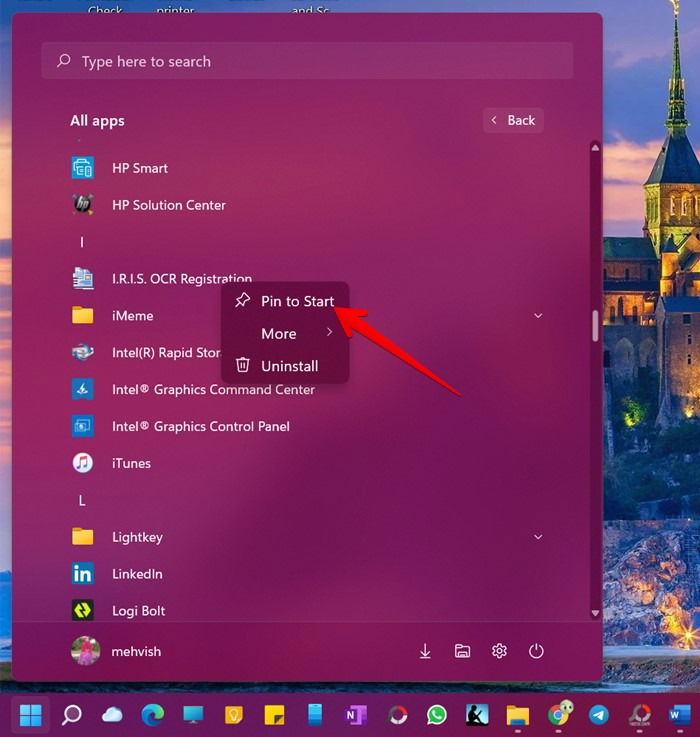
- Right-click on the desired app in the apps list and select “Pin to start.”
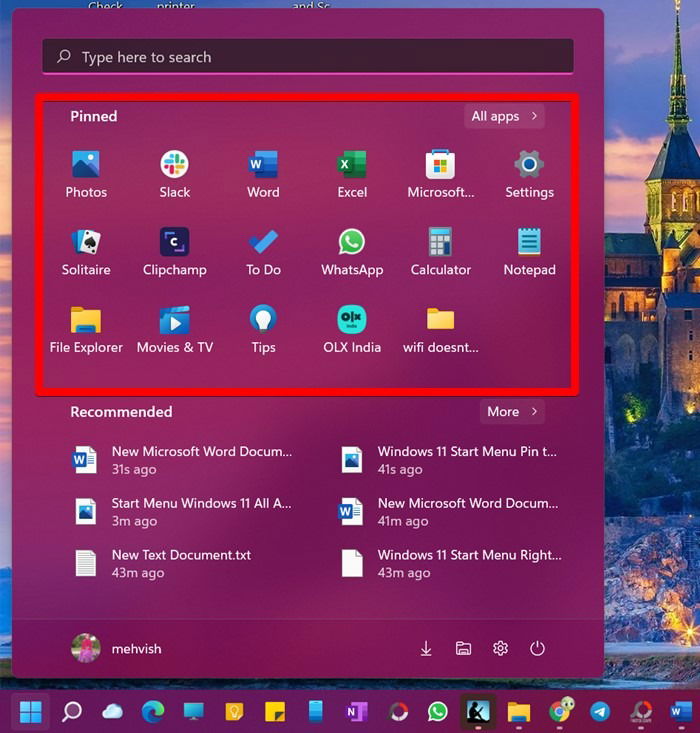
- The pinned app will appear in the “Pinned” section (at the top) in the Start Menu, where you can access it quickly.
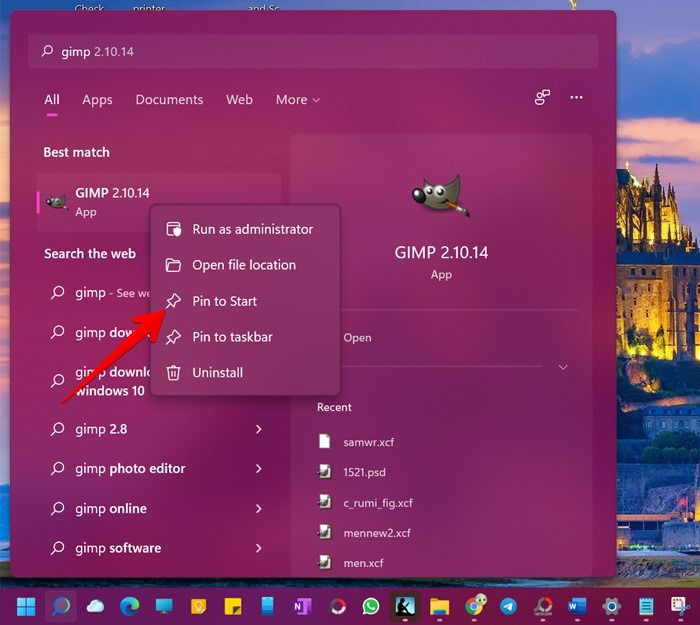
- Alternatively, search for the desired app using Windows search, then right-click on the app. Choose “Pin to start.”
Also read: Why Encryption Is Not Working on Windows 11 Home, and How to Fix It
4. Unpin Apps
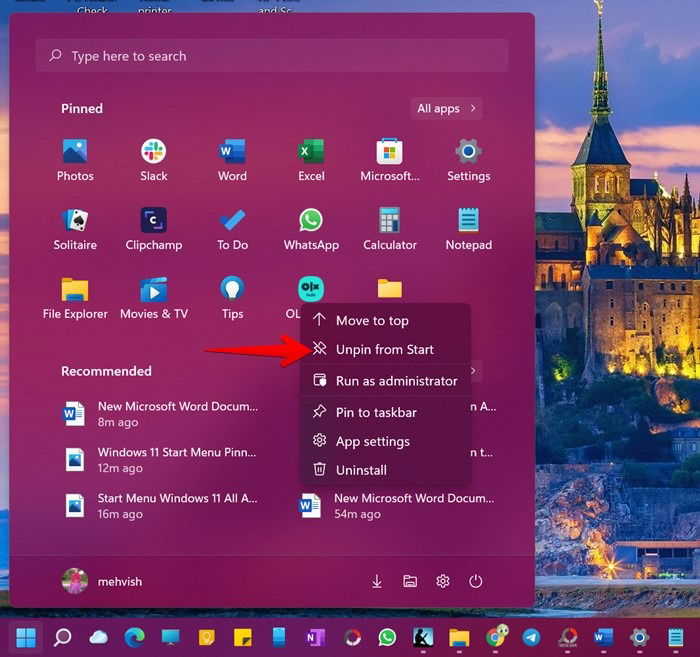
To unpin an app, right-click on the pinned app in the Start Menu and select “Unpin from Start.” Please keep in mind that the app will be removed from the Pinned section only. It will not be uninstalled or removed from the Start Menu altogether.
5. Rearrange Pinned Items
The pinned apps appear in the Start menu in the order that they were pinned. You can easily rearrange the pinned apps to suit your needs, if desired. There are two ways to change the position of pinned apps.
- In the first method, you must right-click on the pinned app and select “Move to top.” This will bring the selected app to the first position in the pinned section.
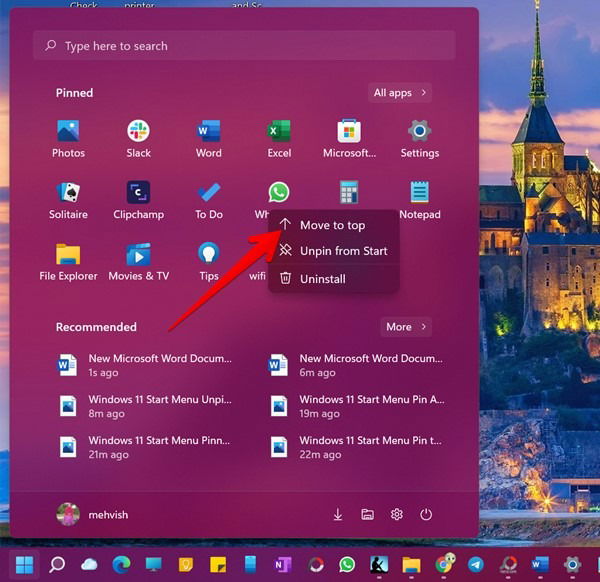
- Alternatively, if you want to manually arrange the pinned apps, simply hold and drag the app using to its new position using the mouse.
Also read: How to Use Windows 11 without a Microsoft Account
6. Pin Websites
Similar to apps, you can pin website links to the Start Menu. Clicking on the website shortcut will directly open the page in the browser. You can pin websites using all browsers. Shown below are the steps to do so for Chrome and Edge.
Pin Website Using Chrome
In Chrome, you must first create a website shortcut, then pin the same to the Start Menu.
- Open the website or bookmark in Chrome.
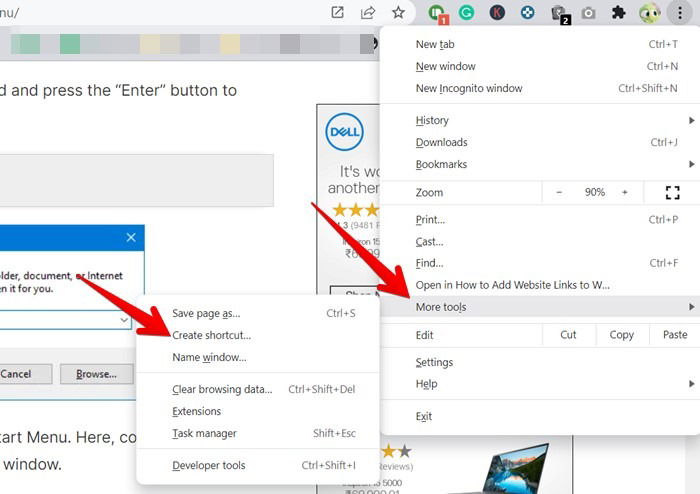
- Click on the three-dot icon and go to “More Tools → Create shortcut.”
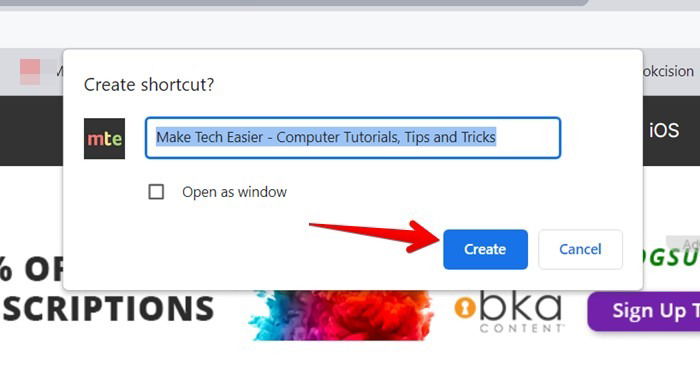
- In the “Create shortcut?” pop-up window, click the “Create” button. Enable the toggle next to “Open as window” if you want the website to open in a separate browser window.
- The shortcut will appear on your desktop. Right-click on the shortcut and select “Pin to start.”
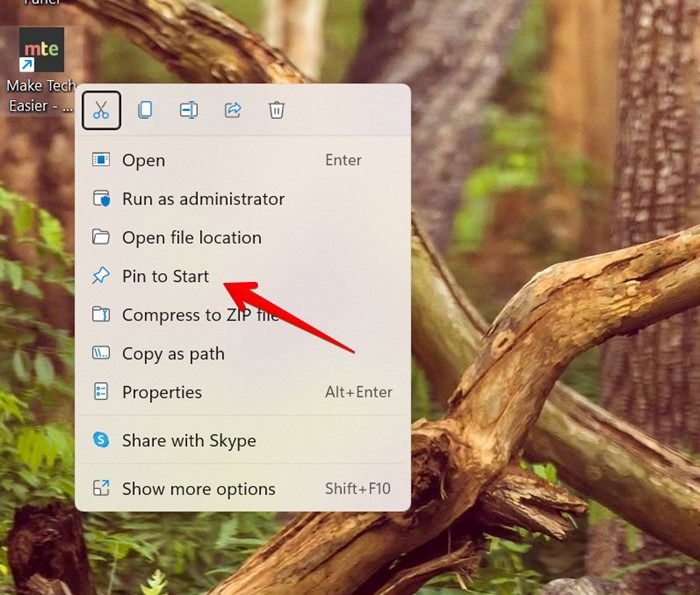
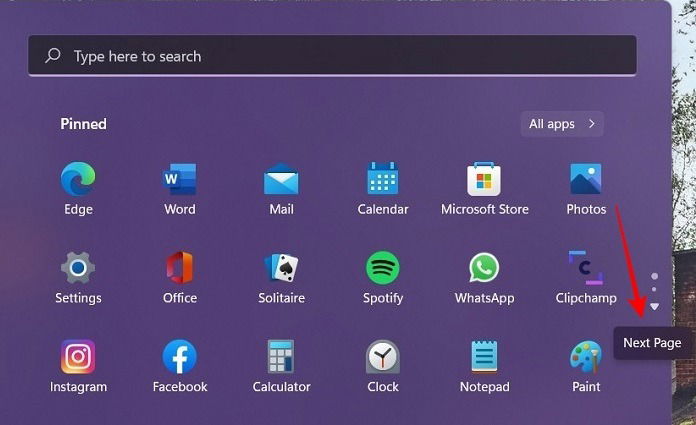
Note: to view the Pin, you may have to tap on the “Next page” button on the right side of the Start Menu.
Pin Website Using Edge
If you use the Edge browser, it offers a native feature to pin websites to the Start Menu.
- Open the website in Edge.
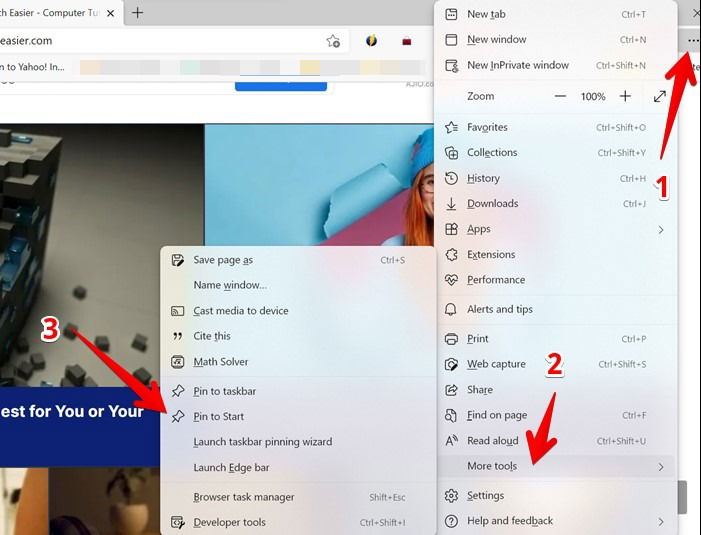
- Click on the three-dot icon and go to “More tools → Pin to Start.” Select “Yes” on the confirmation pop-up.
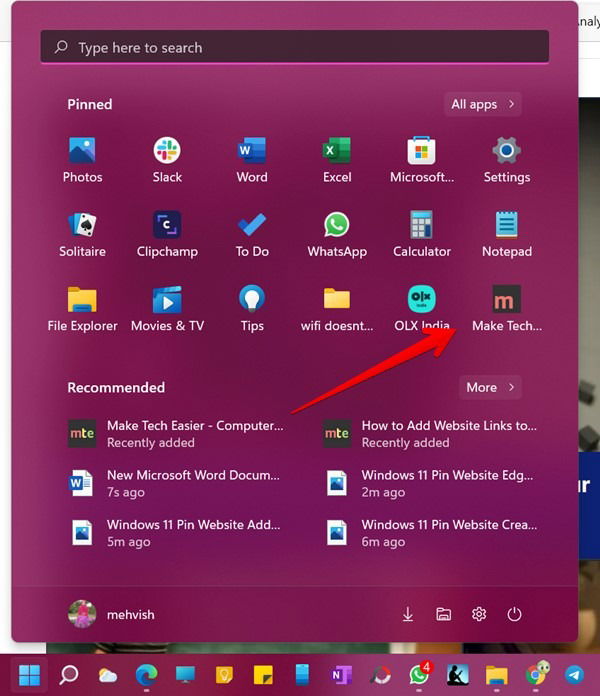
- The pinned website will show up in the pinned section of the Start Menu.
Also read: Everything You Need to Know About Windows 11 Context Menus
7. Show Important Icons
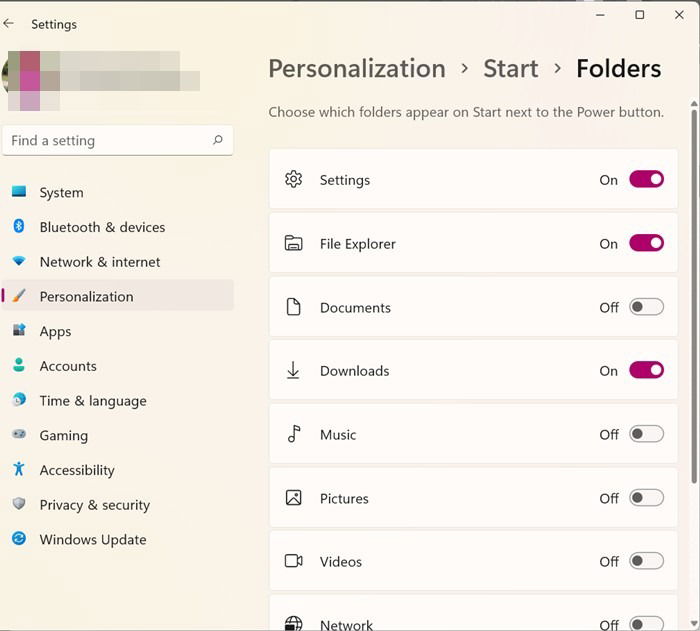
Windows 11 lets you display shortcut icons for important things like Settings, Documents, Downloads, Music, Pictures, Personal folder, etc., in Start Menu. You can choose which folders to show or hide as shown below.
- Open Settings on your computer.
- Go to “Personalization → Start.”
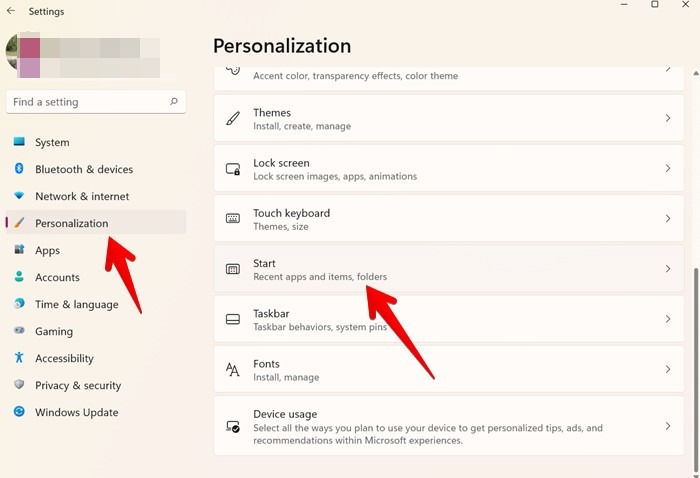
- Click on “Folders” to expand it.

- Enable the toggle next to the items we you want to display in the Start Menu.
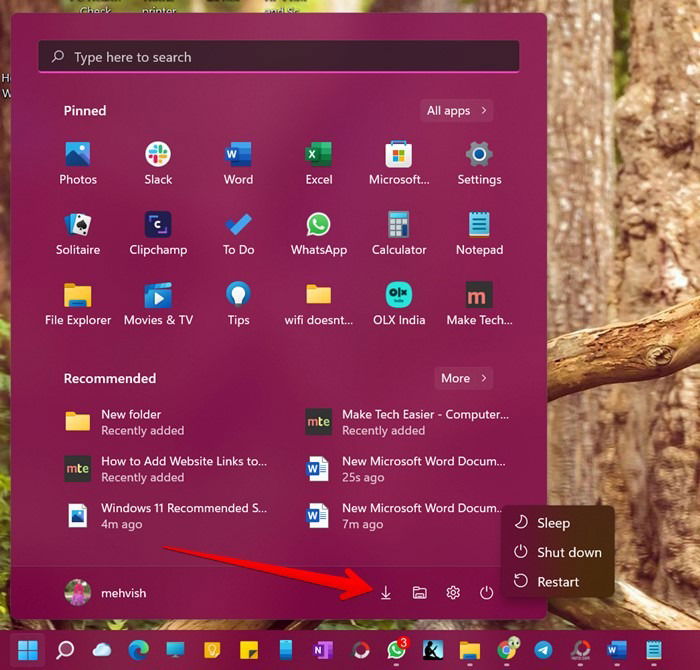
The pinned icons will appear at the bottom-right corner of the Start Menu. Interestingly, if you right-click on these icons, you get extra options, like the ability to view pinned folders in File Manager, Personalize list, Sign out, and more depending on the icon selected.
8. Pin Folders
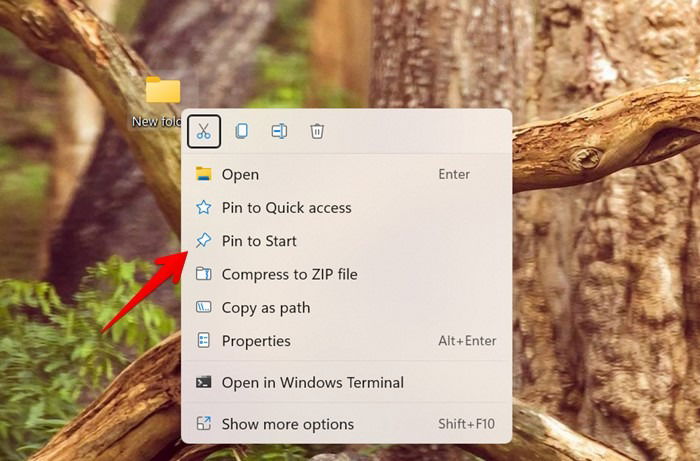
The above method lets you pin selected folders only. What if you want to pin a different folder to the Start Menu? For that, right-click on the folder either on the desktop or in File Explorer. Select “Pin to Start” from the menu.
Also read: How to Download and Install Windows 11 on Your PC
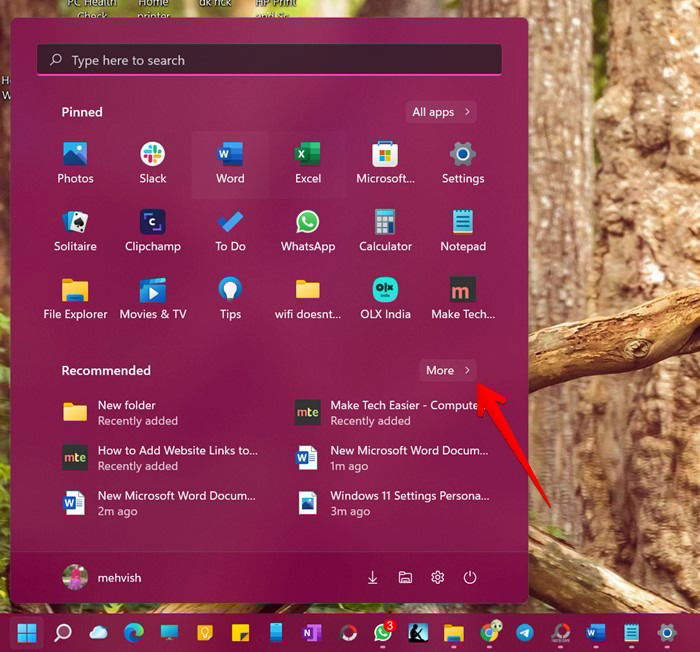
9. View Full List of Recommended Items
The Recommended section in the Start Menu shows only six items on the main screen. You can view a bigger list by clicking on the “More” button next to the “Recommended” title.
10. Remove Recommended Items
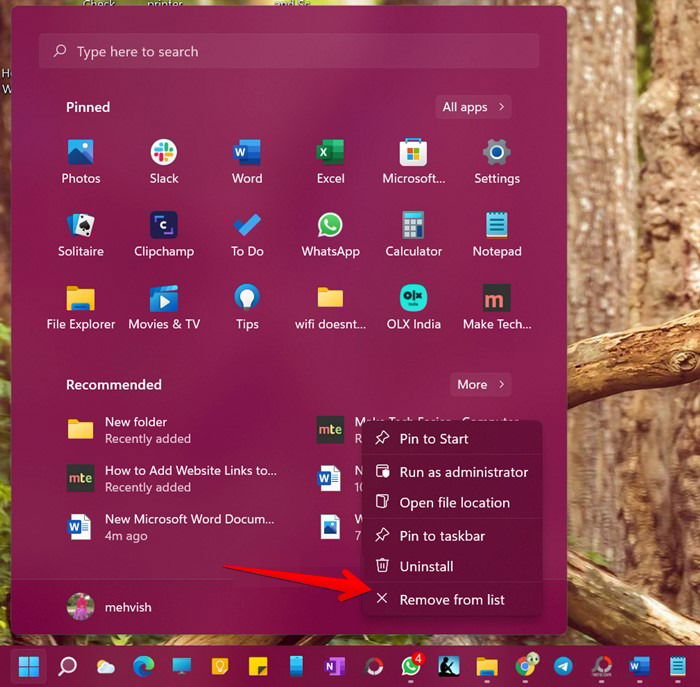
If you don’t want something to appear under the “Recommended” section in the Start Menu, right-click on it and choose “Remove from list” from the menu. This will remove the file from the recommended list, but it will still be available at its original location.
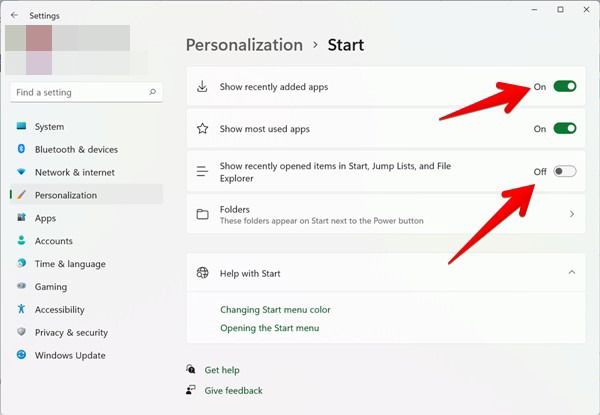
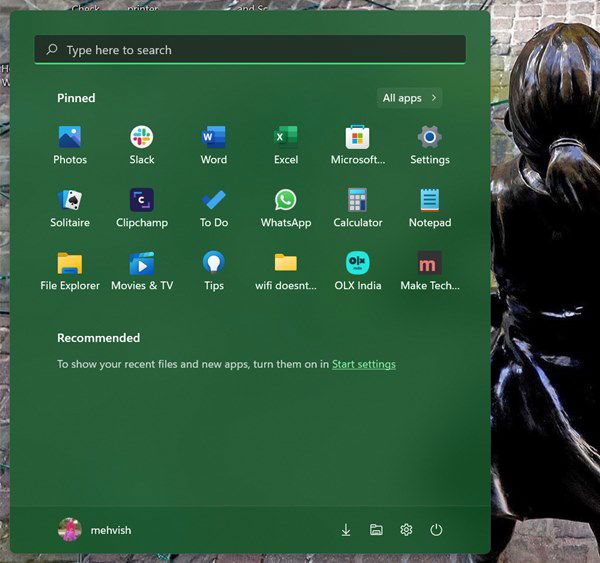
You cannot remove the Recommended section completely from Start Menu. You can hide the files that appear in it, but the “Recommended” tile will still remain. To hide all files, follow these steps:
- Open “Settings → Personalization → Start.”

- Disable the toggles next to “Show recently added apps” and “Show recently opened items in Start, Jump lists, and File explorer.”
- This is how the “Recommended” section will look like after you’ve done the above:
Also read: How to Downgrade from Windows 11 to Windows 10
11. Hide Recently Added Files
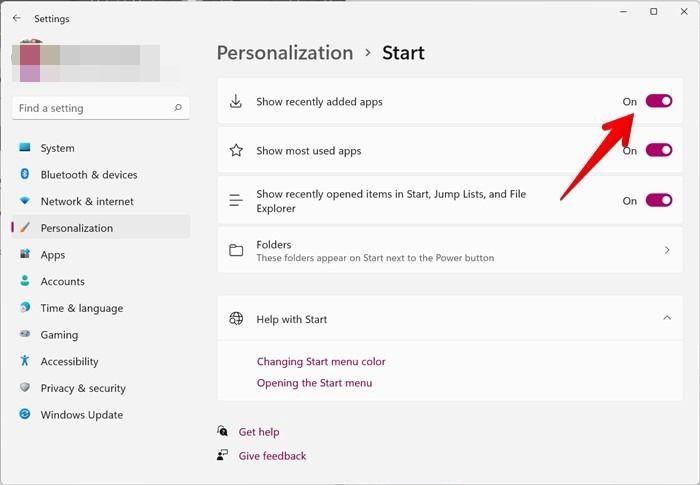
To make your Start Menu’s recommended section a bit cleaner, you can hide recently added files from it. For the unaware, “Recently added files” show up when you click on the “More” button of the Recommended section.
- Go to “Settings→ Personalization→ Start”.

- Turn off the toggle next to “Show recently added apps”.
12. Turn off Most Used Apps Section
In the “All apps” section of Start Menu, you will see the Most used apps panel at the top.
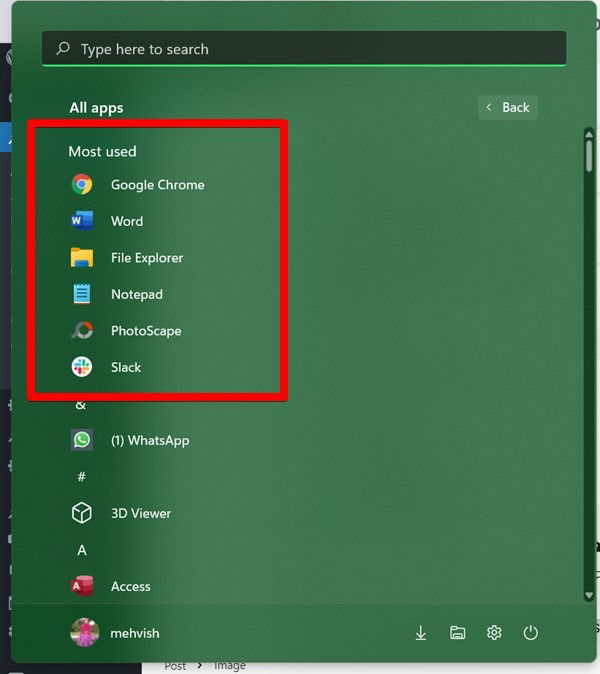
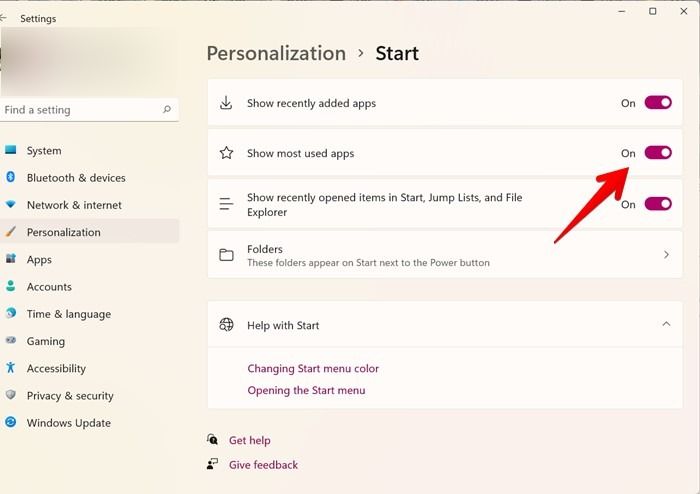
- If you don’t like it, you can disable it by going to “Settings→ Personalization→ Start.”
- Turn off the toggle for “Show most used apps”.
Also read: 11 Questions You’re Probably Asking About Windows 11
13. Uninstall Apps
One of the easiest ways to uninstall apps in Windows 11 is to do it from Start Menu. Right-click on any app that you want to delete and hit the “Uninstall” button.
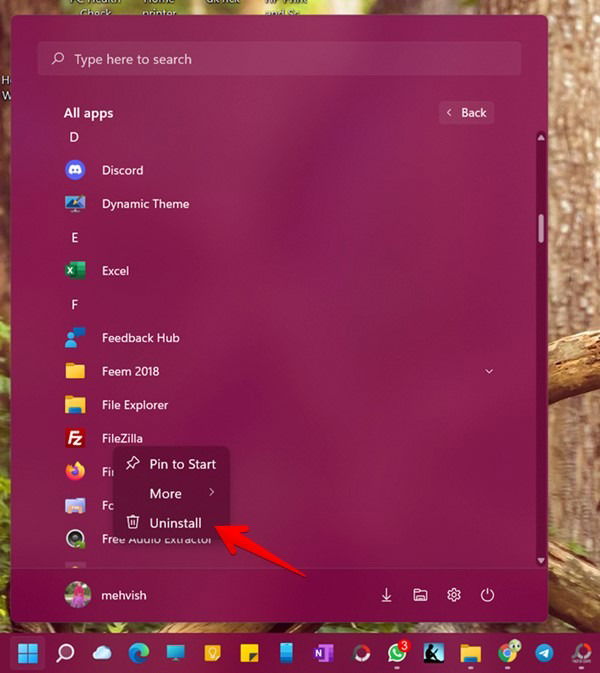
Note: You can also uninstall pinned apps.
14. Access App’s Recent Files or Tasks
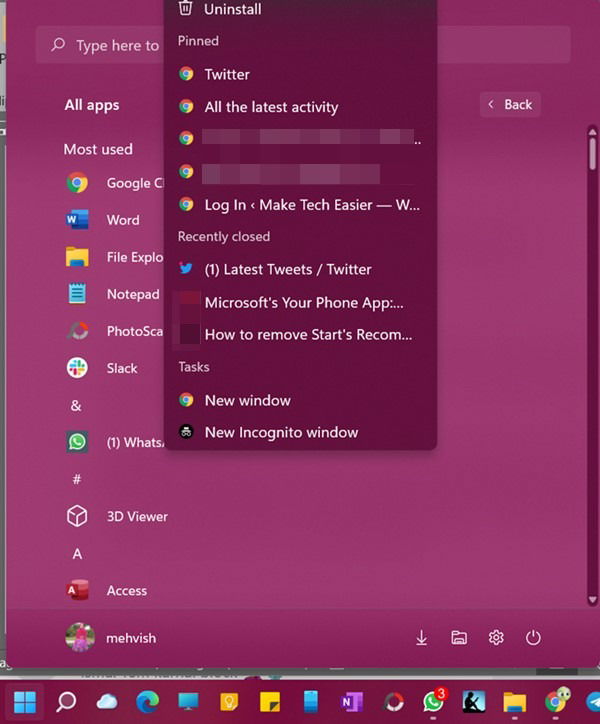
Some of the apps let you quickly access their recent files or important tasks from the app’s icon in Start Menu. For instance, Google Chrome lets you access pinned websites, recently closed, and tasks like New window, New Incognito window. Similarly, the Calculator app lets you open different types of calculators from the app icon.
- Open the full list of apps in Start Menu by clicking on the “All apps” button.

- Right-click on the desired app to view the available options and actions.
15. Change Start Menu Color
Generally, Start Menu will take the light or dark color depending on the theme applied. But by following a simple workaround, you can personalize the Start Menu color with a wide variety of colors.
- Open Settings on your Windows 11 PC.
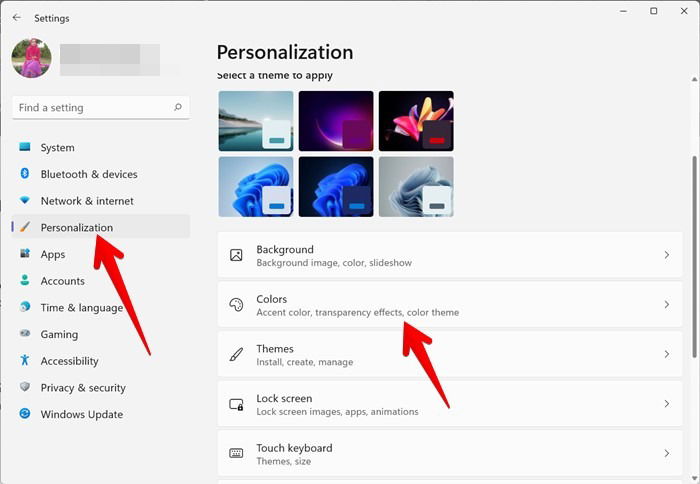
- Go to “Personalization→ Colors”.
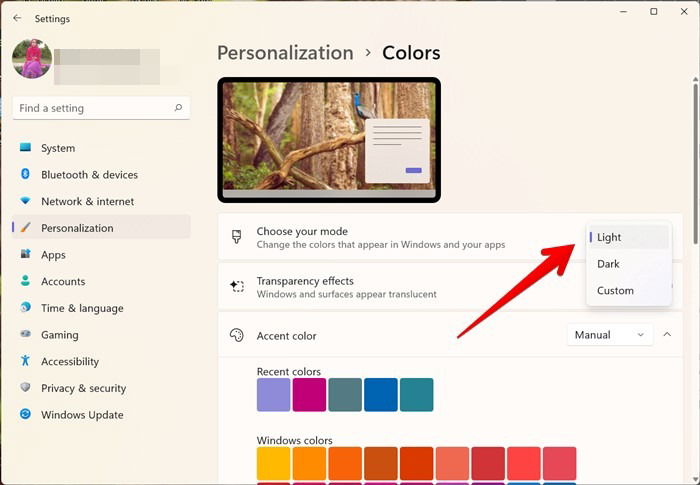
- Select Custom for the drop-down box next to “Choose your mode”.
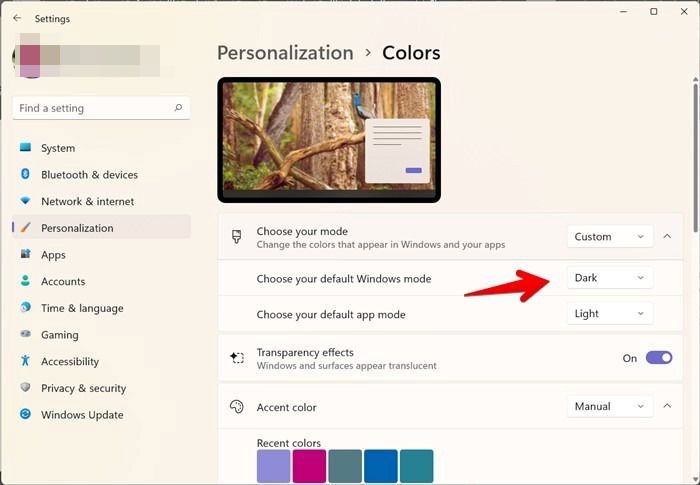
- That will reveal two more drop-down boxes that let you select themes for Windows panels and apps. Since we want to change the color of the Start Menu, you must select Dark for “Choose your default Windows mode”. The Light theme for Windows mode doesn’t allow using custom colors. Similarly, the app mode (option underneath) doesn’t affect Start Menu. So pick your desired option from “Choose your default app mode”.
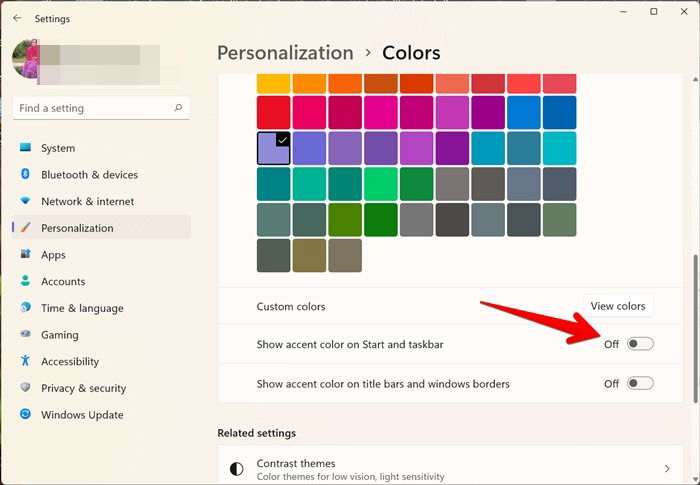
- Scroll down on the same screen and enable the toggle for “Show accent color on Start and taskbar”.
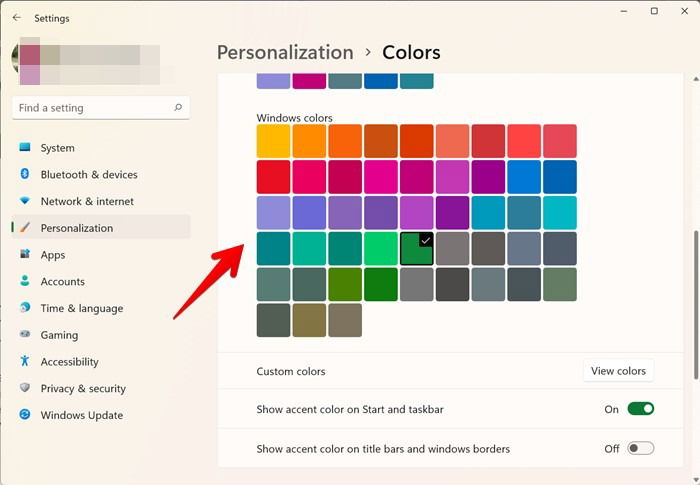
- Scroll up to the section showing the color list. Click on a color to apply it to Start Menu.
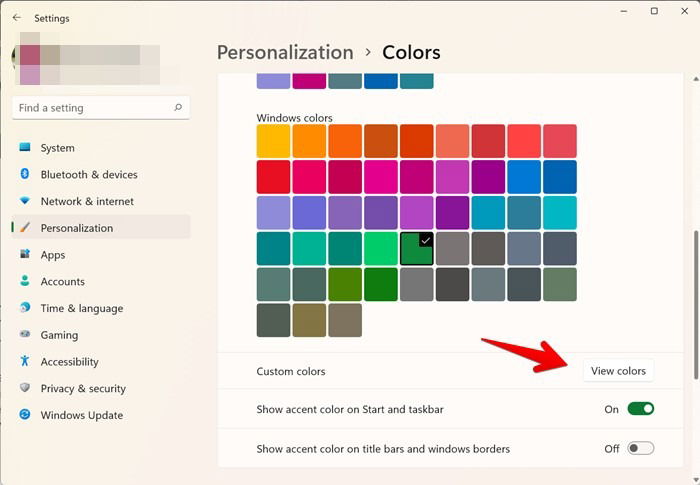
If you don’t find a suitable color from the available list, click on the “View colors” button to see the full-color palette.
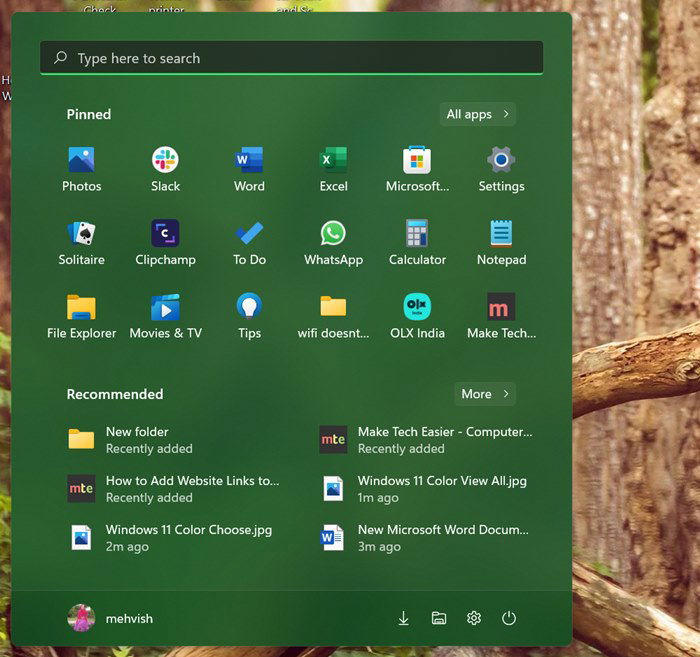
This is how my Start Menu looks with the new color:
Also read: 12 Reasons Why You Should Upgrade to Windows 11
Frequently Asked Questions
1. Are there any paid alternatives to customize Windows 11 Start Menu?
Yes, you can use apps like Stardock’s Start 11 and StartAllBack to customize Start Menu. These apps also let you switch to a Windows 10 style start menu in Windows 11.
2. How to show all apps in Windows 11 Start Menu?
Sadly, there is no way to show the full list of apps directly in the Start Menu. You must click on the “All apps” button to view all apps.
3. Where is the Start menu folder in Windows 11?
You can access the Start Menu folder by going to “C:Users[Your username]AppDataRoamingMicrosoftWindowsStart MenuPrograms”. Alternatively, open “Run” by using the Win + R keyboard shortcut. Type shell:programs to open the Start Menu folder. You might need to do this for various reasons, for instance, to be able to monitor the programs that launch when you first start Windows.
Mehvish is a tech lover from Kashmir. With a degree in computer engineering, she’s always been happy to help anyone who finds technology challenging. She’s been writing about technology for over six years, and her favorite topics include how-to guides, explainers, tips and tricks for Android, iOS/iPadOS, Windows, social media, and web apps.
Subscribe to our newsletter!
Our latest tutorials delivered straight to your inbox
Sign up for all newsletters.
By signing up, you agree to our Privacy Policy and European users agree to the data transfer policy. We will not share your data and you can unsubscribe at any time. Subscribe
