
Whenever you boot up your PC, Windows loads startup programs that open at the same time as the operating system. These programs are controlled through a startup folder on your Windows PC. Here we show where to find the Windows 11/10 Startup Folder and how to control what’s inside that folder – for all users as well as the signed-in user.
Content
- Locating the Windows Startup Folder in File Explorer
- Locating the Windows Startup Folder Programs from Task Manager
- Locating Windows Startup Folder Programs from Command Prompt
- Locating Startup Programs in Registry
- How to Add Programs to Startup Folder in Windows 11/10
- How to Remove Programs from Startup Folder in Windows 11/10
- How Can You Delay the Loading of Windows Startup Programs?
- Frequently Asked Questions
Also read: How to Get a List of All Software Installed on a Windows System
Find the Startup Folder in Windows 11/10
Finding the Windows Startup folder is easy, as there are multiple ways to do that. Here we discuss how to locate the startup apps using Windows utilities, such as File Explorer, Task Manager, Command Prompt, and Registry Editor.
Also read: Windows Environment Variables: A Complete List
Locating the Windows Startup Folder in File Explorer
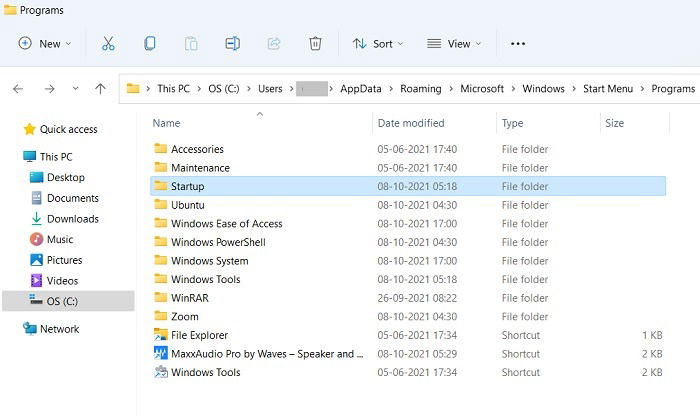
There are two different kinds of startup folders in Windows: one for all users and the other for the current user who’s logged in on the device. Both folder paths can be easily located from the File Explorer window.
To locate the startup folder path for the current user in Windows 11/10, go down the following path: C:UsersUsernameAppDataRoamingMicrosoftWindowsStart MenuProgramsStartup.
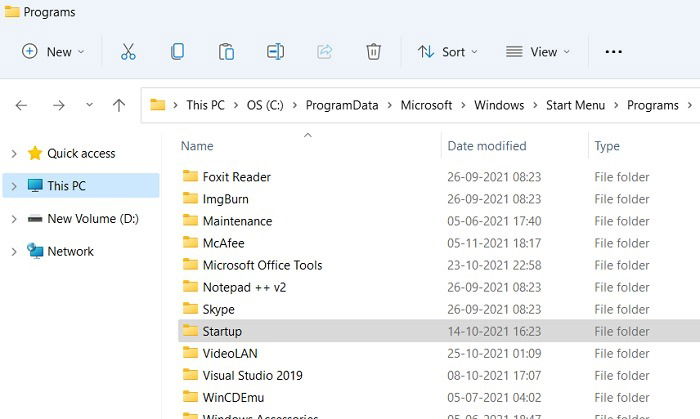
Similarly, the Windows 11/10 Startup folder for all users is located at C:ProgramDataMicrosoftWindowsStart MenuProgramsStartUp
Instead of navigating through this long path, you can simply press Win + R to open the Run box, then type shell:common startup, and the above folder will open at that location.
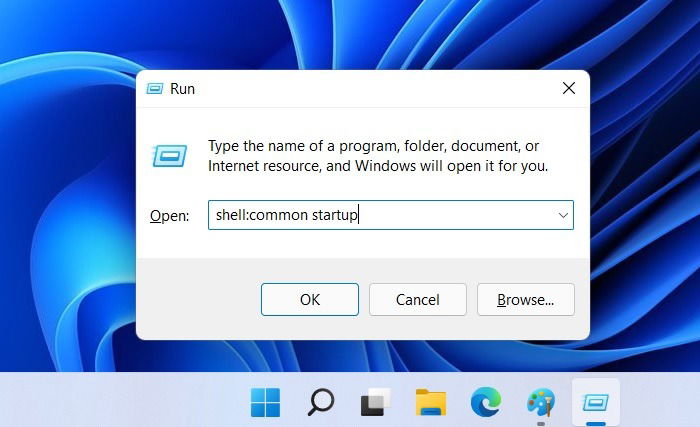
To find the Windows 11/10 Startup folder for the current user, just type shell:startup after Win + R .
Once you’re in the Startup folder, you may be surprised to know that the programs that usually start up with Windows aren’t actually here.
You can manually add program shortcuts here, which we have covered in a later section below, and they’ll start up with your PC from now on. But the apps that have been automatically added by third-party software or Windows 11/10 are controlled by the Task Manager.
Also read: How to Sort Folders by Size in Windows
Locating the Windows Startup Folder Programs from Task Manager
The startup folder is empty in Windows, as its functions have been superseded by the Task Manager, Registry, Command Prompt and other system apps. That’s why some of the programs which you commonly encounter in startup can’t be located directly from the File Explorer.
- To access these from the Task Manager, press Ctrl + Shift + Esc, then click the Startup tab.
- From here you can control the rest of your startup programs, right-clicking to enable or disable them as you please.
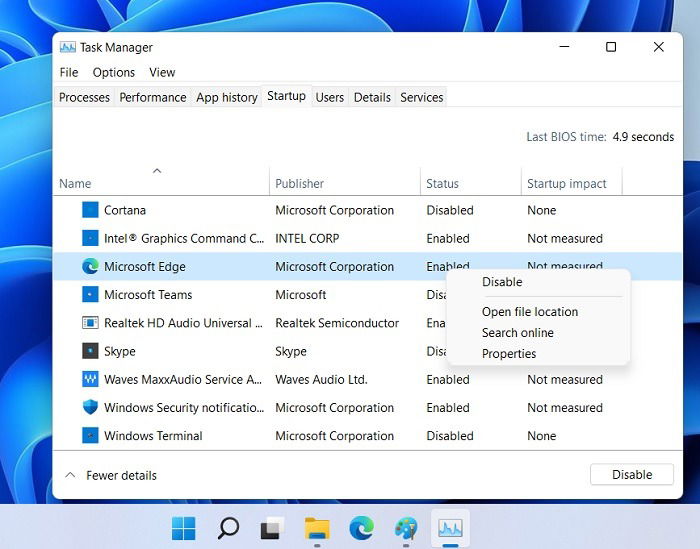
For some of these startup programs in Task Manager, their “open file location” is sometimes greyed out. If you want the precise location of these startup files, there are other methods detailed below.
Locating Windows Startup Folder Programs from Command Prompt
You can locate the programs in the Startup Folder from the Windows Command Prompt or the newly launched Windows Terminal.
- Open either of these programs in Admin mode and enter the following:
wmic startup get caption,command
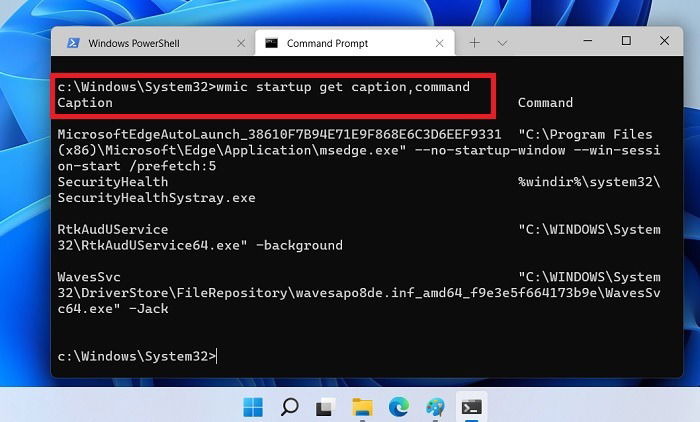
- The above commands and captions will give you a quick summary of all your startup applications and their precise paths which run the startup.
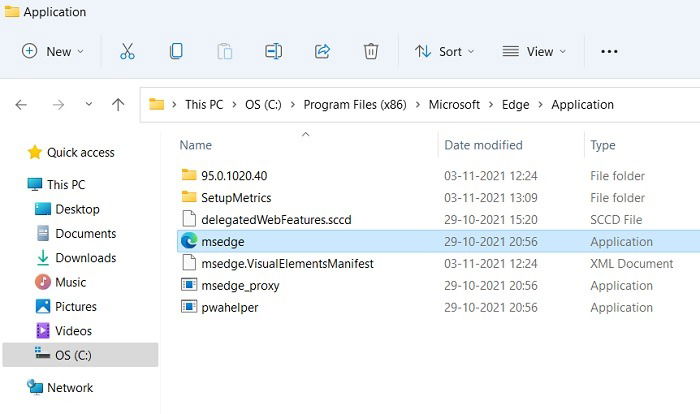
- Once their file location is revealed, you can easily search for the individual startup apps in File Explorer.
Also read: How to Add Portable Apps to Windows Startup
Locating Startup Programs in Registry
If you can’t access any unwanted startup programs through the above methods, the Windows registry is one of the last places to search.
- To access it, press Win + R followed by typing
regedit. - Once open, go down the following path to find all the startup programs.
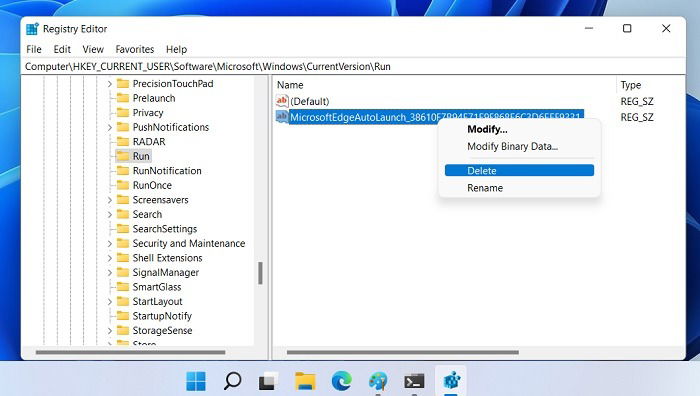
ComputerHKEY_CURRENT_USERSOFTWAREMicrosoftWindowsCurrentVersionRun
- Identify the startup programs you were unable to disable from the Task Manager window. Right-click to delete them from AutoStart.
- Replace “HKEY_CURRENT_USER” with “HKEY_LOCAL_MACHINE” and go down a similar path to find system apps on startup, such as “RealTek Audio” and “Windows Security Health systray.exe.”
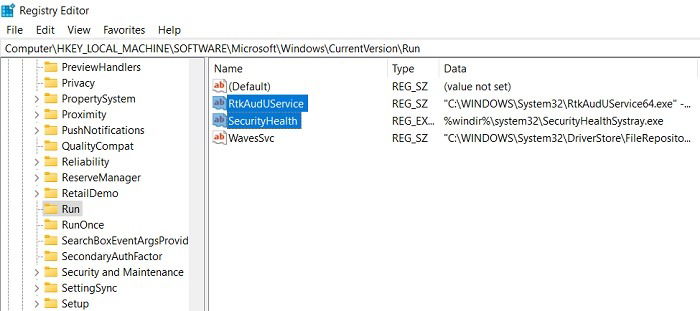
Although you can, you shouldn’t remove a few of the important programs, such as the main browser you’re using or RealTek Audio.
The above methods will help you find any startup folders on your computer, including the ones that seem disabled or hidden from sight.
Also read: How to Get a List of All Software Installed on a Windows System
Manage the Windows 11/10 Startup Folder
There are many things you can do to manage the Startup folder: add/remove the startup programs, delay their individual or collective loading, and somewhat change the launch sequence.
How to Add Programs to Startup Folder in Windows 11/10
If you want to change Windows startup programs by adding them, the fastest way is to create a shortcut of the app in the Windows 11/10 Startup Folder.
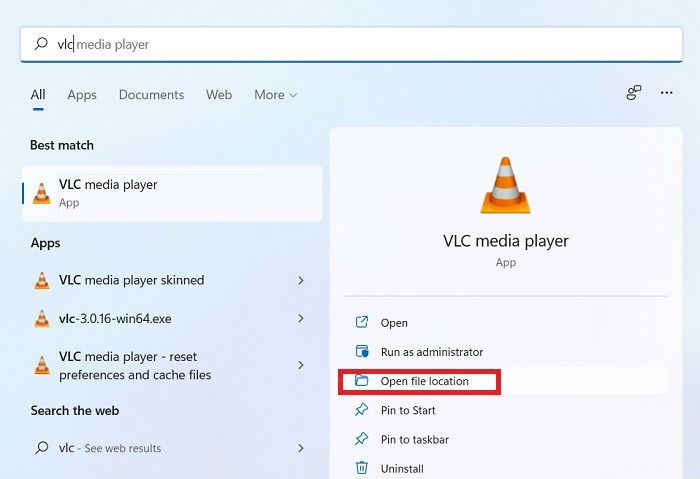
- Select the Start button and use its menu search to locate the program or application.
- Select “Open file location” to navigate to the File Explorer location where the app shortcut is saved.
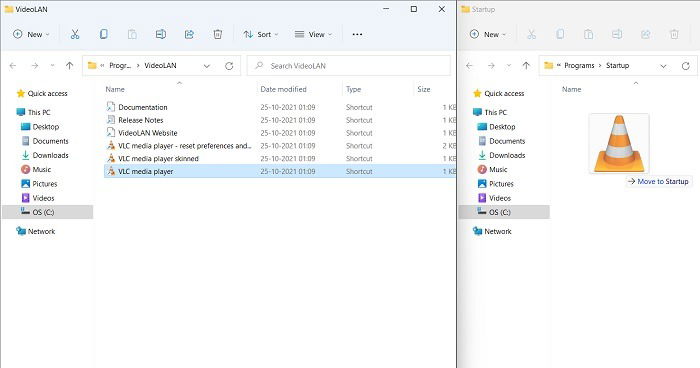
- Open the Startup folder in Windows using Win + R followed by
shell:startup. - Drag or copy-paste the program file shortcut to move it to the Startup Folder.
How to Remove Programs from Startup Folder in Windows 11/10
How do you stop apps from opening on startup? The easiest way is to navigate to the Startup Folder using Win + R followed by shell:startup. Identify the program you want to remove from the Startup Folder, right-click and select “Delete.”
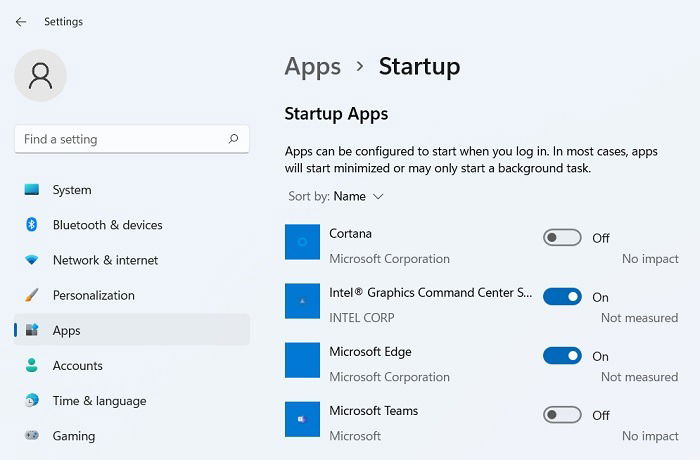
Not all program files will be visible in Startup Folder. Another way to remove programs from your Windows startup is to go to “Startup apps” from the search menu. Here you can disable any other programs you don’t need during Windows boot.
How Can You Delay the Loading of Windows Startup Programs?
Too many startup programs can slow down your Windows device booting. Your Windows desktop screen is held hostage by the CPU-intensive launch screen apps.
You can delay the loading of these programs individually or as a group. For this, consider using a GitHub application called LaunchLater. At less than 2 MB, it’s a very lightweight application and very safe to utilize.
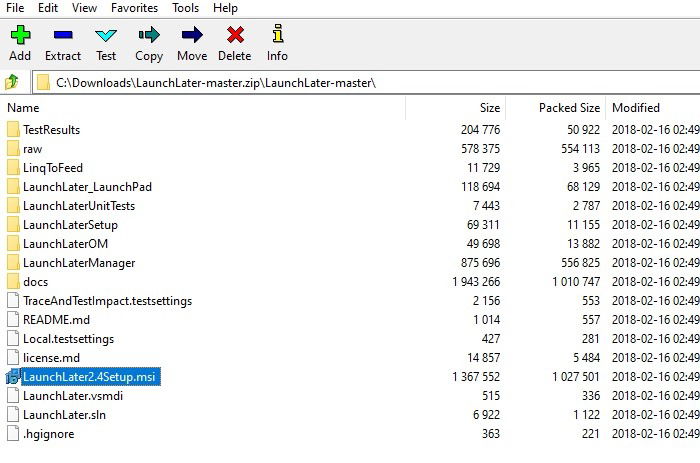
- Go to “Code” in the download page and select “download ZIP” to download the program’s ZIP file.
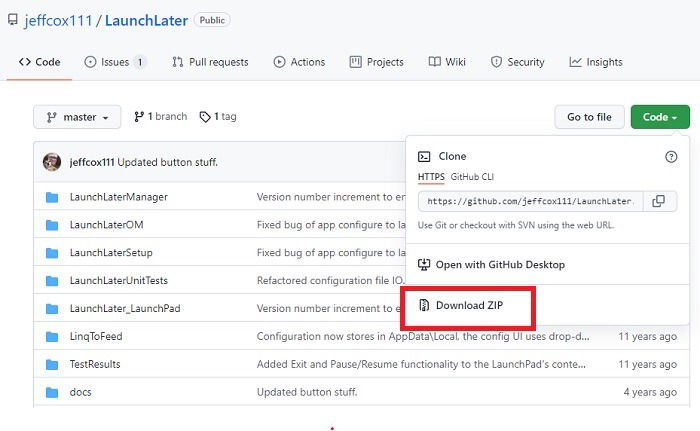
- Unzip the downloaded file using an application like 7-Zip and click the “setup program.”
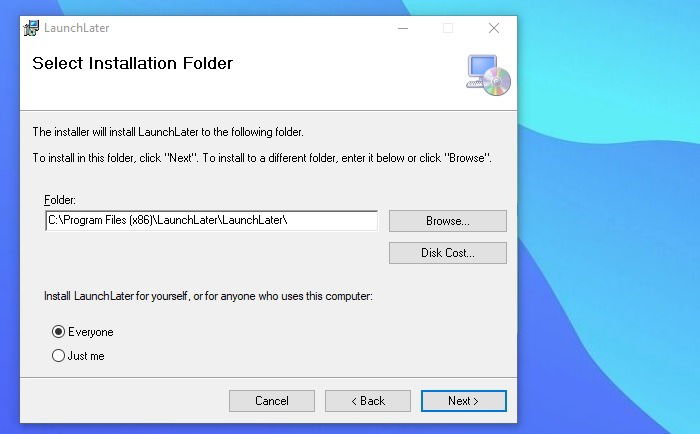
- You have to carry out a simple installation. Follow the on-screen instructions until LaunchLater is installed on your computer.
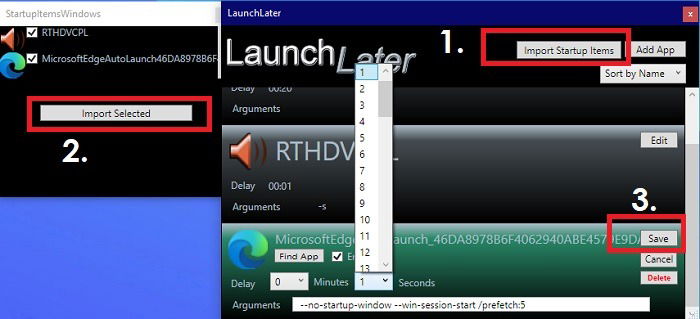
- Launch the installed app and click “Import startup items.” This will populate the screen with all of your Windows startup apps.
- Select the programs you want to create a delay for and click “Import selected.”
- For each and every app, you can introduce a delay in seconds or even minutes. Click “Save” to finalize your configurations.
It is no longer possible to change the launch order of Windows startup programs through Windows built-in options. However, you can use the LaunchLater app shared above to introduce a gentle difference in seconds for the launch of individual apps.
Another program you can use for a startup delay in Windows 11/10 is Startup Delayer.
Frequently Asked Questions
1. Which programs should be in the Windows startup menu?
While it’s down to individual choice, it’s a good idea to have a minimum of the following in the Windows startup menu:
- RealTek High Definition Audio Driver: without this, your Windows computer is mute. You don’t want to set up your PC audio every time you log in.
- The Browser You Use: to connect to the Internet quickly, it’s better to enable your favorite browser in the startup apps.
Many other startup apps which seem important can actually be safely disabled from the Startup location. These include the Windows Defender Icon, Skype, Send to OneNote, Zoom, and Microsoft Teams.
2. How do I remove the startup delay in Windows 11/10?
If you don’t want any startup delay between Windows boot and the launching of apps, there’s a registry hack called “Serialize” that achieves this. The following is a summary of the steps:
- Press Win + R and follow it by typing
regedit. - Go down this path:
ComputerHKEY_CURRENT_USERSoftwareMicrosoftWindowsCurrentVersionExplorer
- Add a new key called “Serialize” followed by another key called “StartupDelayInMSec” and save its D-Word 32 value as 0.
- Restart your PC for the delay to disappear.
To ensure you don’t have any corrupt programs from bad sources in your Startup menu, always download them from this list of safe websites. If you’re struggling, check out this list of fixes for common Windows problems.

Sayak Boral –
Staff Writer
Sayak Boral is a technology writer with over eleven years of experience working in different industries including semiconductors, IoT, enterprise IT, telecommunications OSS/BSS, and network security. He has been writing for MakeTechEasier on a wide range of technical topics including Windows, Android, Internet, Hardware Guides, Browsers, Software Tools, and Product Reviews.
Subscribe to our newsletter!
Our latest tutorials delivered straight to your inbox
Sign up for all newsletters.
By signing up, you agree to our Privacy Policy and European users agree to the data transfer policy. We will not share your data and you can unsubscribe at any time. Subscribe